
A Bliss water flosser can transform your oral hygiene routine by reaching areas that traditional string floss simply cannot access. If you have braces, dental implants, crowns, or simply want a more effective way to remove plaque and food particles between teeth, mastering your Bliss water flosser is essential for maintaining optimal dental health. This guide walks you through every step of proper usage, from initial setup to daily maintenance, ensuring you get the most from your oral care investment.
Preparing Your Bliss Water Flosser for First Use
Before operating your Bliss water flosser, you must complete several important preparation steps to ensure safe and effective performance. Start by unpacking all components and verifying that you have the main unit, multiple jet tips, the reservoir, and the power adapter.
Begin by charging the device fully before your first use, which typically takes between 4 to 6 hours depending on your specific model. Place the water reservoir on the base unit and fill it with lukewarm water or your preferred mouthwash solution, taking care not to exceed the maximum fill line indicated on the tank. Select the appropriate tip for your needs, whether the standard jet tip for general cleaning or a specialized orthodontic tip if you have braces.
Selecting the Right Pressure Setting
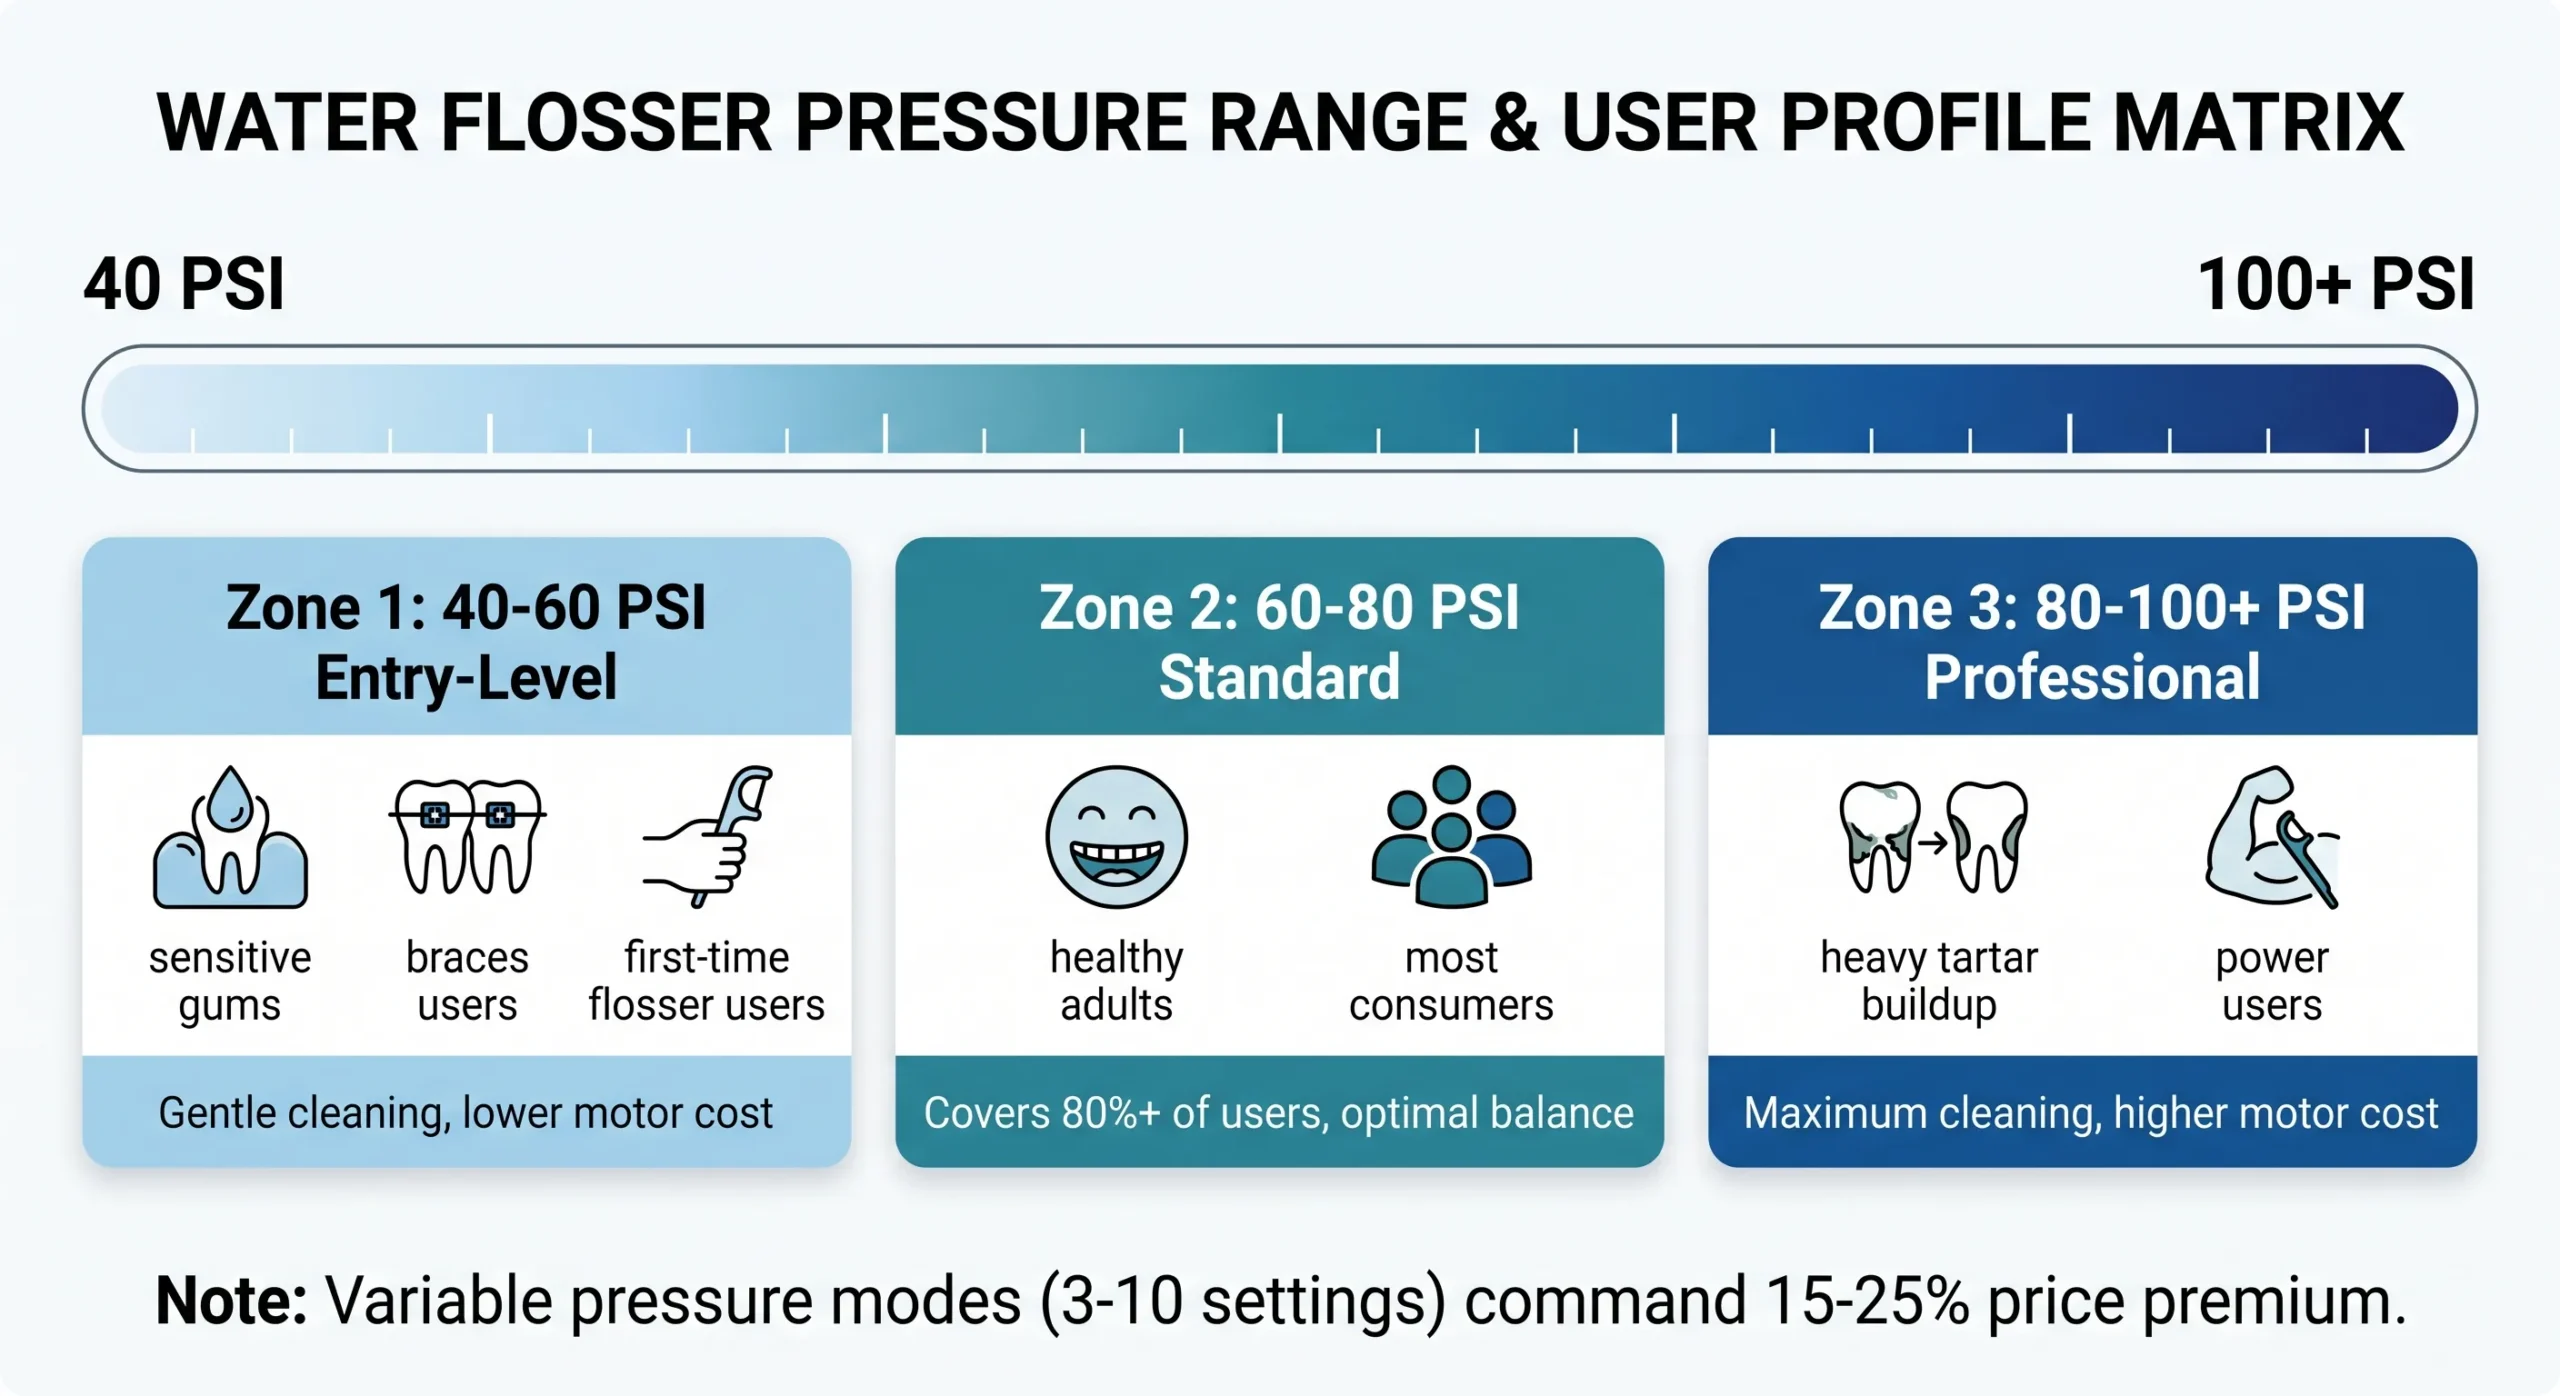
Your Bliss water flosser offers multiple pressure levels designed to accommodate different sensitivity levels and oral health conditions. Start with the lowest pressure setting if you are new to water flossing or have sensitive gums, then gradually increase the intensity as your gums become accustomed to the sensation. Most Bliss models feature at least three pressure settings ranging from gentle to maximum clean.
For daily use, a medium setting typically provides the ideal balance between effectiveness and comfort for most users. Those with deeper gum pockets or specific periodontal concerns may benefit from higher pressure settings, though you should consult with your dentist before using maximum pressure regularly. Pay attention to how your gums respond, as bleeding or discomfort may indicate you need to reduce the pressure setting.
Proper Technique for Effective Water Flossing
Hold the Bliss water flosser handle at a 90-degree angle toward your gumline, positioning the tip slightly above the gumline rather than directly on it. This angle allows the water stream to flow between teeth and along the gumline where plaque and bacteria accumulate most problematicly. Start with the back teeth and work forward systematically, pausing briefly at each tooth gap to allow the water to dislodge particles.
When cleaning around dental work such as braces, crowns, or implants, angle the tip to reach around and behind the hardware thoroughly. The orthodontic tip design specifically accommodates brackets and wires, but you may need to spend additional time ensuring all areas are properly cleaned. Aim the tip into the sink as you move between teeth to allow the water and debris to flow downward rather than splashing across your bathroom.
Cleaning Each Section of Your Mouth

Divide your mouth into four quadrants to ensure comprehensive cleaning without missing any areas. Begin with the upper right quadrant, targeting the outer surfaces of teeth, then move to the inner surfaces where the water stream can reach beneath the gumline. Continue through all four quadrants, spending approximately 20 seconds on each section for thorough plaque removal.
Pay special attention to areas where food particles commonly trap, such as the back molars and around dental restorations. The periodontal pockets along the gumline require particular attention, as these areas are most susceptible to bacterial buildup and gum disease. If you notice persistent food debris in specific areas, pause and direct the water stream directly at those spots until cleared.
Maintaining Your Bliss Water Flosser
Regular cleaning of your Bliss water flosser prevents bacterial growth and ensures consistent performance over time. After each use, empty the remaining water from the reservoir and rinse it thoroughly with clean water. Wipe the handle and base unit with a damp cloth to remove any splatter or residue that may have accumulated during use.
Perform a deeper clean weekly by running a solution of equal parts water and white vinegar through the reservoir and flosser tip to remove mineral deposits and kill bacteria. Rinse thoroughly with plain water afterward to eliminate any vinegar taste. Replace the jet tips every 3 to 6 months or sooner if you notice any wear, discoloration, or reduced spray quality, as worn tips become less effective at removing plaque.
Troubleshooting Common Issues
If your Bliss water flosser fails to turn on, verify that the device is properly charged and that the power connection is secure. Low water pressure can result from clogged tips, so remove and soak the tip in warm water to dissolve any mineral buildup. If the device pulsates irregularly or sputters, check that the reservoir is properly seated and that the water level is above the minimum fill line.
Leaking around the handle connection typically indicates that the O-ring seal needs cleaning or replacement. Clean the seal gently with a soft brush and ensure it is properly positioned during reassembly. Persistent motor noise or vibration changes may require professional service or indicate that the device has reached the end of its operational lifespan.
Frequently Asked Questions About Bliss Water Flosser
Can I use my Bliss water flosser with tap water?
Yes, you can use tap water in your Bliss water flosser, though many users prefer distilled water to prevent mineral buildup in the device. If using tap water, perform regular vinegar cleaning cycles to prevent scaling.
How often should I use my Bliss water flosser?
Most dental professionals recommend using a water flosser once daily, preferably before or after brushing your teeth. Consistency matters more than timing, so choose a routine that fits your schedule and stick with it.
Is water flossing better than string flossing?
Water flossers reach areas that string floss cannot access effectively, making them particularly beneficial for people with braces, implants, or gum disease. However, many dental professionals recommend using both methods for comprehensive oral care.
Can I use mouthwash in my Bliss water flosser?
You can add a small amount of mouthwash to your water reservoir, but dilute it with water to prevent irritation and avoid damaging internal components. Plain water is generally sufficient for effective cleaning.
Why does my gums bleed when using the water flosser?
Bleeding gums often indicate inflammation from plaque buildup or using too high pressure. Start with the lowest setting and allow your gums to strengthen over two weeks. Persistent bleeding should be discussed with your dentist.
Key Takeaways for Using Your Bliss Water Flosser Effectively
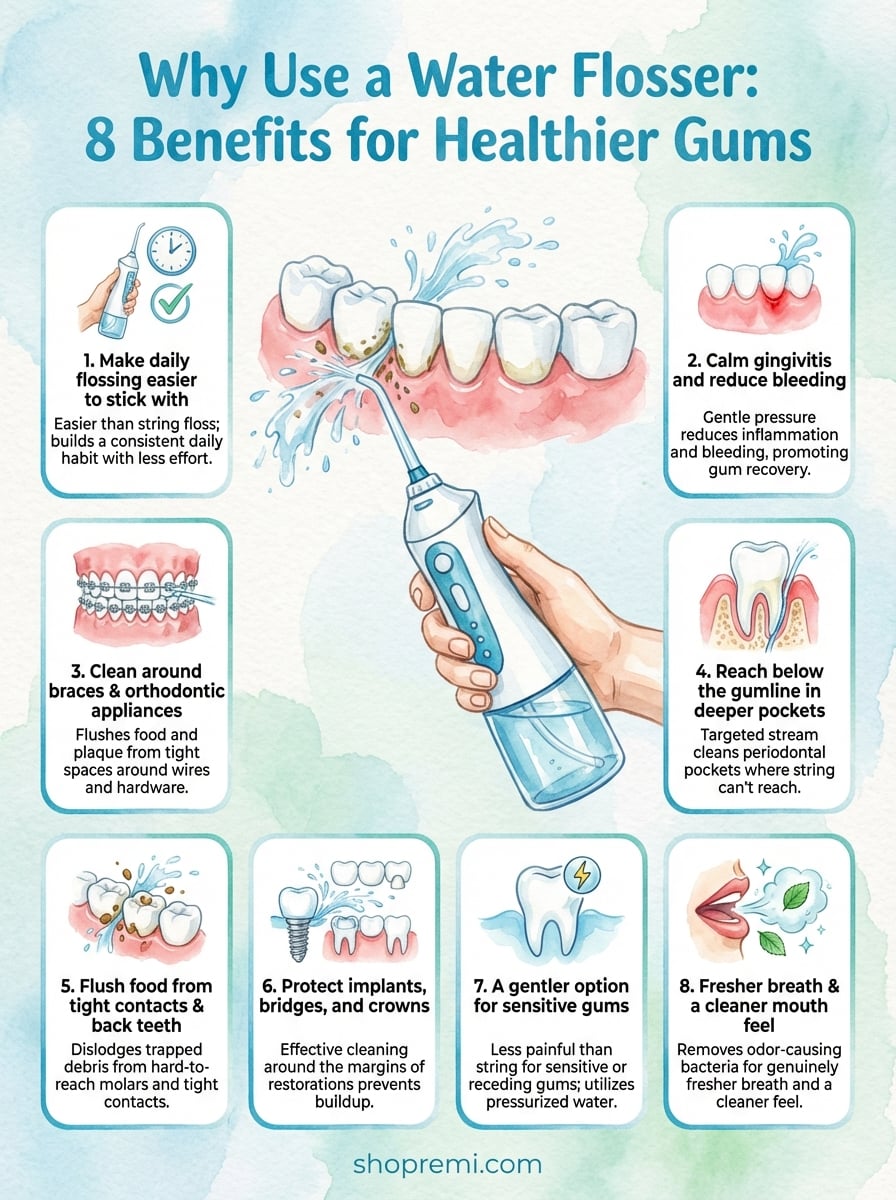
Mastering your Bliss water flosser requires attention to proper technique, consistent pressure settings appropriate for your gum health, and regular maintenance to keep the device functioning optimally. Remember to aim the water stream at a 90-degree angle to your gumline, clean all four quadrants of your mouth systematically, and replace tips regularly for best results. With daily use and proper care, your Bliss water flosser can significantly improve your oral hygiene and help prevent gum disease and tooth decay. Start with gentle pressure and gradually adjust as your gums become healthier and more resilient.