
If you have just unboxed your Burst Water Flosser, you might feel unsure about how to get started with this cordless oral care device. The good news is that learning how to use Burst Water Flosser properly takes just a few minutes, and the technique quickly becomes second nature. This guide walks you through every step, from attaching the tip to maintaining the device for years of reliable use.
By following these instructions, you will achieve cleaner teeth and healthier gums while avoiding common mistakes that reduce effectiveness. Let’s dive into the complete process.
Attach the Flossing Tip Securely
Proper tip attachment is the first step in learning how to use Burst Water Flosser correctly. A loose tip can dislodge during use, causing splashing or reduced cleaning power.
Lock the Tip with a Click
Locate the release button on the base of the handle. While pressing this button, slide the flossing tip into the connector at the bottom of the handle. Push firmly until you hear a distinct click, then gently tug on the tip to confirm it is locked in place. The tip rotates 360 degrees, so position it facing toward you before turning on the device.
Choose the Right Tip for Your Needs
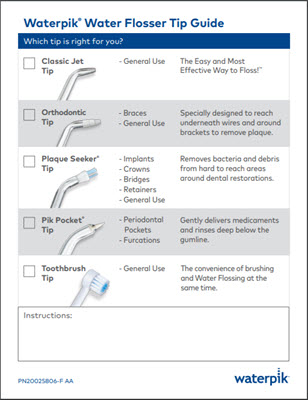
Burst offers several specialized tips for different dental situations. The Classic Jet Tip works well for everyday cleaning. The Orthodontic Tip is designed specifically for braces and aligners. The Plaque Seeker Tip cleans around implants and bridges. The Gum Massager Tip soothes sensitive gums. The Tongue Cleaner Tip removes bacteria from the tongue surface.
Replace tips every three to six months or sooner if they show signs of wear. Using the correct tip improves cleaning precision and protects your dental work.
Power On and Select Cleaning Mode
The smiley-face button on top of the handle controls power and mode selection. Understanding how to use Burst Water Flosser modes ensures you get the best clean for your specific needs.
Use the Smiley-Face Button
Start with the device turned off. Press and hold the smiley-face button for approximately three seconds. The indicator light will cycle through the three available modes. Release the button when your preferred mode is active. The device remembers your last setting, so you will not need to reselect it each time you use it.
Choose the Best Mode for Your Mouth
Standard Mode delivers balanced pressure ideal for daily use and beginners. Turbo Mode provides maximum intensity for deep plaque removal. Pulse Mode offers gentle pulsations suitable for sensitive gums or post-surgery recovery.
Start with Standard Mode to assess your comfort level. If your gums bleed slightly at first, this is common and usually resolves within a week of regular use.
Fill and Use the Water Reservoir
Knowing how to use Burst Water Flosser reservoir properly ensures consistent water pressure throughout your cleaning session.
Fill with Safe Liquids Only
Remove the transparent reservoir by lifting it straight up from the handle. Fill it with plain water for daily use, warm salt water for anti-inflammatory benefits, or diluted mouthwash mixed at a one-to-one ratio with water.
Never use undiluted mouthwash, essential oils, or oily solutions. These substances can clog internal tubing and damage the motor over time.
Refill Mid-Session if Needed
The reservoir holds enough liquid for 60 to 90 seconds of continuous use, which is typically enough to clean your entire mouth. If you are using the device slowly or on Turbo Mode, you may need to refill mid-session to maintain strong water pressure. Always refill before each use to ensure hygiene and performance.
Use the flosser over a sink or in the shower to manage splashing. Keep a towel nearby and tie back long hair to stay dry.
Master the Correct Flossing Technique
The technique you use directly impacts how effective your water flossing session becomes. Follow these steps to maximize results when learning how to use Burst Water Flosser.
Aim at 90 Degrees to the Gumline
Position the tip at a 90-degree angle to your gumline, aiming the stream between teeth rather than directly into the gums. This targets plaque buildup where it hides. Avoid holding the stream in one spot for more than a few seconds to prevent gum irritation. Use short bursts instead of continuous flow for better control and less mess.
Move Systematically Through All Quadrants
Start at the back molars and work forward. Spend two to three seconds per gap between teeth. Clean all four areas of your mouth: upper right, upper left, lower right, and lower left. Do not skip the inner tongue-side surfaces, though focus more on the outer cheek-side where plaque accumulates faster.
Use the rotating tip to adjust angles for hard-to-reach spots, especially behind molars or around braces.
Floss Before or After Brushing
Most dentists recommend using the Burst Water Flosser before brushing. This loosens debris and bacteria, allowing fluoride toothpaste to penetrate between teeth more effectively. However, either order is acceptable since consistency matters most.
Optimize Your Routine with Best Practices
These tips help you get the most from your device while avoiding common frustrations.
Start Slow and Adjust Gradually
If you are new to water flossing, begin with Standard Mode for the first few days. If your gums feel tender, switch to Pulse Mode. Once your gums adjust, try Turbo Mode for a deeper clean. Avoiding high pressure initially prevents discomfort that could discourage regular use.
Use It in the Shower for Easy Cleanup
Many users prefer flossing in the shower because water spray gets rinsed away instantly, reducing mess and simplifying cleanup. Just make sure the device is placed on a dry surface when not in use, even though it is waterproof during operation.
Prevent Tip Ejection
A loose tip can shoot off under pressure. Always press and click it into place before turning on the device. Double-checking the connection every time takes two seconds and prevents accidents.
Maintain Strong Water Pressure
A half-empty reservoir causes sputtering or weak streams. Keep the tank full during use. If pressure drops suddenly, check for blockages or air bubbles in the line.
Clean and Store Properly After Use
Proper maintenance extends the life of your device and ensures hygienic operation.
Rinse and Dry the Components
After each use, empty remaining liquid from the reservoir. Rinse the reservoir and tip with clean water. Wipe the handle with a damp cloth. Store upright in a dry area and let the handle air dry to prevent mold or bacterial growth inside the motor compartment.
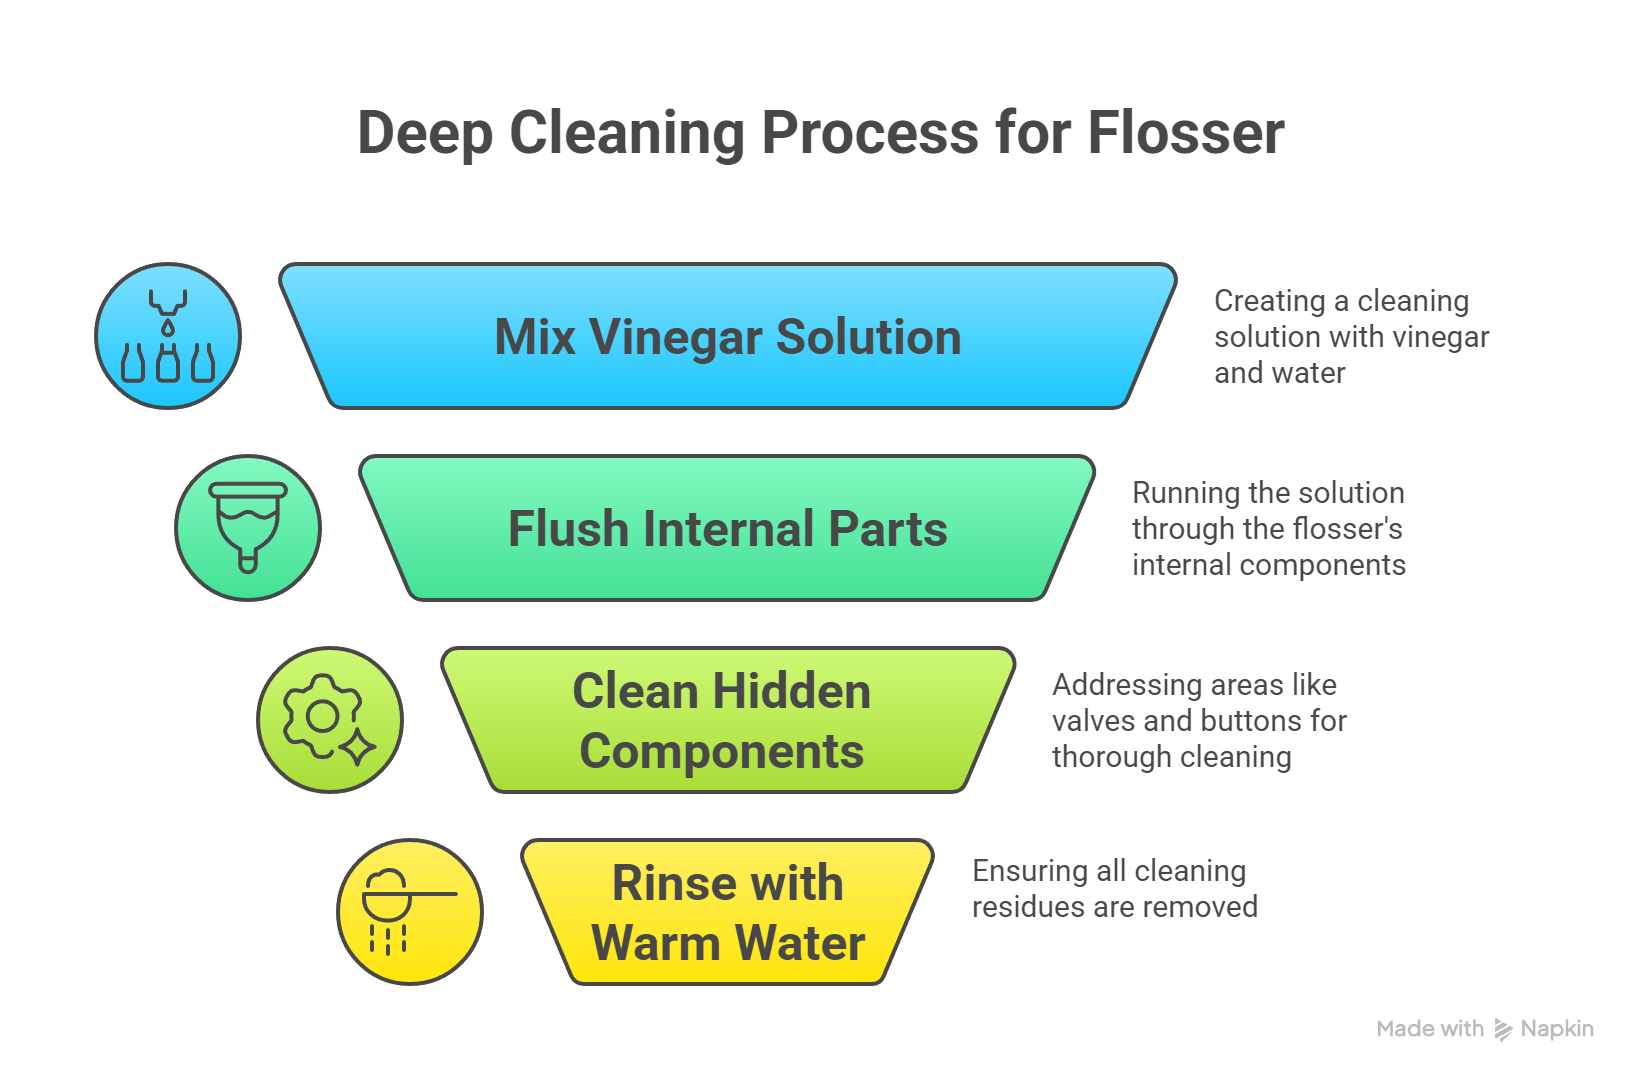
Flush the System Monthly
Mineral buildup affects performance over time. Every 30 days, fill the reservoir with white vinegar or Burst recommended cleaning solution. Run the device for 30 seconds to clear internal tubing. Rinse with clean water to remove vinegar residue. This keeps the water flow strong and hygienic.
Maintain Long-Term Performance
Regular care keeps your Burst Water Flosser working optimally for years.
Charge the Device Regularly
A full charge lasts two to four weeks with twice-daily use. When the battery light flashes red or dims, connect the included USB cable to recharge. Avoid letting the battery drain completely to extend the lifespan of the lithium-ion battery.
Store Tips Correctly
Keep extra tips in a clean, ventilated case. Avoid tossing them in drawers or cups where they collect dust or bacteria. Label them if you use multiple types, such as orthodontic versus gum massager.
Avoid Drops and Impacts
The Burst Water Flosser is durable but not indestructible. Dropping it may damage internal seals or the motor. Always place it on a stable surface during use.
Safety Tips and Who Should Use It
Understanding safety considerations helps you use the device confidently.
Safe for Most Adults and Teens
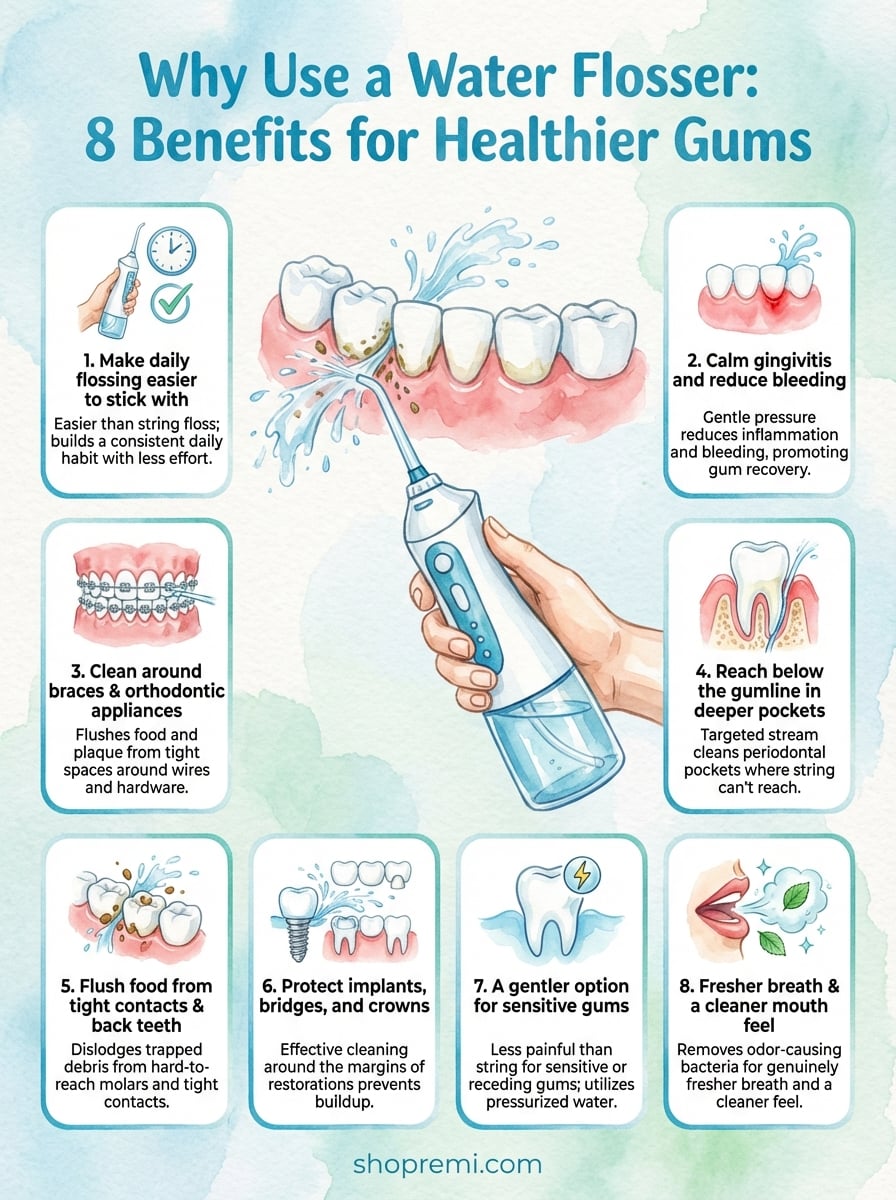
The Burst Water Flosser is ideal for people with braces, implants, crowns, or periodontal pockets. It also benefits those with limited dexterity who struggle with string floss. Anyone seeking deeper cleaning than brushing alone provides can use it. Children aged six and older can use it under adult supervision due to aspiration risk.
Not for Young Kids Without Supervision
Do not allow children under six years old to use the device unsupervised. The force of the water stream could cause choking or injury if misdirected.
Handle Gum Sensitivity Wisely
Mild bleeding during the first week is normal, especially if you have not flossed regularly. If bleeding continues beyond 10 to 14 days, consult your dentist. In the meantime, reduce pressure or switch to Pulse Mode. Never use the flosser on open wounds or surgical sites without dentist approval.
Maximize Effectiveness with Pro Tips
Combining your water flosser with other oral care tools produces the best results.
Combine with Other Oral Care Tools
For optimal oral health, pair your Burst Water Flosser with fluoride toothpaste, a soft-bristled toothbrush, and a tongue scraper. You will notice fresher breath, reduced plaque, and healthier gums within weeks.
Track Your Progress
Many users report 30 percent less plaque after one month of regular use. Reduced gingivitis symptoms, including redness and swelling, are common. Improved breath longevity is another frequently reported benefit. Stick with it daily, even 60 seconds makes a difference.
Replace Tips on Schedule
Worn tips lose effectiveness. Mark your calendar to replace tips every three to six months, or sooner if they become cracked or discolored.
Frequently Asked Questions About Using a Burst Water Flosser
How long does the Burst Water Flosser battery last on a full charge?
A full charge typically lasts two to four weeks with twice-daily use, depending on which mode you use and how long each session lasts. Recharge when the battery indicator shows low, usually by flashing red or dimming.
Can I use mouthwash in my Burst Water Flosser?
You can use diluted mouthwash mixed at a one-to-one ratio with water. Never use undiluted mouthwash, essential oils, or oily solutions, as these can clog the internal tubing and damage the motor over time.
How often should I replace the flossing tip?
Replace the flossing tip every three to six months, or sooner if it shows signs of wear such as cracking, discoloration, or reduced water flow. Using a worn tip reduces cleaning effectiveness.
Is the Burst Water Flosser safe for braces?
Yes, the Burst Water Flosser is safe and effective for braces. Use the Orthodontic Tip specifically designed for braces and aligners. The water stream can clean around brackets and wires that traditional floss cannot reach.
Why is my Burst Water Flosser sputtering during use?
Sputtering usually indicates a low water reservoir or air bubbles in the line. Keep the tank full during use. If sputtering persists, try flushing the system with white vinegar to clear any mineral buildup.
Can I use the Burst Water Flosser if I have sensitive gums?
Yes, start with Pulse Mode, which provides gentle pulsations ideal for sensitive gums. If bleeding occurs during the first week, this is normal and usually resolves as your gums adjust. Reduce pressure or consult your dentist if bleeding continues beyond two weeks.
Key Takeaways for Using Your Burst Water Flosser Effectively
Learning how to use Burst Water Flosser properly transforms your oral hygiene routine. The device removes plaque and debris from areas traditional brushing misses, leading to healthier gums and fresher breath. Always attach the tip securely before each use, select the appropriate mode for your needs, and aim the water stream at a 90-degree angle to the gumline.
Maintain your device by rinsing components after each use, flushing the system monthly with vinegar, and replacing tips every three to six months. Start with Standard Mode if you are new to water flossing, and gradually adjust to Turbo or Pulse Mode as your gums adapt. Consistency matters most, so aim for daily use even if sessions are brief.
Your smile will thank you for investing a few minutes each day in this powerful oral care tool.