
If you have ever struggled with string floss or noticed bleeding gums despite regular brushing, an electric water flosser could be the missing piece in your oral care routine. Designed to blast away plaque and debris with a targeted stream of water, this device reaches deep between teeth and below the gumline, areas traditional floss often misses. But to get real results, you need to use it correctly.
Using a water flosser is not just about turning it on and spraying around your mouth. Done wrong, it can be messy, ineffective, or even irritating. Done right, it reduces gum inflammation, improves breath, and enhances overall dental health, especially if you have braces, implants, or sensitive gums. In this guide, you will learn the exact steps to use your electric water flosser for maximum benefit.
Fill the Reservoir with Warm Water
Start by preparing your water flosser for use. Remove the water tank and fill it with lukewarm water, not cold which can cause discomfort, and never hot as it may warp plastic components. Fill only up to the max fill line marked on the reservoir to prevent overflow.
Using warm water increases comfort and encourages consistent use, especially for beginners with sensitive gums. If you are targeting gum inflammation or healing after dental work, some users add a capful of 3% hydrogen peroxide diluted in water, but only 2 to 3 times per week and with dentist approval.
Once filled, securely reattach the reservoir to the base unit. Many models will not operate unless the tank is locked in place.
Choose and Attach the Right Tip
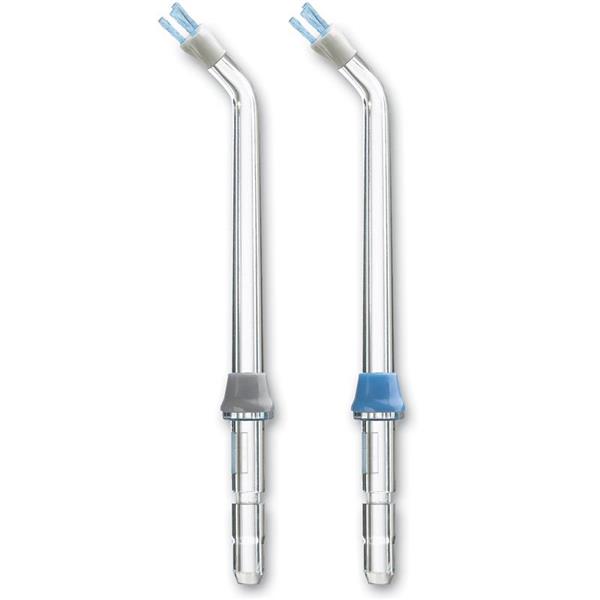
The tip you use determines how well your flosser works for your specific needs. Most models come with interchangeable nozzles, so choose the one that matches your oral condition.
• Standard Jet Tip: Ideal for general use with healthy gums
• Orthodontic Tip: Has soft bristles to clean around braces, wires, and retainers
• Plaque Seeker Tip: Targets plaque around crowns, bridges, and implants
• Pik Pocket Tip: Designed for deep periodontal pockets, use under dental supervision
• Tongue Cleaner Tip: Removes bacteria from the tongue surface
Click the selected tip firmly into the handle until it locks. A loose fit can cause leaks or reduced pressure. Replace tips every 3 to 6 months, or sooner if worn or discolored.
Prime the Pump Before First Use
Before your first session, prime the system to remove air bubbles that can disrupt water flow. Set the pressure to the highest level, point the tip into the sink, and turn on the device.
Let water run continuously until the stream becomes steady and uninterrupted, usually 10 to 20 seconds. Then turn it off. This step ensures full pressure and consistent pulsation during use.
You do not need to repeat priming unless the reservoir has been empty for days.
Position Yourself Over the Sink
Stand or lean over the sink with your head slightly forward. This allows water to drain directly from your mouth and minimizes splashing. Many people prefer using their water flosser in the shower to manage mess and save time.
Keep your lips closed loosely, like a slight pout, to contain the spray while letting excess water escape. Avoid watching yourself in the mirror with an open mouth, as this causes uncontrolled spraying.
Insert Tip Before Turning On
One of the most common mistakes is turning on the flosser before placing the tip in your mouth. This leads to sudden bursts of water spraying everywhere.
Instead, insert the tip first, position it along the gumline, then press the activation button. For models with dual controls, turn on the base first, then press the handle button only when ready.
Aim at the Gumline, Not Between Teeth
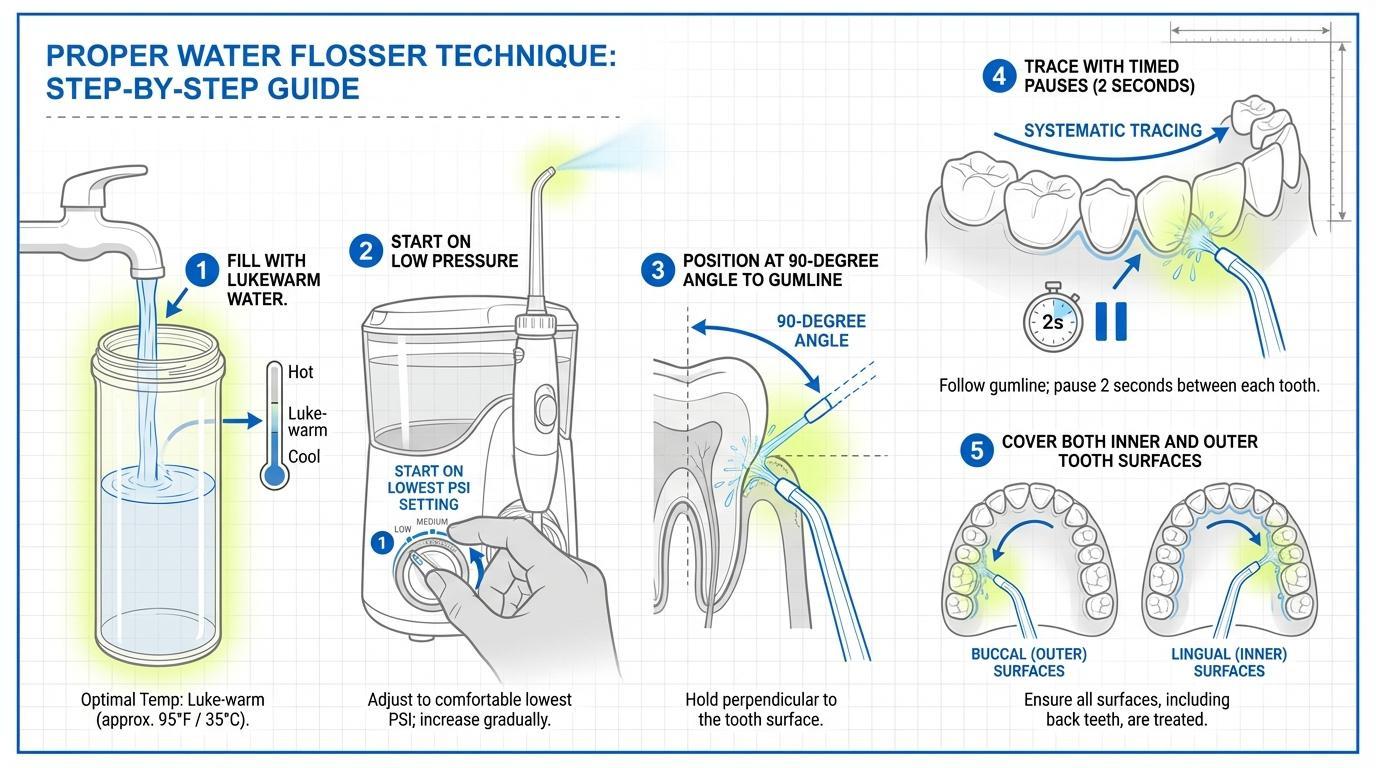
Position the tip so the water stream hits the gumline at a right angle, not angled down into the gums or up toward the tooth crown. Hold it 1 to 2 mm away from the tissue. Do not press it directly into the gums.
Aim the stream along the gumline, not into the interdental space. The pulsating action will naturally flush out debris from between teeth while stimulating the gums.
Start on Low Pressure
Begin at Level 1 to 3 if you are new to water flossing. High pressure can cause pain, bleeding, or tissue trauma, especially if you have gingivitis or thin gums.
As your gums adapt, slowly increase the pressure to a comfortable, massaging sensation. Most users settle between Levels 4 to 7. Only go higher if well-tolerated.
Use the highest pressure you can tolerate without discomfort. Avoid max settings long-term, as chronic high pressure may contribute to gum recession. Models with only an on/off switch lack control and are not recommended.
Floss Systematically Along the Gumline
Start at the back molars and move forward, gliding the tip slowly along the gumline. Pause briefly between each tooth, about 1 to 3 seconds, to let the pulsations dislodge plaque and debris.
Use a steady, gentle motion, like painting the gumline. Do not scrub aggressively. Cover both outer and inner surfaces of all teeth. On the inner side, keep the same horizontal positioning even though visibility is limited.
Spend 60 to 120 Seconds Total
A full session should take 1 to 2 minutes. Aim for 30 seconds on the upper arch, then 30 on the lower. Rushing reduces effectiveness.
Focus on hard-to-reach areas, behind wisdom teeth, around implants, braces, crowns, or previous periodontal sites. These zones trap the most plaque. You can refill the reservoir mid-session if needed, especially with cordless models that hold less water.
Drain and Power Down Safely
After finishing, keep the tip in your mouth and let water continue flowing into the sink as you remove it. This prevents dripping.
Release the handle button, then turn off the base unit. Spit out any remaining water in your mouth.
Empty the reservoir immediately after use. Standing water breeds bacteria and mold, especially in humid bathrooms.
Clean and Store Properly
After each session, empty and rinse the reservoir with warm water. Rinse the tip under running water and wipe the base with a damp cloth.
Once a week, run a 50/50 mix of white vinegar and water through the device to descale internal tubing. Soak tips in antibacterial mouthwash for 10 to 15 minutes, then flush with clean water afterward.
Store the reservoir detached and open to dry. Keep tips upright in a ventilated holder. Avoid enclosing them in sealed cases.
Use Before or After Brushing
While either order works, many dentists recommend using the water flosser before brushing. It loosens food particles and plaque, allowing toothpaste fluoride to better penetrate interdental spaces. This boosts remineralization and cavity prevention.
However, if you prefer using it after brushing to rinse away debris and freshen breath, that is fine too. Consistency matters more than sequence.
Combine with Mechanical Cleaning
A water flosser does not replace string floss or interproximal brushes. It flushes debris but does not physically scrape off sticky plaque biofilm.
For best results, follow this protocol. First, brush with fluoride toothpaste. Second, use interproximal brushes between teeth, preferred by experts over floss. Third, floss if brushes do not fit. Fourth, water floss to flush out remaining bacteria and inflammatory agents.
Interproximal brushes are superior to floss. Water flossing enhances but does not substitute mechanical cleaning.
Avoid These Common Mistakes
• Turning on before inserting tip: Insert first, then activate
• Aiming into gums instead of gumline: Keep tip horizontal, 1 to 2 mm away
• Using excessive pressure: Start low, increase gradually
• Skipping inner tooth surfaces: Clean all sides systematically
• Not emptying reservoir after use: Empty and rinse every time
• Using only plain on/off models: Choose adjustable-pressure devices
Also, never use undiluted chemicals or essential oils unless approved by the manufacturer. Check your user manual before adding any solution.
When to Use Additives
Additives should be used sparingly and only when needed. Use 3% hydrogen peroxide diluted to help reduce gum inflammation. Use diluted bleach, 1 to 2 drops per cup, for antimicrobial effects during active infections.
Use additives no more than 2 to 3 times per week. Daily use can disrupt your oral microbiome or irritate tissues. Always rinse with plain water afterward if stinging occurs.
Who Benefits Most
Water flossers are ideal for people with braces or aligners, as they clean around wires and prevent decalcification. They benefit individuals with implants, crowns, or bridges by reducing risk of peri-implantitis. Patients with gingivitis or periodontitis see reduced bleeding and pocket depth.
People with limited dexterity find water flossers easier than string floss. Even general users benefit, with studies showing water flossers remove up to 99.9% of plaque from treated areas when used correctly.
Safety and Side Effects
It is common to experience mild gum bleeding in the first 1 to 2 weeks, especially if you have gingivitis. This usually resolves as gum health improves.
But see your dentist if you have persistent bleeding beyond two weeks, chronic pain or discomfort, swelling, pus, or worsening sensitivity, or no improvement after 4 to 6 weeks.
Avoid using a water flosser immediately after tooth extraction unless approved. In deep pockets over 5 mm, improper use can drive bacteria deeper, so use under professional guidance.
Choose the Right Device Type
Corded countertop models suit home use with consistent pressure and larger families, though they need an outlet and are less portable. Cordless portable models work well for travel, shower use, and convenience, though they have smaller tanks and may need mid-session refills.
Corded models like Waterpik Aquarius offer longer run time and stronger performance. Cordless models like Waterpik Cordless Plus are great for mobility. Most Waterpik devices come with a 3-year warranty.
Key Takeaways for Using Your Electric Water Flosser
To get the most from your electric water flosser, use warm water and the correct tip for your needs. Start on low pressure and increase gradually as your gums adapt. Aim horizontally at the gumline, not into the gums.
Pause 1 to 3 seconds between each tooth and spend 60 to 120 seconds total. Empty the reservoir after every use and clean the device weekly to prevent buildup. Combine with interproximal brushes or floss for complete cleaning.
Consistent, correct use leads to healthier gums, fresher breath, and reduced risk of gum disease. Over time, you will notice less bleeding, tighter gums, and fewer dental issues.
Frequently Asked Questions About Using an Electric Water Flosser
Can I use a water flosser every day?
Yes, you can use a water flosser once daily as part of your oral care routine. For patients with periodontitis, diabetes, or cardiovascular disease, using it 2 to 3 times per day is recommended for enhanced gum health.
Do I still need to floss if I use a water flosser?
Yes, a water flosser does not replace string floss or interproximal brushes. It flushes away debris but does not physically scrape off sticky plaque biofilm. Use all three for optimal results.
Why do my gums bleed when I use a water flosser?
Mild gum bleeding in the first 1 to 2 weeks is common, especially if you have gingivitis. This usually resolves as gum health improves. If bleeding persists beyond two weeks, reduce pressure and consult your dentist.
Should I use cold or warm water in my water flosser?
Use lukewarm or warm water for comfort and effectiveness. Cold water may cause discomfort, while hot water can damage plastic components. Warm water also helps increase compliance, especially for beginners.
How long does a water flosser tip last?
Replace water flosser tips every 3 to 6 months, or sooner if worn, discolored, or damaged. Worn tips lose effectiveness and may harbor bacteria. Label each family members tip when sharing a device.