
If you’re wearing braces, you know how easily food gets trapped around brackets and wires. No matter how carefully you brush, debris and plaque still hide in hard-to-reach spots, putting you at risk for gingivitis, cavities, and white spot lesions. A water flosser blasts away stubborn particles with a pulsating stream of water, making it one of the most effective tools for keeping your teeth and gums healthy during orthodontic treatment.
Using a water flosser with braces isn’t just about convenience. Studies show it removes up to 99.9% more plaque than string floss alone and reduces gum bleeding by up to 50% more over time. This guide walks you through everything from choosing the right model to mastering the technique so you can keep your smile healthy throughout your orthodontic journey.
Choose the Right Water Flosser for Braces
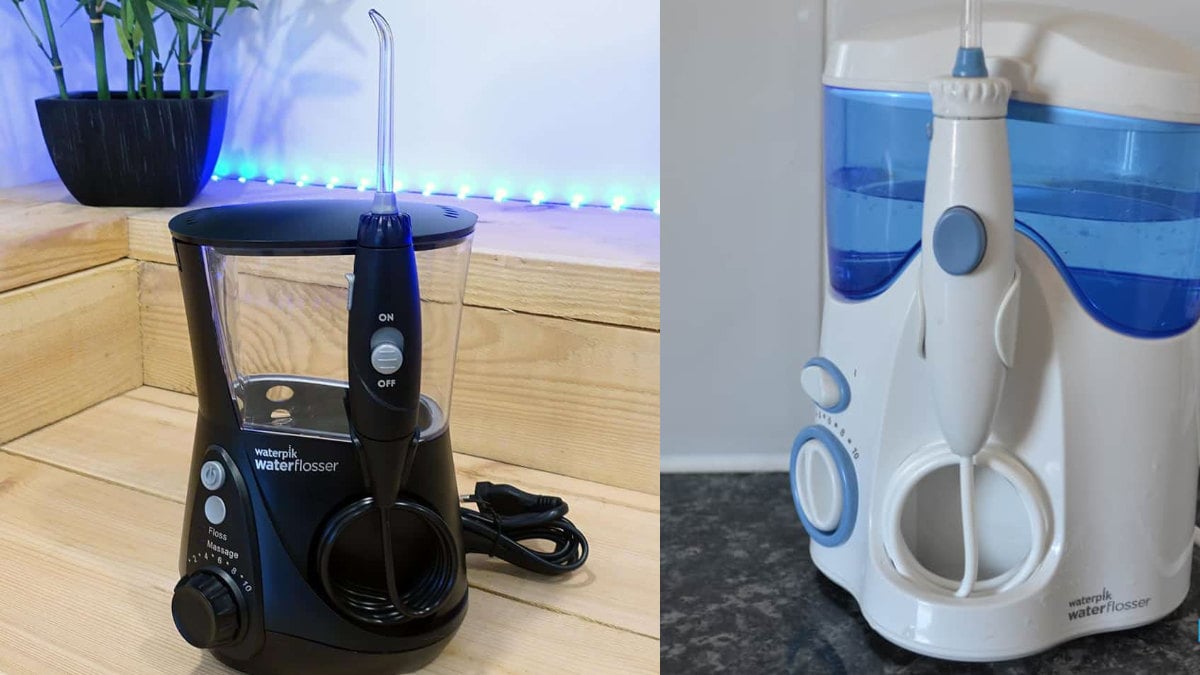
Not all water flossers work equally well for orthodontic care. The best models combine power, precision, and features specifically designed for braces wearers.
Recommended Models for Braces
Look for these dentist-approved options when shopping for a water flosser. Both carry the ADA Seal of Acceptance, meaning they’ve been clinically proven to reduce plaque and gingivitis.
The Waterpik Ultra with Orthodontic Tip stands out as the gold standard. It features 10 pressure settings, a large 600ml reservoir, and an orthodontic tip that combines pulsating water with gentle scrubbing action around brackets and wires.
The Oral-B Water Flosser Advanced uses Oxyjet Technology, which infuses air bubbles into the water stream for deeper cleaning below the gumline. It’s ADA-approved and specifically marketed for braces, implants, and bridges.
Key Features to Look For
Several features matter most when selecting a water flosser for braces. The orthodontic tip is essential since standard tips can’t clean effectively around brackets. Adjustable pressure settings let you start low and increase as your gums adapt. A large, removable reservoir reduces refills during use. The ADA Seal of Acceptance confirms safety and effectiveness. Cordless options work well for travel and on-the-go use.
Use the Correct Orthodontic Tip
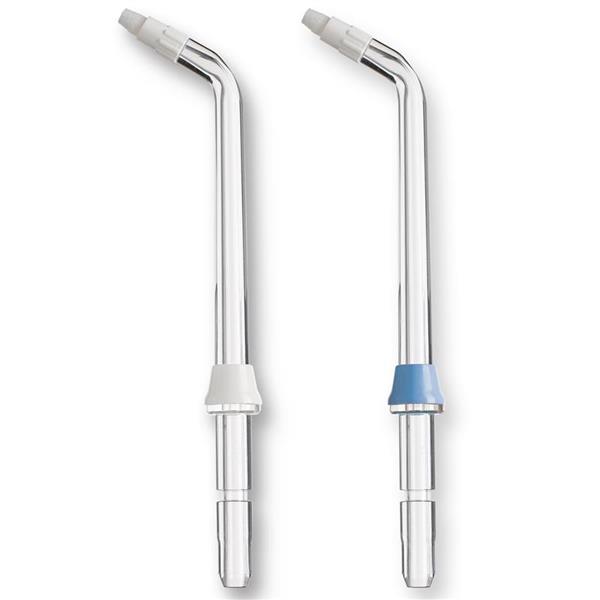
The orthodontic tip makes or breaks your water flossing routine. Without it, you’ll miss the plaque buildup that causes cavities and gum disease around your brackets.
Why the Orthodontic Tip Is Essential
The orthodontic tip has a tapered, brush-like end that delivers pulsating water while gently scrubbing around brackets and under archwires. This dual action removes plaque far more effectively than water alone. Standard tips only flush debris, missing the biofilm buildup that clings to bracket surfaces.
Replace your tip every three months or sooner if it becomes frayed, discolored, or clogged. Worn tips lose pressure and can harbor bacteria, reducing cleaning effectiveness.
Fill Your Reservoir with Lukewarm Water
Water temperature affects both comfort and device longevity. Getting this step right sets you up for success.
Best Water Type and Temperature
Use lukewarm water for maximum comfort. Cold water can cause sensitivity, especially around recently adjusted wires. Hot water damages internal seals and motor components. If you live in a hard water area, use distilled or filtered water to prevent mineral buildup inside your device.
Can You Add Mouthwash?
Yes, but only if diluted 1:1 with water and your device manual allows it. Never use undiluted mouthwash unless specified. Chlorhexidine or fluoride rinses can boost antibacterial effects, but overuse may stain teeth or irritate gums.
Set the Right Pressure Level
Pressure settings matter more than most people realize. Starting too high causes pain and bleeding; starting too low means poor cleaning.
Start Low and Adjust Gradually
Beginners and anyone with sensitive gums should start at level 1 to 3, often labeled as sensitive mode. After about a week of daily use, gradually increase to medium settings (4 to 6) for deeper cleaning. Avoid high pressure initially since it causes gum trauma, especially right after orthodontic adjustments.
Most users find level 5 to 6 ideal for daily braces care. If your gums bleed at first, don’t panic. This is common when starting out and usually stops within two weeks as gum health improves.
Position Yourself Properly
Where you stand and how you hold your mouth determines how much mess you’ll make. Getting this right saves cleanup time and prevents choking.
Avoid Splashing and Choking
Stand over the sink and lean forward slightly. Keep your lips slightly open so water can drain out naturally. Never close your mouth completely around the tip. This prevents overflow, choking, and messy splatter all over your mirror and counter.
Aim the Jet Correctly
Where you aim the stream makes all the difference between thorough cleaning and wasted effort.
Target the Gumline, Not Directly Into Gums
For upper teeth, point the tip slightly above the brackets, angling down toward the gumline. For lower teeth, aim slightly below the brackets, angling up. Never blast directly into the gums themselves. Instead, let the pulsating stream hug the gumline and flow around each bracket.
Clean All Tooth Surfaces
Move methodically through your mouth, starting at the back molars. Pause two to three seconds per tooth. Cover outer, inner, and chewing surfaces. Angle the tip to guide water under the archwire and around every bracket. Pay extra attention to back teeth since they’re often missed but prone to plaque buildup.
Follow a Complete Braces Care Routine
A water flosser works best when combined with other tools. No single device cleans everything.
Daily Step-by-Step Protocol
Brush first using a soft-bristled or electric toothbrush with fluoride toothpaste. Angle the brush at 45 degrees to clean above and below brackets. Brush for two full minutes after every meal.
Floss second using a floss threader or Oral-B Super Floss. Thread the floss under your archwire and use a C-shape motion to hug each tooth. This step reaches contact points where water can’t.
Water floss third, using your water flosser after brushing and flossing. Use lukewarm water, start at low pressure, and focus on gumlines and brackets.
Rinse last with fluoride mouthwash for 30 seconds. Do not rinse with water afterward. Leaving fluoride on teeth overnight provides extra protection against cavities.
Clean and Maintain Your Device
Your water flosser needs regular care to work effectively. Neglected devices harbor bacteria and lose power.
Daily and Weekly Maintenance
After each use, empty remaining water and rinse the tip under running water. Store the tip upright to dry. Weekly, wash the reservoir with warm water and mild soap. If you use hard water, descale monthly by running equal parts water and white vinegar through the device, then rinse thoroughly.
Replace tips every three months or sooner if worn. Avoid bleach or undiluted cleaning solutions unless approved by the manufacturer.
Avoid Common Mistakes
Even with the right device, poor habits reduce effectiveness. Watch out for these errors.
Top Mistakes to Avoid
Using high pressure too soon causes gum bleeding and discomfort. Skipping the orthodontic tip means poor cleaning around brackets. Missing back teeth or lingual surfaces leads to plaque buildup and cavities. Thinking water flossing replaces string floss causes interdental plaque and decay. Using cold or hot water creates discomfort or damages the device. Not replacing tips reduces cleaning power and allows bacterial growth.
Use Portable Tools During the Day
You can’t always do a full routine after lunch, but you can still keep braces clean on the go.
Quick Cleaning Options
Interdental brushes, also called proxy brushes or Christmas tree brushes, fit between teeth and around brackets. They’re perfect for removing food stuck under wires after meals. Keep a travel toothbrush in your bag for quick brushing. Pack floss threaders and travel floss for nighttime use when you can do a full routine.
Attend Regular Professional Checkups
Home care matters, but professional cleanings catch what you miss.
Why Checkups Matter
Even with perfect home care, tartar builds up over time, especially around brackets. Only a dentist or hygienist removes it with professional scaling tools. Visit every six months or more often if prone to cavities or gum disease. Your orthodontist adjusts your braces and checks wire integrity. Your dentist monitors for cavities, white spots, and gum disease.
Frequently Asked Questions About Using a Water Flosser with Braces
Can I replace traditional floss with a water flosser?
No, a water flosser cannot fully replace traditional dental floss. While it excels at flushing debris and reducing plaque along the gumline, it lacks the mechanical scrubbing action needed to remove plaque from contact points between teeth. Use both for complete cleaning.
How long should I water floss with braces?
Aim for about 60 seconds total, covering both upper and lower arches. Pause two to three seconds per tooth, ensuring you hit all surfaces around every bracket and under every wire.
What pressure setting should I start with?
Begin at level 1 to 3, depending on your model’s scale. This sensitive mode prevents gum trauma while you build tolerance. Increase to level 5 or 6 after one to two weeks for optimal cleaning.
How often should I replace the orthodontic tip?
Replace your orthodontic tip every three months or sooner if it shows signs of wear like fraying, discoloration, or reduced water pressure. Worn tips harbor bacteria and clean less effectively.
Can I use mouthwash in my water flosser?
Yes, but only if diluted 1:1 with water and your device manual allows it. Undiluted mouthwash can damage internal components. Fluoride or chlorhexidine rinses boost antibacterial effects when used occasionally.
Is a cordless or corded water flosser better for braces?
Both work well. Cordless models offer convenience and portability but have smaller reservoirs and shorter battery life. Corded models provide consistent pressure and larger water tanks, making them better for home use.
Key Takeaways for Using a Water Flosser with Braces
A water flosser isn’t a luxury, it’s a necessity for anyone with braces. When used correctly with the orthodontic tip, proper pressure, and correct aiming technique, it transforms your oral hygiene routine by flushing out food debris, reducing plaque, and keeping gums healthy.
Remember that water flossing complements but never replaces traditional flossing. The combination of mechanical cleaning from floss and hydrodynamic cleaning from your water flosser gives you the best defense against cavities, gum disease, and white spot lesions during orthodontic treatment.
Stick to the full protocol: brush, floss, water floss, rinse, and inspect. Choose a model with an orthodontic tip and the ADA Seal of Acceptance. Start at low pressure and gradually increase. Replace tips every three months. With consistent daily use, you’ll see real improvements in gum health within two to four weeks, and when your braces come off, you’ll reveal a clean, healthy, beautifully straight smile.