
If you’ve noticed a musty smell, black specks, or reduced water pressure from your water flosser, it’s likely time to clean the water flosser tank. This crucial maintenance step prevents mold, bacteria, and mineral buildup that compromise both hygiene and performance. Left uncleaned, the tank becomes a breeding ground for biofilm and limescale, especially if you use tap water or mouthwash regularly. The good news: with just a few minutes of effort and common household supplies like white vinegar or hydrogen peroxide, you can keep your device running smoothly and safely.
In this guide, you’ll learn exactly how to clean your water flosser tank, including daily routines, monthly deep cleans, model-specific tips, and how to tackle stubborn mold or hard water deposits. Whether you own a Waterpik, Oral-B, or portable model, these proven steps will extend your device’s life and ensure every flossing session delivers clean, fresh water.
Daily Tank Maintenance Routine
Empty and Rinse After Each Use
After every flossing session, empty the tank completely. Never leave water sitting inside, as stagnant water encourages bacterial growth and mold within 24 to 48 hours, especially in humid environments. Remove the reservoir from the base unit and pour out all remaining liquid. Then, rinse the interior thoroughly under warm running water to remove any residue.
Clean and Dry the Nozzle
Eject the flossing tip using the release button and rinse it under running water to flush out debris. Gently shake off excess water and place it upright to air dry. For families sharing the device, consider labeling tips with colored tape to avoid cross-contamination. Store tips in a clean, ventilated holder. Never store tips in a sealed case while damp.
Wipe and Air Dry All Components
Use a soft, non-abrasive cloth to wipe the exterior of the base unit and handle. Avoid wetting electronic components. Leave the reservoir detached or cap open when storing to allow full air drying. Never reassemble or store parts while still wet, as trapped moisture leads to mold, particularly in portable models with narrow or sealed tanks.
Monthly Deep Cleaning Process

Dishwasher-Safe Tank Cleaning
Waterpik and Oral-B Models
If you own a Waterpik or Oral-B countertop model, the reservoir, lid, and removable black valve are typically top-rack dishwasher safe. Remove these components before starting. Place them on the top rack only, and never use the heated dry cycle, as high heat can warp plastic. Use a mild, non-abrasive detergent without citrus or bleach. After washing, inspect each part for residue or cloudiness, then allow them to air dry completely.
Check for Warping or Cracks
After several dishwasher cycles, examine the tank for cracks, warping, or seal damage. A misshapen reservoir may leak or fail to seat properly. Replace the tank if you notice any structural issues, as most manufacturers sell replacement reservoirs separately.
Hand Washing Non-Dishwasher-Safe Tanks
For Portable Models
Many rechargeable and travel models have non-dishwasher-safe tanks due to sealed bases or narrow openings. For these, hand washing is essential. Fill the sink with warm, soapy water using mild dish soap. Submerge the tank and scrub the interior with a small bottle brush to reach corners and the bottom. Avoid abrasive sponges or steel wool, which scratch surfaces and harbor bacteria.
Rinse and Inspect Thoroughly
After scrubbing, rinse the tank under running water until no soap remains. Hold it up to the light to check for film, discoloration, or residue in hard-to-see areas. For models with tight curves or sealed interiors, increase soak time and use a flashlight to inspect the base.
Effective Cleaning Solutions for Stubborn Buildup
White Vinegar for Limescale and Bacteria
For visible buildup or routine monthly cleaning, mix equal parts white vinegar and warm water. Fill the reservoir and let it sit for 5 to 10 minutes, or up to 30 minutes for heavy deposits. Swirl gently to coat all interior surfaces. The acetic acid dissolves limescale and kills 99% of bacteria and mold.
After soaking, empty the solution and rinse the tank thoroughly. Reattach it to the base and run the vinegar mix through the flosser until the tank is empty. Follow with one full reservoir of clean water to flush out any lingering vinegar taste.
Hydrogen Peroxide for Mold Removal
For mold, mildew, or biofilm, use 3% hydrogen peroxide diluted with water. A 1:2 ratio (one part peroxide to two parts water) works for routine disinfection. For severe mold, use a 1:1 ratio. Fill the reservoir and let it sit for 5 to 30 minutes.
After soaking, gently scrub the tank with a bottle brush if black specks remain. Empty, then rinse thoroughly. Reattach and run the solution through the tubing, followed by two cycles of clean water to ensure complete removal.
Avoid Harmful or Risky Cleaners
Never use bleach or rubbing alcohol. While bleach kills germs, it degrades plastic seals and leaves toxic residues. Rubbing alcohol, especially high-proof varieties, can warp or crack reservoirs and is unsafe if ingested. Stick to vinegar or peroxide for safe, effective cleaning.
Skip sugary or alcohol-based mouthwashes. Using mouthwash in your flosser? Only use sugar-free, alcohol-free formulas, and dilute them (for example, 1:3 with water). Sugary rinses accelerate mold growth. Run mouthwash through the system, then flush with two full reservoirs of clean water to prevent residue buildup.
Cleaning Internal Components and Tubing
Flush Internal Tubing and Pump
Mineral deposits and biofilm can clog internal tubing, reducing water flow. Once a month, after cleaning the tank, fill it with vinegar or peroxide solution and run it through the entire system. This flushes the pump and delivery channels, maintaining optimal pressure. Before starting, ensure the tank is full. Do not run the flosser dry for more than a few seconds, as this can permanently damage the pump.
Remove and Clean the Black Valve
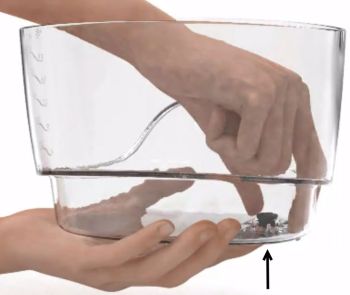
Locate the black rubber valve at the base of the reservoir in most Waterpik models. Push it upward from the bottom to remove. Massage it under warm running water for 30 to 45 seconds to clear debris. Inspect for cracks or wear, and replace if damaged.
Ensure the valve clicks securely back into place. A misaligned or clogged valve is a common cause of low water pressure or sputtering sounds.
Nozzle and Tip Maintenance
Soak Tips Monthly
Remove all tips and soak them in a 2:1 water-to-vinegar or 2:1 water-to-hydrogen peroxide solution for 5 to 10 minutes. This disinfects and clears internal clogs. Rinse thoroughly under running water afterward.
Scrub and Replace as Needed
Use a soft toothbrush to gently scrub around the nozzle opening. If spray becomes weak, uneven, or discolored, replace the tip. The standard replacement interval is every 3 to 6 months, or sooner if shared among users.
Drying and Reassembly Best Practices
After cleaning, place the reservoir upside down on a clean towel to drain and dry. Allow at least 2 to 4 hours for full drying, and overnight is ideal. Never use a hairdryer, oven, or direct sunlight, as heat can warp plastic.
Reattach components only when fully dry. A damp tank promotes mold, especially in portable models. Store the flosser with the cap off or tank detached to maintain airflow.
Model-Specific Cleaning Tips
Waterpik Countertop and Cordless Models
The reservoir is dishwasher-safe on the top rack. The black valve is removable and should be cleaned monthly. Use 1 to 2 tablespoons of vinegar per full tank, run through, then rinse. Wipe the handle with a damp cloth, and do not submerge it. Replace tips every 3 to 6 months.
Oral-B Water Flossers
The reservoir and lid are dishwasher-safe on the top rack. The handle is not dishwasher-safe, so wipe only. Do not run the device dry, as this can damage the pump. After each use, empty, rinse, wipe, and leave open to dry.
Portable Models
The reservoir is typically not dishwasher-safe, so hand wash only. Narrow openings make scrubbing difficult, and mold risk is high due to trapped moisture. Rinse daily, dry thoroughly, and use distilled water. Replace nozzles every 3 to 6 months.
Troubleshooting Common Tank Problems
Low Water Pressure
Mineral buildup, a clogged tip, or a dirty black valve can cause low water pressure. Run a vinegar flush, clean the nozzle, and massage the black valve under water. For hard water users, switch to distilled water to reduce limescale.
Musty Smell or Sour Odor
Biofilm, stagnant water, or mold causes unpleasant odors. Soak the tank in hydrogen peroxide (1:1) for 30 minutes. Rinse and flush the system with clean water. Always empty and dry after use.
Black Specks in Water
Mold or mildew causes black specks. Soak in peroxide solution, scrub with a bottle brush, and flush the system. If specks persist, replace the tank, especially in non-cleanable portable models.
White Chalky Deposits
Limescale from hard water causes white chalky deposits. Use a vinegar soak (1:1) for 10 to 30 minutes. Rinse thoroughly. For long-term prevention, use distilled water.
Leaking Reservoir
A cracked tank, damaged seal, or misaligned valve causes leaking. Inspect for cracks. Ensure the black valve is properly seated. Replace the tank if leaking continues.
Maximizing Your Device’s Lifespan
Use Distilled Water
Switching to distilled water reduces mineral buildup by up to 90%. Users in hard water areas report no limescale for over a year and can extend cleaning intervals to every 6 to 8 weeks.
Set a Cleaning Reminder
Create a monthly calendar alert labeled Water Flosser Cleaning Day. Pair it with other household chores to build consistency. Over time, regular cleaning can extend your device’s life to 5 or more years.
Replace Worn Parts Promptly
Check the tank, valve, and nozzles every 3 to 6 months. Replace any part that is cracked, discolored, or leaking. Most manufacturers offer affordable replacement parts online.
Frequently Asked Questions About Cleaning Water Flosser Tanks
How Often Should I Clean My Water Flosser Tank?
Empty and rinse the tank after every use to prevent stagnant water. Perform a deep clean with vinegar or hydrogen peroxide monthly. Flush internal tubing monthly as well. Replace nozzles every 3 to 6 months.
Can I Put My Water Flosser Tank in the Dishwasher?
Waterpik and Oral-B reservoirs are typically top-rack dishwasher safe. Remove the reservoir, lid, and black valve before washing. Never place the motorized base, handle, or charging unit in the dishwasher.
What Is the Best Solution for Cleaning a Water Flosser Tank?
White vinegar (1:1 with water) works best for limescale and bacteria. Hydrogen peroxide (1:1 or 1:2 with water) is more effective for mold and biofilm. Both are safe for plastic components and leave no harmful residues.
Why Does My Water Flosser Smell Bad?
A musty smell indicates biofilm, stagnant water, or mold. Deep clean with hydrogen peroxide, rinse thoroughly, and always empty and dry the tank after each use. Using distilled water can prevent future odors.
Can I Use Mouthwash in My Water Flosser?
Only use sugar-free, alcohol-free mouthwash, and dilute it with water (1:3 ratio). Run it through the system, then flush with two full reservoirs of clean water. Sugary mouthwashes accelerate mold growth.
How Do I Clean Black Mold From My Water Flosser Tank?
Soak the tank in hydrogen peroxide (1:1) for 30 minutes. Scrub with a soft bottle brush. Rinse thoroughly and flush the system with clean water. If mold persists, the tank may need replacement, especially in portable models with limited access.
Key Takeaways for Maintaining a Clean Water Flosser Tank
A clean water flosser tank isn’t optional. It is essential for hygiene, performance, and longevity. By following these steps, you will ensure every use delivers fresh, clean water free from mold, bacteria, and buildup.
The most important habits are emptying and rinsing after each use, performing a monthly deep clean with vinegar or peroxide, and using distilled water to minimize limescale. Regular maintenance prevents costly repairs and extends your device’s life to 5 years or more.
Whether you have a durable Waterpik, a sleek Oral-B, or a compact portable model, consistent care keeps your flosser working like new. Set a monthly reminder, stock up on vinegar and hydrogen peroxide, and enjoy healthier, fresher flossing sessions every day.