
If your Gurunanda water flosser isn’t delivering a strong, steady stream or has developed an odd smell, it’s likely overdue for a cleaning. Over time, mineral deposits from tap water and bacterial buildup from daily use can clog internal tubing and nozzle tips, reducing performance and compromising oral hygiene. The good news? Cleaning your Gurunanda water flosser is simple, quick, and requires only household items like white vinegar and warm water. This guide walks you through daily care, weekly deep cleaning, and long-term maintenance so your flosser stays hygienic and effective.
Daily Rinse and Dry
Empty Reservoir After Use
Always drain leftover water from the reservoir immediately after flossing. Standing water encourages bacterial growth and biofilm formation. Tilt the reservoir fully to ensure no moisture remains trapped at the bottom.
Rinse Nozzle and Base
Rinse the nozzle under warm running water to flush out debris and saliva. If your model has multiple tips, clean each one separately. Wipe the exterior of the base unit with a damp cloth. Never immerse the base in water.
Air-Dry All Parts
Place the reservoir upside down or upright with the cap off to allow full air drying. Store nozzle tips in a clean, ventilated holder. Keeping components dry prevents mildew and maintains sanitation between uses.
Never store with water inside — this is the number one cause of odor and clogs in water flossers.
Weekly Deep Cleaning
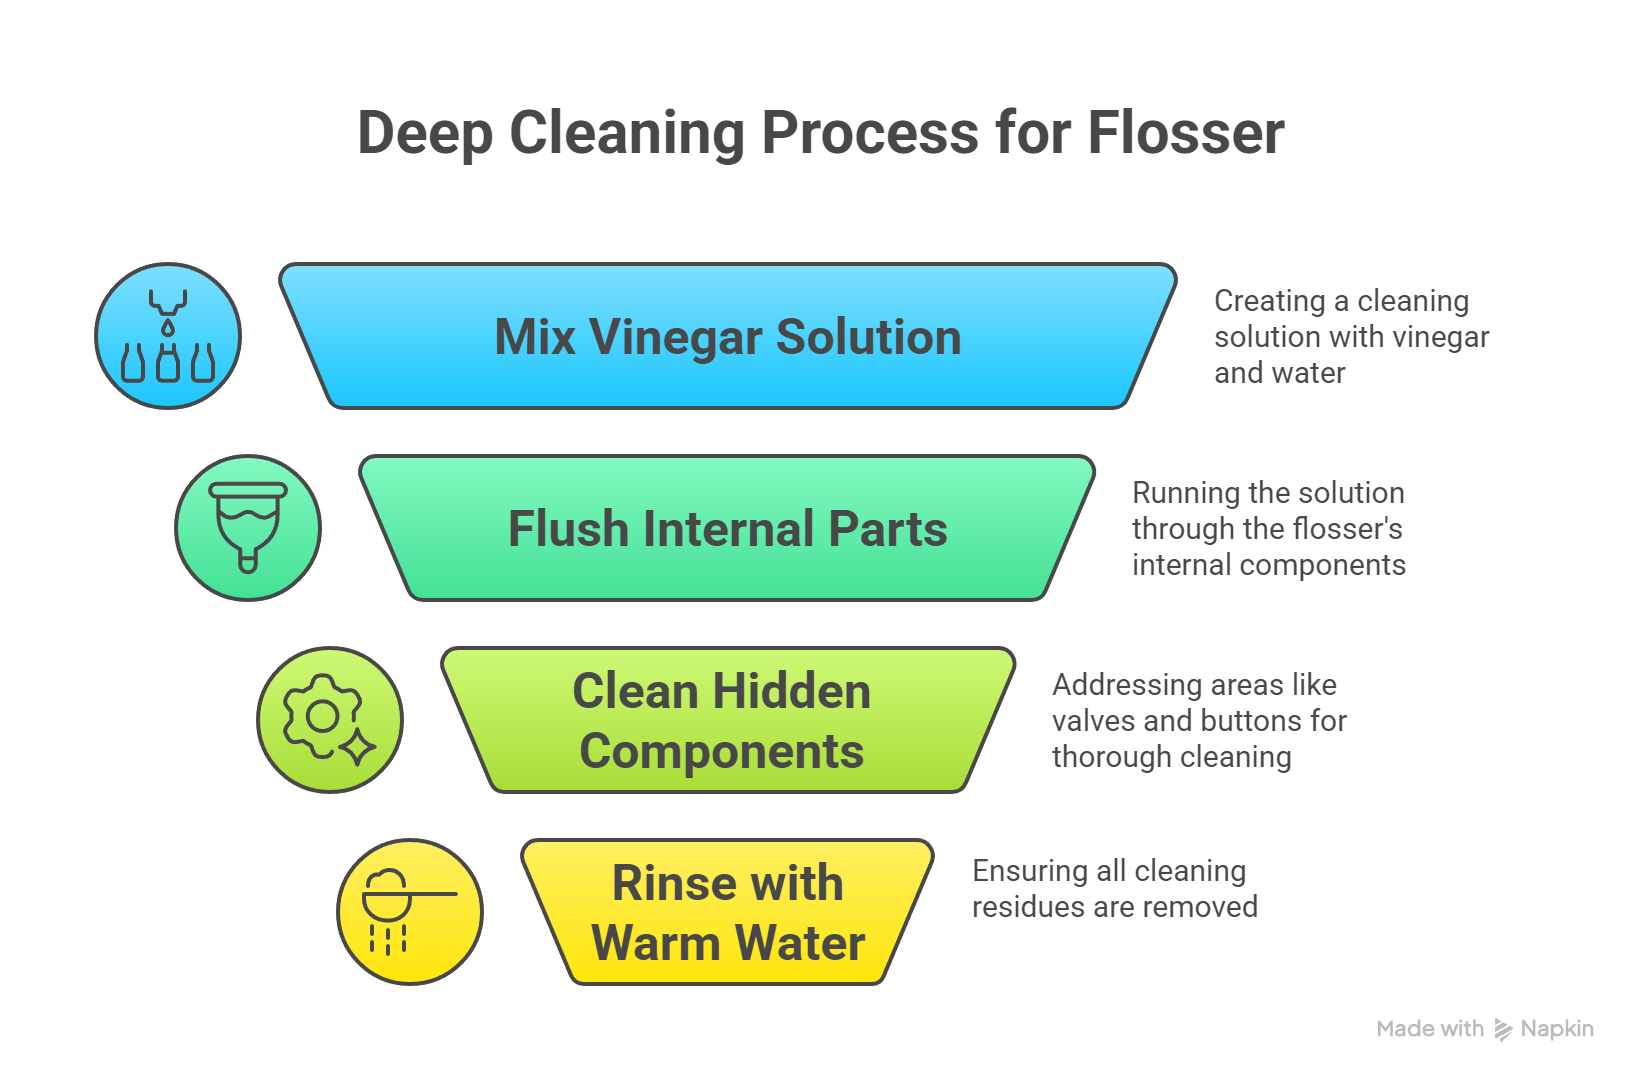
Mix Vinegar Cleaning Solution
Combine equal parts white vinegar and warm water in a bowl or cup. This natural solution dissolves mineral scale and kills 99% of bacteria, mold, and viruses. Avoid bleach or undiluted vinegar, which can damage plastic parts.
Safe alternatives include denture cleaning tablets like Polident dissolved in water once a month for additional sanitization.
Soak Nozzles and Reservoir
Remove all nozzle tips and the reservoir. Submerge them in the vinegar solution for 15 to 30 minutes. For heavy buildup, soak up to 60 minutes. Do not exceed one hour to avoid material degradation.
Scrub Nozzle Openings
After soaking, use a soft toothbrush to gently clean around the tip’s opening. Mineral deposits often cling to the nozzle edges. Rinse each tip under running water and blow through lightly to clear internal channels.
Flush Internal Tubing
Fill the reservoir with the vinegar solution and reattach it to the base. Turn on the flosser and run it for 30 to 60 seconds, letting the solution circulate through the pump and tubing. This clears internal scale and sanitizes hard-to-reach areas.
Final Water Rinse
Discard the vinegar mix, rinse all parts with fresh water, then refill the reservoir with clean water. Run the flosser again for 15 to 30 seconds to flush out any vinegar residue. This prevents acidic taste during your next use.
Air-Dry Before Reassembling
Let all components dry completely on a clean towel. Reassemble only when fully dry to avoid trapping moisture inside the device.
Use Distilled Water Daily
Prevent Mineral Buildup
Using distilled or filtered water instead of tap water significantly reduces limescale accumulation, especially in hard water areas. This simple switch can cut your deep cleaning frequency by half. Users in hard water zones report up to 60% less descaling when using distilled water.
Maintain Strong Water Pressure
Mineral deposits restrict water flow and cause sputtering. By using purified water, you preserve consistent pressure and extend the life of the pump and nozzle. If you notice reduced water pressure or spitting inconsistencies, mineral buildup is likely the cause.
Replace Nozzles Every 3-6 Months
Check for Wear and Discoloration
Inspect nozzle tips monthly. Look for cloudiness, cracks, or clogging that will not clear after cleaning. Worn tips reduce cleaning efficiency and may harbor bacteria despite regular cleaning.
Label Tips for Multiple Users
If shared among family members, label each tip by name or color code to prevent cross-contamination. Orthodontic, sensitive gum, and standard tips should be cleaned and stored separately to maintain hygiene.
Stick to Replacement Schedule
Replace all nozzles every 3 to 6 months, or sooner if damaged. This ensures optimal performance and hygiene, just like changing your toothbrush. Keeping to this schedule prevents reduced cleaning effectiveness and bacterial buildup.
Proper Storage Tips
Keep Unit Dry and Ventilated
Store the flosser in a clean, dry area. Never in a closed cabinet while still damp. Leave the reservoir detached or open to allow airflow and prevent musty odors from developing.
Avoid Humid Environments
Do not keep the device near the shower or sink edge where it can get splashed. Moisture on the base unit may lead to electrical issues or mold growth. Choose a well-ventilated countertop location instead.
Troubleshoot Common Issues
Low Water Pressure? Clean the Nozzle
If the stream is weak or uneven, mineral buildup is likely blocking the nozzle or tubing. Perform a vinegar flush immediately. Soak the tip and run the descaling cycle to restore proper flow.
Foul Smell? Deep Clean and Dry
An unpleasant odor means bacteria or mold is growing inside. Clean all parts with vinegar, flush the system, and ensure complete drying after every use. This resolves most odor issues within one cleaning cycle.
Leaking Reservoir? Check for Cracks
Inspect the reservoir for cracks or warping. If damaged, replace it. Also ensure it is fully seated on the base. Partial attachment causes leaks and reduces water pressure during use.
Pump Not Working? Check for Blockages
Turn off and unplug the device. Inspect the nozzle and tubing path for debris. Never immerse the base in water. Moisture damage voids most warranties and can cause permanent electrical issues.
Safety and Warranty Tips
Always Unplug Before Cleaning
If your Gurunanda model is electric or rechargeable, unplug it before starting any cleaning. This prevents electrical hazards and protects internal components from damage.
Never Submerge the Base
The motorized base is water-resistant but not waterproof. Wipe with a damp cloth only. Never soak or rinse it under water. This is a critical safety measure that also protects your warranty.
Follow Manual Instructions
Refer to your user manual if available. Adhering to manufacturer guidelines helps maintain warranty coverage. Keep your receipt and packaging in case service is needed.
Monthly Maintenance Checklist
Inspect Seals and Connections
Check the reservoir seal and nozzle fitting monthly. A worn gasket can cause leaks or reduce pressure. Replace if cracked or loose to maintain optimal performance.
Run Denture Tablet Flush (Optional)
Once a month, dissolve an effervescent denture tablet in warm water, fill the reservoir, and run it through the system. This adds extra sanitization and removes organic residue that vinegar may miss.
Test All Nozzle Types
If you use specialty tips like orthodontic, gum care, or plaque control tips, test each one to ensure proper fit and flow. Clean any that show reduced performance before your next use.
Cleaning Schedule Summary
| Frequency | Task |
|---|---|
| After Every Use | Empty reservoir, rinse tip, air-dry all parts |
| Weekly | Deep clean with vinegar solution (soak plus flush) |
| Monthly | Inspect seals, run denture tablet flush |
| Every 3-6 Months | Replace all nozzle tips |
| As Needed | Descale with vinegar if using tap water |
Frequently Asked Questions About Cleaning a Gurunanda Water Flosser
How often should I deep clean my Gurunanda water flosser?
You should perform a deep clean with vinegar at least once per week. If you use tap water in a hard water area, consider deep cleaning every 4 to 5 days to prevent mineral buildup.
Can I use bleach to clean my water flosser?
No, you should never use bleach or harsh chemical solvents. These can damage plastic components and leave harmful residues. White vinegar is the safest and most effective natural cleaner for water flossers.
Why does my water flosser smell bad even after cleaning?
Persistent odors indicate bacterial or mold growth inside the tubing or reservoir. Perform a thorough vinegar soak, flush the internal system, and ensure all parts are completely dry before storing. If odor persists, replace the reservoir and nozzles.
Can I use my water flosser while it still has vinegar in it?
No. Always run fresh water through the device for 15 to 30 seconds after any vinegar cleaning. This removes all acidic residue and prevents unpleasant taste during your next use.
Is it normal for water pressure to decrease over time?
Some decrease is normal as nozzles wear, but sudden pressure loss usually indicates mineral buildup. Regular deep cleaning and using distilled water prevent this issue and maintain consistent pressure.
Where is the best place to store my water flosser?
Store it in a clean, dry, well-ventilated area away from humidity. Keep the reservoir detached or open to allow airflow. Avoid enclosed cabinets while the device is still damp.
Final Thoughts on Keeping Your Gurunanda Water Flosser Clean
A clean Gurunanda water flosser works better and lasts longer. By following this simple routine of daily rinsing, weekly vinegar flushes, and using distilled water, you will prevent clogs, eliminate odors, and maintain peak oral hygiene. The key actions are emptying the reservoir after every use, deep cleaning with vinegar weekly, and replacing nozzles every 3 to 6 months.
Even without official brand instructions, these proven steps align with dental device best practices and keep your flosser safe and effective for years. Take a few minutes after each use to rinse and dry your device, and schedule a weekly deep clean into your routine. Your oral health and your device will thank you.