
If your water flosser smells bad, especially musty or mildewy, it is not just unpleasant. That odor signals bacteria, mold, or biofilm has built up inside the device. Left untreated, this contamination can undermine your oral hygiene instead of supporting it. The good news is that a smelly water flosser is almost always fixable, and it is completely preventable with the right habits.
In this guide, you will learn exactly how to diagnose, eliminate, and prevent bad smells in your water flosser. From daily drying routines to deep cleaning with vinegar, peroxide, and denture tablets, we will cover every step you need to keep your device fresh and effective.
Identify Where the Smell Comes From
Before you start cleaning, figure out whether the odor originates from your device or your mouth. This saves time and points you to the right solution.
Device Smell vs. Oral Cavity Smell
The smell comes from your device if you notice it as soon as you turn on the flosser, even before the water touches your mouth. Check the reservoir, hose, and nozzle for visible slime or discoloration.
The smell is localized to your mouth if it appears only when aiming the water stream at one specific tooth or dental implant. Even without pain, bleeding, or swelling, this could indicate subsurface bacteria trapped around a crown or implant abutment.
Pro Tip: Swap in a brand-new clean tip and run distilled water through the system. If the smell persists at the same tooth or implant location, see a dentist. The issue may be peri-implantitis or microleakage, not your flosser.
Clean the Reservoir After Every Use
A dirty reservoir is the number one cause of bad smells in water flossers. Moisture left behind becomes a breeding ground for microorganisms.
Empty and Dry the Reservoir Completely
Pour out all water from the reservoir immediately after flossing. Tilt the reservoir and shake it upside-down to remove trapped water from the base and corners. Leave the reservoir off or the lid slightly open to allow air circulation during storage. Never store water inside the reservoir, even overnight.
Warning: Standing water left for 24 hours creates ideal conditions for biofilm formation.
Wash the Reservoir Weekly
Hand-wash the reservoir with warm, soapy water and use a bottle brush to reach the bottom interior and connection port where mold hides. If your model is dishwasher-safe, place the reservoir on the top rack only and disable the heated dry cycle to prevent warping.
Flush the Internal System Monthly
Biofilm builds up inside hoses and pumps. You cannot see it, but you can definitely smell it. Regular flushing breaks down this buildup.
Vinegar Flush Procedure
Mix one part white vinegar with two parts warm water. Fill the reservoir with this solution and run half of it through the system into the sink. Turn off the device and let the remaining solution soak for 30 to 45 minutes. This soaking time is critical for breaking down sticky biofilm. Finish by running the remainder, then flush with two full reservoirs of clean water.
Hydrogen Peroxide Flush Procedure
For mold-heavy situations, use three percent hydrogen peroxide diluted with an equal amount of water. Follow the same process as the vinegar flush: run half, soak 30 to 45 minutes, flush remainder, then rinse twice with clean water. Hydrogen peroxide is particularly effective against anaerobic bacteria and mold spores.
Why soak? Skipping this step only provides a temporary fix. The soaking time is what actually breaks down the biofilm.
Deep Clean the Nozzles and Tips

Nozzles and tips accumulate bacteria with every use. They need regular attention to stay hygienic.
Soak and Scrub Nozzles Regularly
Remove all tips from the device. Soak them in undiluted white vinegar or three percent hydrogen peroxide for 15 to 30 minutes. Use a cotton swab or small brush to gently scrub the nozzle opening. Rinse thoroughly under warm water before reattaching.
Replace Tips Every Three to Six Months
Even if tips look intact, replace them every six months. Worn plastic traps bacteria and loses cleaning effectiveness. If multiple people use the same device, use color-coded tips to prevent cross-contamination between users.
Clean the Black Check Valve
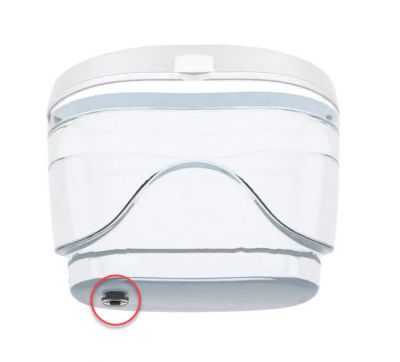
On Waterpik and similar models, a small black rubber valve at the reservoir base traps water and debris. This is a major hidden source of odor.
Remove and Wash the Valve Monthly
Push the black valve out from underneath using a pen tip or toothpick. Soak it in vinegar or peroxide for 10 minutes. Scrub gently with a soft brush, rinse thoroughly, and reinsert the valve into its housing.
Visual cue: If the valve looks discolored or slimy, that is likely your primary smell source.
Run an Air Flush After Every Use
This single habit prevents up to ninety percent of odor problems in water flossers.
Dry the Hose and Pump
After emptying the reservoir, press the power button for 5 to 10 seconds with no water in the reservoir. This forces air through the internal system, blowing out residual moisture from the hose and pump. Perform this step every single time you use the device.
User experience: “I did not know about air-flushing. After starting this habit, my flosser stays fresh for months.”
Use Denture Tablets for Stubborn Odors
When regular cleaning does not eliminate the smell, try this deeper method.
Overnight Soak Process
Drop one effervescent denture cleaning tablet into a full reservoir of warm water. Let it dissolve completely. Submerge the entire unit, assembled, and soak overnight for 8 to 12 hours. The next day, flush all the solution through the system, then rinse with two full reservoirs of clean water.
Why it works: The effervescent action penetrates biofilm in narrow tubing that vinegar cannot reach. Users report this method kills odors that other solutions cannot touch.
Prevent Mineral Buildup From Hard Water
Hard water accelerates gunk buildup, which leads to stronger smells faster.
Use Distilled or Filtered Water
Fill your reservoir with distilled or filtered water, especially if your tap water is hard. This prevents limescale deposits that trap bacteria and reduce water flow. Using distilled water also extends the life of your device.
Descale the System Quarterly
Run undiluted white vinegar through the system every three months. Let it soak for 30 minutes, then rinse thoroughly with three or more full water cycles. Alternatively, use a citric acid solution (one tablespoon per cup of warm water) as a gentler descaling option.
Inspect the Hose and Handle
Hidden gunk accumulates in dark, damp hoses, especially in countertop models.
Check for Black Gunk
Remove the handle and inspect the internal hose if visible. Shine a flashlight inside and look for slime, discoloration, or particles. Soak the handle in a two-to-one water-to-vinegar solution for 5 to 7 minutes, then rinse thoroughly.
Replace If Necessary
Cracked, cloudy, or brittle hoses cannot be fully sanitized. If cleaning does not resolve the smell, the internal components may be contaminated beyond repair. In this case, replacing the unit is safer and more cost-effective than continuing to use a contaminated device.
Store Your Water Flosser Properly
Where and how you store the device matters more than most people realize.
Keep It Dry and Ventilated
Store your water flosser in a dry area, not a humid bathroom cabinet. Leave the reservoir off or the lid open to promote airflow. Avoid enclosing the device in cabinets or drawers where moisture lingers.
Mistake to avoid: Storing the device immediately after use without drying it first. Moisture stays trapped inside for days, creating the perfect environment for mold.
When the Smell Is Not From the Device
Sometimes the odor originates in your mouth, not the flosser.
Localized Smell at One Implant or Tooth
If you notice a rotten or musty smell only when directing the water stream at one specific implant or tooth, the problem may be under the crown or around the abutment. Even with clean X-rays and no visible inflammation, anaerobic bacteria can thrive in tiny gaps.
See a Dental Specialist
Consult a periodontist or prosthodontist if the smell persists despite thorough device cleaning. Ask about CBCT scans for three-dimensional imaging of the implant site. Consider microbial testing if the issue continues. In some cases, bacteria hiding beneath the abutment require professional intervention.
Follow a Preventive Maintenance Schedule
Consistent care prevents odors before they start.
| Task | Frequency | Key Benefit |
|---|---|---|
| Empty reservoir and air flush | After every use | Prevents moisture buildup |
| Wipe exterior | After every use | Stops surface contamination |
| Internal vinegar or peroxide flush | Every 1 to 3 months | Kills biofilm |
| Clean reservoir and valve | Every 1 to 3 months | Removes hidden mold |
| Denture tablet soak | Every 3 to 6 months | Deep sanitizes tubing |
| Replace all tips | Every 3 to 6 months | Eliminates bacterial reservoirs |
| Full system inspection | Quarterly | Catches issues early |
Avoid Harmful Cleaning Agents
Some cleaners damage your device and can make odors worse.
Never Use These
Avoid undiluted bleach, which degrades seals and O-rings. Do not use essential oils, which leave residue and may harm plastic. Skip abrasive scrubbers that scratch surfaces and create more places for biofilm to attach. Avoid undiluted alcohol, which dries out rubber parts and causes cracking.
Safe Alternatives
Stick with white vinegar (five percent), three percent hydrogen peroxide, citric acid, or denture tablets. Always dilute as directed and rinse thoroughly after cleaning.
Upgrade to a More Hygienic Model
Some water flosser designs resist odor better than others.
Features to Look For
Choose a model with a removable, dishwasher-safe reservoir for easy cleaning. Look for built-in air-flush modes that dry the system automatically. Select models with smooth internal tubing that resists biofilm. Prioritize devices with easy-to-remove valves and hoses for maintenance access.
Pro tip: Countertop models with long hoses require more maintenance than cordless units. Factor this into your purchase decision.
Replace the Unit If Necessary
If you have deep cleaned multiple times, replaced all tips, used vinegar, peroxide, and denture tablets, and still experience bad smells, the internal pump or motor housing may be contaminated. At that point, replacement is the safer and more cost-effective choice.
Key Takeaways for Fixing a Smelly Water Flosser
A water flosser smells bad because moisture plus time equals microbial growth. However, you can stop it with consistent habits.
Do this now to eliminate existing odors. Empty the reservoir and air-flush after every single use. Run a vinegar or peroxide flush with a 30-minute soak. Clean the black check valve and all nozzles. Replace tips older than six months.
Do this to prevent future smells. Use distilled water in hard water areas. Soak with a denture tablet every few months. Store the device open and dry. Replace tips every six months.
And if the smell appears only at one tooth or implant, do not ignore it. See a dental specialist, as it could indicate a hidden infection requiring professional care.
Bottom line: Your water flosser should freshen your breath, not ruin it. With consistent care and proper maintenance, it will.
Frequently Asked Questions About Water Flosser Smells
Why does my water flosser smell musty even after cleaning?
The musty smell usually comes from biofilm buildup inside the hoses, pump, or valve. Regular rinsing does not reach these areas. You need to perform a vinegar or peroxide flush with a 30-minute soak to break down the biofilm. The black check valve in Waterpik models is a common culprit.
How often should I deep clean my water flosser?
Perform an internal flush with vinegar or peroxide every one to three months. If you have hard water or use the device daily, clean monthly. Use a denture tablet soak every three to six months for deeper sanitization.
Can I use bleach to clean my water flosser?
No. Undiluted bleach degrades seals and O-rings, causing damage. It also leaves residue that can be harmful if ingested. Stick with white vinegar, hydrogen peroxide, or denture tablets for safe and effective cleaning.
Why does my water flosser only smell at one tooth?
If the odor appears only when aiming at one specific tooth or implant, the problem may be in your mouth, not the device. This could indicate microleakage around a crown or biofilm around an implant abutment. See a periodontist or prosthodontist for evaluation.
How long do water flosser tips last?
Replace all nozzles and tips every three to six months, even if they appear undamaged. Worn plastic harbors bacteria and loses cleaning effectiveness. Color-code tips for multiple users to prevent cross-contamination.
Does hard water cause bad smells in water flossers?
Yes. Hard water leaves mineral deposits that create rough surfaces where bacteria and biofilm attach. These deposits trap moisture and cause odors to develop faster. Use distilled water and descale regularly to prevent this issue.