
Running out of power mid-floss is frustrating, and many Oracura OC400 owners struggle with charging issues or simply don’t know the correct method. The good news: charging your Oracura water flosser is quick, safe, and simple when you follow the right steps. This guide walks you through exactly how to charge the Oracura OC400 water flosser, how to tell when it’s fully charged, and how to avoid common mistakes that could damage your device. You’ll also learn maintenance tips to extend battery life and keep your flosser working like new.
Charging the Oracura OC400 Water Flosser
Prepare the Charging Port
Before plugging in, always check the charging port for moisture. Remove the rubber cover from the charging point and inspect the socket carefully. If you see any water or residue, dry it completely with a soft cloth. Charging while the port is wet can damage the internal circuitry or reduce charging efficiency. Only proceed when the port is clean and dry.
Connect the USB Cable
Insert the USB charging cable firmly into the flosser’s charging socket. Then plug the other end into a standard USB power source like a wall adapter, computer port, or power bank. Make sure the connection is snug. A loose connection may prevent charging or cause the CH indicator to blink irregularly.
Monitor the Charging Indicator
Once connected, the CH light will begin blinking, signaling that charging has started. This blinking light means the battery is actively charging. Do not use the flosser during this time. A full charge takes approximately 5 hours. When charging is complete, the CH indicator turns off automatically. This is your signal that the flosser is ready to use.
Protect the Port After Charging
After unplugging, always replace the rubber cover over the charging port. This seal prevents water, dust, and debris from entering the socket during use or storage. Keeping the port covered extends the life of your device and maintains its waterproof integrity.
Installing and Removing Jet Tips Safely

Attach the Nozzle Correctly
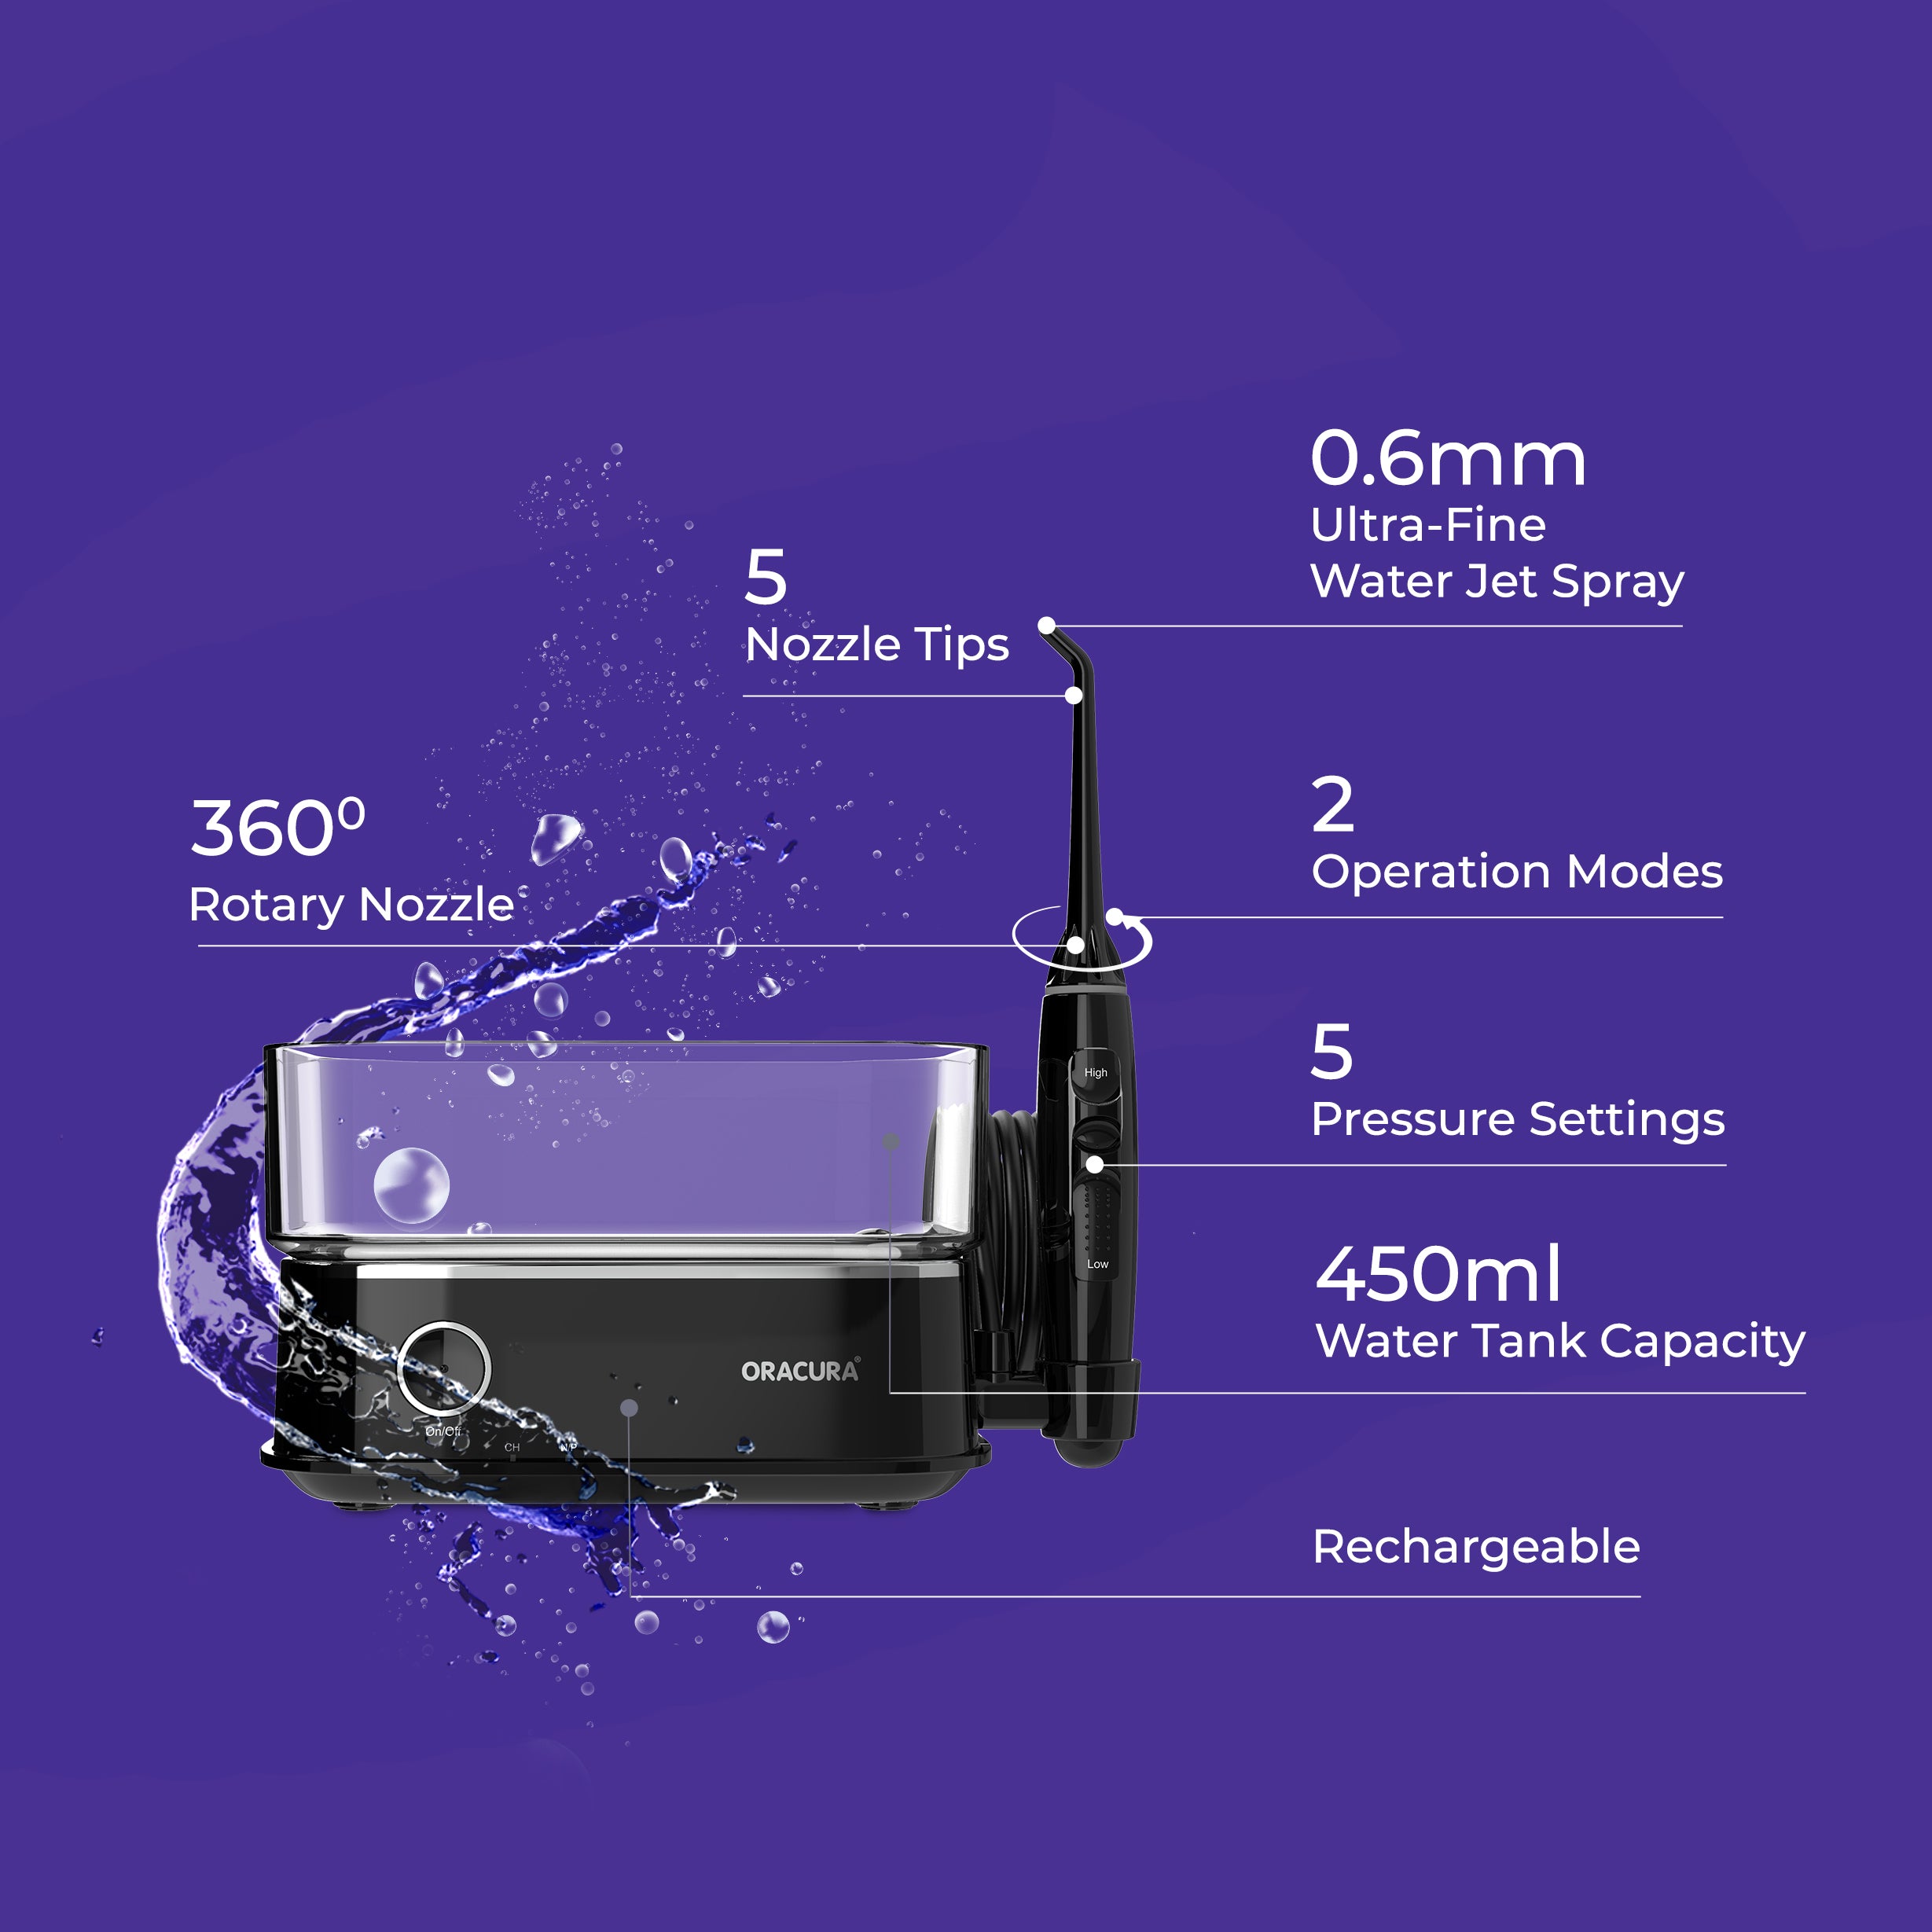
Grab the standard nozzle from the tip storage. Align it with the holder on the handle and press it in until you hear a distinct click. This sound confirms the tip is locked in place and ready for use. Ensure the nozzle is straight and secure. Misalignment can cause leaks or reduced pressure during flossing.
Remove Tips Without Damage
To remove the tip, press the tip button first, then pull the nozzle out gently. Never press the button while the device is running. This can eject the tip forcefully and damage the mechanism. After removal, store the tip in the designated compartment to keep it clean and protected.
Warning: Operating the flosser with the tip button pressed can cause injury or equipment failure. Always release the button before turning on the device.
Troubleshooting Charging Issues
No Light When Plugged In
If the CH indicator does not blink after connecting, check these three things. First, verify the charging port is dry and clean. Second, confirm the USB cable is fully inserted. Third, test if the power source is working by trying a different outlet or cable. A dead indicator light could mean a drained battery, faulty cable, or damaged port. Try a different USB cable or adapter before assuming the flosser is broken.
Blinking Light After Full Charge
If the CH light keeps blinking even after 5 hours or more, unplug and wait 30 seconds before reconnecting. Sometimes the system needs a reset. If blinking continues, the battery may be failing and require professional service.
Charging Takes Too Long
If charging exceeds 5 hours regularly, use only the original USB cable. Avoid low-power sources like laptops and use a wall adapter instead. Ensure the port is not corroded or dirty. Over time, battery performance degrades. If charging time increases significantly, consider battery replacement or contacting Oracura support.
Maximize Battery Life
Avoid Overcharging
While the Oracura OC400 stops charging when full, it is best not to leave it plugged in for days. Unplug after 5 to 6 hours to reduce battery strain and heat buildup.
Charge Before Fully Drained
Do not wait until the flosser dies completely. Recharge when you notice reduced performance or a weak stream. Regular top-ups help maintain battery health and extend its lifespan.
Store With Partial Charge
If storing for weeks, charge the flosser to about 50 percent first. A fully drained or overcharged battery stored long-term can lose capacity or fail prematurely.
What You Need to Charge Your Oracura
Required Charging Tools
To charge your Oracura water flosser properly, you will need a few essential items. The USB charging cable comes included with your device. You will also need a USB power source such as a wall adapter rated 5V/1A, a computer port, or a power bank. Finally, keep a soft dry cloth handy for drying the port if needed.
Note: Do not use fast-charging adapters or high-voltage sources. They may damage the flosser’s internal battery.
Frequently Asked Questions About Charging Oracura Water Flosser
How long does the Oracura OC400 battery last?
On a full charge, the battery typically lasts 7 to 10 days with regular twice-daily use. Actual performance depends on usage frequency and water pressure settings.
Can I use the flosser while it is charging?
No. The Oracura OC400 cannot be used while charging. Always disconnect and replace the rubber cover before use.
Is the charging port waterproof?
The port is water-resistant when sealed with the rubber cover. However, it is not waterproof during charging. Never expose the open port to water.
What does the CH light mean?
When the CH light is blinking, charging is in progress. When the CH light is off, the device is fully charged or not connected. If the light blinks during use, recharge immediately.
How long does full charging take?
Full recharging takes approximately 5 hours for the Oracura OC400.
What should I do if the charging port gets wet?
Dry the port completely with a soft cloth before charging. Moisture in the charging port is the number one cause of charging failure.
Safety and Maintenance Tips
Keep It Dry Before Charging
Moisture in the charging port is the leading cause of charging failure. Always dry the device thoroughly after use, especially around the base. Never charge immediately after flossing. Wait at least 10 to 15 minutes before connecting the charger.
Use Genuine Accessories
Stick to the original cable and nozzle tips. Third-party chargers may not regulate power properly and can overheat the battery or void the warranty.
Clean Nozzles Regularly
Rinse jet tips after each use and soak them in vinegar weekly to prevent clogs. Clogged tips force the motor to work harder, draining the battery faster.
Final Charging Checklist
Before you start charging your Oracura water flosser, run through this quick checklist. Remove the rubber cover from the charging port. Dry the charging port completely using a soft cloth. Insert the USB cable securely into the flosser. Plug the cable into a working power source. Confirm the CH light is blinking. Wait 5 hours for a full charge. Unplug and replace the rubber cover after charging is complete.
Key Takeaways for Charging Your Oracura Water Flosser
Charging your Oracura OC400 water flosser correctly ensures peak performance and long-term reliability. By following these steps, drying the port before charging, using the right cable, monitoring the indicator light, and protecting the charging point, you will avoid common issues and keep your oral care routine uninterrupted. For best results, recharge every 7 to 10 days and always store the device with the port covered. If you encounter persistent charging problems, try a different cable or adapter before contacting Oracura support for professional assistance.