
Putting together your Waterpik water flosser is quick, straightforward, and essential for effective daily use. Whether you’ve just unboxed a Waterpik Ultra WP-100, Aquarius™, Evolution, or another countertop corded model, the assembly process is nearly identical across devices. This guide walks you through each step with precision so you can start flossing confidently and safely. You’ll learn how to attach the reservoir, install cleaning tips, fill and prime the system, and avoid common setup mistakes. By the end, you’ll be ready to use your device like a pro.
Attach Reservoir to Base Unit
The first physical step in assembling your Waterpik is securing the water tank to the motor base. This creates the main structure of the device and ensures proper water delivery throughout use.
Align and Press Until It Clicks
Hold the reservoir by its handle and align it with the rear mounting slot on the base unit. Gently slide it downward, applying firm pressure until you hear a distinct click. This indicates the reservoir is locked into place and forms a watertight seal.
Pro Tip: If the reservoir wobbles or leaks later, remove it and reseat it with more force. A loose fit is the most common cause of leaks during operation.
Check for Stability
Once attached, give the reservoir a slight wiggle to confirm it is secure. The base should sit flat on a level, stable surface near your sink and an electrical outlet. Avoid placing it near sink edges to prevent accidental tipping, especially when full.
Fill Reservoir with Water
With the reservoir attached, it is time to fill it. Proper filling prevents overflow, ensures smooth operation, and protects internal components from damage.
Use Lukewarm Water Up to Max Line
Remove the fliptop lid or cap and pour in lukewarm water up to the MAX fill line (approximately 600 mL or 19 oz). Never exceed this mark because overfilling causes water to spill out when the unit pressurizes.
Warning: Do not use hot water because it can warp seals and damage internal tubing. Cold water may cause sensitivity in users with tooth or gum discomfort.
Add Mouthwash (Optional)
For enhanced cleaning and breath freshness, mix antiseptic mouthwash with water in a 1:1 ratio. Only use solutions recommended by Waterpik, and never use undiluted essential oils, alcohol-based rinses, or abrasive cleaners.
Note: Using unapproved liquids voids the warranty and may lead to clogs or bacterial buildup in the internal system.
Install a Cleaning Tip
Your Waterpik comes with multiple interchangeable tips. Installing one is simple but critical for maintaining hygiene and achieving optimal performance.
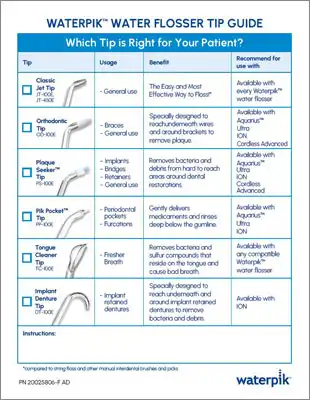
Choose the Right Tip for First Use
Start with the Classic Jet Tip (standard nozzle) unless you have braces, implants, or sensitive gums. Other included tips serve specific purposes:
• Orthodontic Tip for braces and retainers
• Plaque Seeker Tip for crowns and implants
• Pick Pocket Tip for deep gum pockets
• Tongue Cleaner Tip for bad breath
• Toothbrush Attachment for dual cleaning function
Push Until It Clicks Securely
Insert the base of the tip into the nozzle on the wand handle. Press firmly until you hear a click, confirming a tight seal. A loose connection can cause leaks, reduced pressure, or accidental detachment during use.
Visual Cue: The tip should sit straight and flush with the wand with no wobbling or gaps visible.
Plug In and Power On
Now that the device is assembled, it is time to connect power and prepare for first-time use.
Connect Power Cord to Outlet
Attach the power cord to the base unit and plug it into a standard 120V outlet. Route the cord away from water sources and sink edges to prevent tripping hazards or electrical issues.
Note: Corded models operate only when plugged in. There is no battery backup for these countertop units.
Confirm Power Readiness
Press the on/off button located on the base or wand (depending on your model). Some units emit a soft beep or light indicator when powered. If nothing happens, check the outlet with another device to rule out power issues.
Prime the System Before First Use
Priming removes air from internal tubing. This step is essential for smooth, consistent water flow. Skip it, and your flosser may sputter or deliver uneven pressure during use.
Set Pressure to Maximum
Turn the rotary dial to 10 (maximum setting). This forces water through the system quickly, clearing any trapped air in the internal tubes.
Point Tip Into Sink and Activate
Hold the wand so the tip is aimed into the sink or a cup, never toward your face. Press the on/off button and let water run for 10 to 15 seconds.
Look For: A steady, bubble-free stream. When the flow becomes smooth and continuous, turn the unit off.
Lower Pressure for Actual Use
After priming, reduce the dial to setting 2 to 3, which is ideal for beginners or sensitive gums. You can gradually increase to settings 6 to 8 as you become accustomed to the sensation.
Why Prime? Air pockets disrupt water flow and reduce cleaning effectiveness. Re-prime if the reservoir runs dry or after long periods of storage.
Daily Use Setup Checklist
Once assembled, daily use requires minimal setup. Consistency ensures optimal hygiene and performance over time.
Quick Morning Routine
- Fill reservoir (empty from previous use)
- Attach preferred tip (e.g., Orthodontic for braces)
- Plug in and power on
- Start at low pressure, then adjust as needed
Time Estimate: Full setup takes under 60 seconds with practice.
Storage Between Uses
Leave the unit assembled with an empty reservoir. Store upright in a dry area. Never leave water sitting inside for more than 24 hours because this encourages mold and mineral buildup.
Troubleshoot Common Assembly Issues

Even with correct steps, minor problems can arise. Here is how to fix them fast.
Reservoir Will Not Click Into Place
Cause: Misalignment or debris in the slot
Fix: Remove the reservoir, inspect the connection point, wipe clean, and reattach with firm, even pressure.
Tip Will Not Stay Attached
Cause: Damaged eject mechanism or worn tip
Fix: Try a different tip. If the problem persists, contact Waterpik support because internal wear may require servicing.
Water Leaks From Base
Cause: Loose reservoir or cracked seal
Fix: Reseat the reservoir firmly. If leaking continues, discontinue use and check warranty eligibility.
No Water Flow After Assembly
Cause: Airlock, clog, or unprimed system
Fix: Re-prime at max pressure. Clean the tip under running water. Check that the reservoir is fully seated on the base.
Maintain and Clean After Assembly

Assembly is not complete without a plan for ongoing care. Daily and weekly maintenance keeps your Waterpik hygienic and efficient.
Rinse Components Daily
After each use, perform these steps:
• Empty and rinse the reservoir and lid
• Rinse the wand and tip under tap water
• Wipe the base unit with a damp cloth (never submerge)
Store Tips Properly
Place used tips in the integrated storage compartment (usually in the lid or base). Let them air-dry upright to prevent bacterial growth.
Deep Clean Weekly
Disassemble all parts and soak in a 1:1 white vinegar and water solution for 15 to 30 minutes. This dissolves mineral deposits and kills bacteria. Rinse thoroughly afterward with clean water.
Descale Monthly
In hard water areas, run a vinegar-water cycle once a month. Fill the reservoir with 1:1 vinegar solution, prime and run for 30 seconds, then flush with two full cycles of plain water.
Consequence of Neglect: Clogs, weak pressure, mold growth, and shortened device life.
Frequently Asked Questions About Assembling a Waterpik Water Flosser
How do I attach the water reservoir to my Waterpik base?
Hold the reservoir by its handle and align it with the rear mounting slot on the base unit. Press down firmly until you hear a distinct click, which confirms a secure, watertight seal.
What water temperature should I use when filling my Waterpik?
Use lukewarm water only. Hot water can damage internal seals and tubing, while cold water may cause discomfort for users with sensitive teeth or gums.
Do I need to prime my Waterpik before first use?
Yes, priming is essential. Set pressure to maximum (10), point the tip into the sink, and run water for 10 to 15 seconds until the flow is steady and bubble-free.
How often should I replace the cleaning tips?
Replace tips every 3 to 6 months or sooner if they become cracked, discolored, or no longer click securely into the wand.
Can I add mouthwash to my Waterpik reservoir?
Yes, but only in a 1:1 ratio with water. Use only Waterpik-approved solutions. Never use undiluted essential oils, alcohol-based rinses, or abrasive cleaners.
Why is my Waterpik leaking from the base?
A leak usually means the reservoir is not seated properly. Remove it and reattach with firm pressure. If leaking persists, check for damaged seals and contact customer support.
Key Takeaways for Assembling Your Waterpik Water Flosser
Assembling your Waterpik water flosser correctly sets the foundation for superior oral health. From attaching the reservoir to priming the system, each step ensures reliable, bubble-free performance during use. The process takes less than five minutes for first-time setup and under one minute for daily reassembly.
With daily use and proper maintenance, your device will last for years while delivering up to 50% better gum health than string floss. Keep tips replaced every 3 to 6 months, clean regularly with vinegar solutions to prevent mineral buildup, and consult your dentist for personalized pressure settings. Now that it is assembled and ready, your Waterpik is more than a tool. It is a long-term investment in a healthier smile.