
Your Waterpik cordless water flosser has stopped holding a charge. The motor won’t start. You’ve tried different outlets and chargers with no luck. Before you spend $70 or more on a replacement, know that many Waterpik models like the WP-450 and WP-462W have user-replaceable batteries. With the right tools, you can restore your flosser to full function for under $25.
This guide shows you exactly how to change the battery in a Waterpik water flosser step by step. You’ll learn which models support battery replacement, how to safely desolder and reconnect wires, and what to watch for during reassembly. Whether you’re upgrading to a higher-capacity NiMH pack or replacing a failing Li-ion cell, this walkthrough covers everything you need.
Confirm Your Model Supports Replacement
Battery replacement is only possible on select cordless models with accessible internals. Not all Waterpik flossers are created equal, and attempting to open sealed units will void your warranty and potentially damage the device beyond repair.
Check for Repairable Models
Look for your model number on the bottom of the unit or behind the water reservoir. These models are confirmed repairable:
- WP-450 Cordless Select
- WP-462W
- WP-560 Cordless Advanced
- Compatible variants including WP-440, WP-450A/C/E/EU/UK, WP-455, and WP-460 through WP-470
Avoid sealed models like the Cordless Express (also labeled WP-450) which has a non-replaceable battery. The WP-563W requires advanced soldering skills and is not recommended for beginners.
Identify Battery Type
Open your model’s label or teardown guide to confirm chemistry before ordering parts. Using the wrong battery type can damage your flosser permanently.
- NiMH (2.4V): Found in WP-450 and WP-462W models. Safer to work with and common in older units.
- Li-ion (3.7V): Found in WP-560 models. Higher energy density but risk of fire if mishandled during soldering.
Gather Required Tools and Parts
Battery replacement requires precision tools and replacement components. This is not a plug-and-play repair, so gather everything before starting.
Essential Repair Tools
You will need these tools for the repair:
- Phillips screwdriver (size #1 or #2) for removing 6 screws total
- Large flat-blade screwdriver for prying out nozzle holder
- Plastic spudger or razor blade for opening seams without cracking plastic
- Temperature-controlled soldering iron (18 to 25W)
- Desoldering pump or braid for cleaning old solder joints
- Flux and lead-free solder for strong, clean connections
- Wire cutters and strippers if modifying jumper wires
Replacement Components
Order these components before starting your repair:
- New battery pack (NiMH 2.4V at 1300 to 2000mAh for older models, or Li-ion 3.7V at 1200 to 1500mAh for WP-560)
- Heat-resistant tape for insulating solder points
- Double-sided tape for temporarily securing battery
- Vinegar and cotton swabs for cleaning corrosion from contacts
Pro tip: Take photos at every step using your smartphone. This helps track wire routing and button placement during reassembly.
Prepare the Flosser for Disassembly
Skipping preparation can lead to water damage or lost parts. Follow these steps carefully before opening your device.
Power Down and Drain
Complete these steps before disassembly:
- Turn off the device completely.
- Remove and empty the water reservoir.
- Detach the nozzle or tip from the top.
- Let the unit dry for 24 hours to prevent short circuits during disassembly.
Never open a wet flosser. Moisture near electronics can cause permanent damage to the motor and circuit board.
Document Internal Layout
Before unscrewing anything, take clear photos of the back panel, nozzle holder, and charging port. Label wires if needed, for example marking red as positive. Note the position of the blue nozzle release button since it detaches easily during removal. This visual reference prevents costly mistakes during reassembly.
Remove Water Reservoir and Nozzle Holder
Access begins with two removable external components. Work slowly to avoid cracking the plastic housing.
Slide Off the Reservoir
Press the release clip underneath the reservoir. Gently slide the reservoir downward and off the base. Set it aside safely in a clean location.
Pry Out the Nozzle Holder
Place cardboard over the top of the device to protect the finish from scratches. Insert a large flat-blade screwdriver into the seam around the holder. Apply even pressure to pop it out, as it may release suddenly.
Watch for the blue nozzle release button inside the housing. It often falls out when the holder is removed. Set it aside in a safe place where it won’t get lost.
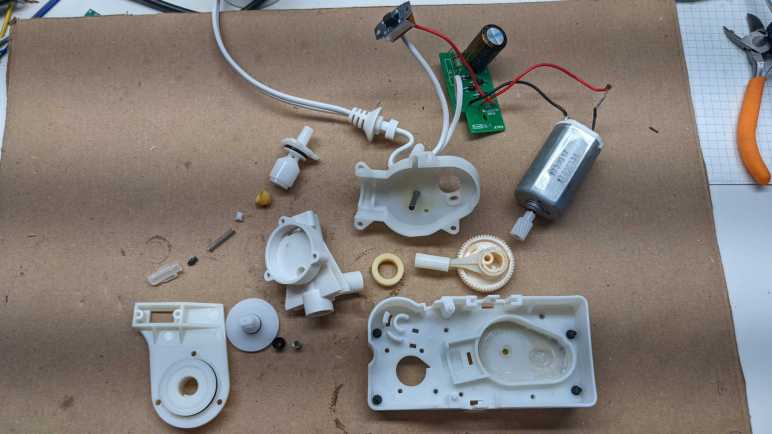
Open the Back Cover and Access Internals
Now you will expose the core assembly containing the motor, pump, and battery. This section requires careful handling of small components.
Unscrew the Rear Panel
Use a Phillips screwdriver to remove four screws from the back cover. Gently lift the panel and unhook it from the housing. Set the cover aside carefully.
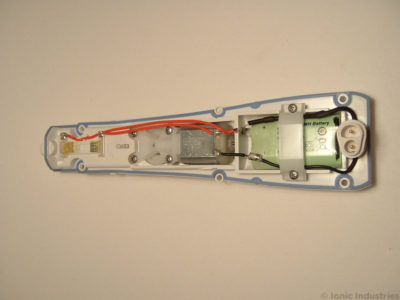
Remove the Inner Plate
Locate the two self-tapping screws securing the black inner plate. Remove them carefully using the Phillips driver. Begin prying up the plate using a plastic spudger. Check that the charging socket is attached to the plate and not stuck to the front casing.
Twist slightly counterclockwise as you lift to disengage the nozzle release mechanism. Forcing it can break internal tabs and render your flosser unusable.
Locate and Remove the Old Battery
With the inner plate flipped over, the battery compartment is now visible. This is the critical phase where mistakes can damage your device.
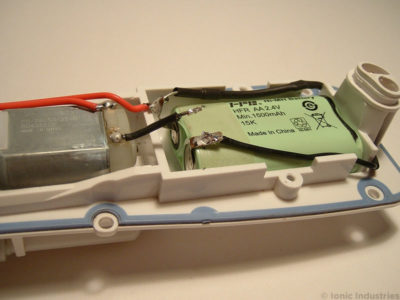
Find the Battery Pack
The battery sits at the bottom of the housing, often with a gap above it. It connects via soldered wires with red for positive and black for negative. Some models include a black-sleeved diode on the positive terminal for reverse-polarity protection during charging.
Remove the Retaining Clamp
Unscrew or unclip the plastic clamp holding the battery in place. Note how wires pass through cutouts in the clamp, as you will need to route them the same way later.
Desolder the Connections
Use a desoldering pump or braid to clean each joint. Work in this order:
- Black motor wire from negative terminal
- Wire from charging socket to negative terminal
- Two wires from positive terminal including the diode if present
Work quickly since prolonged heat can damage NiMH cells or ignite Li-ion batteries. Alternatively, cut the wires near the battery for easier removal, then strip and tin the ends before soldering to the new pack.
Install the New Battery Pack
Now comes the critical phase of connecting the replacement. Accuracy here determines whether your flosser works again or becomes scrap.
Match Battery Orientation
Place the new battery in the same position as the original. Red wire goes to positive and black to negative. Reversed polarity can destroy the motor permanently.
Adjust for Terminal Mismatch
Some replacement packs have reversed terminal locations. Fix this by folding solder tags outward, flipping the battery over, bending tags up and slightly back, then trimming to match original length.
Test fit before soldering. Ensure wires reach and the battery sits low enough for the plate to close properly.
Solder New Connections
Follow this connection sequence:
- Tin the new battery’s solder tags first.
- Attach motor red wire to positive terminal.
- Attach motor black wire to negative terminal.
- Connect charging wires to correct polarity.
- Attach diode to positive terminal if used.
Avoid melting insulation by keeping iron contact under three seconds per joint.
Insulate and Secure
Wrap heat-resistant tape around all solder points. Use double-sided tape to hold the battery in place if needed. Reinstall the retaining clamp, routing wires through the original cutouts.
Reassemble the Flosser Carefully
One misaligned part can prevent the motor from running or the nozzle from releasing properly. Take your time during this phase.
Reinsert the Blue Button
Place the blue nozzle release button into its slot. Temporarily tape it in place to prevent loss during the rest of reassembly.
Reattach the Inner Plate
Hook the left side behind the screw towers first. Align the right side and press down. Ensure the speed selector switch engages the internal lever. Verify the nozzle release mechanism clicks into the blue button.
Test before screwing. Hold the plate in place and power on briefly. The motor should run if the battery is charged and connections are correct.
Reinstall Screws
Insert the two self-tapping screws for the inner plate. Turn half a turn counterclockwise until they click into the threads to prevent cross-threading. Replace the four back cover screws.
Snap On Nozzle Holder
Align the holder and press it into place until it clicks. Reattach the water reservoir.
Test and Charge the Refurbished Flosser
Final validation ensures your repair was successful. Follow these steps before using your flosser normally.
Power and Function Test
Turn on the device and cycle through all pressure settings. Check for strong water flow and consistent motor sound. Confirm the nozzle releases properly.
If it does not power on, check solder connections for cold joints. Verify polarity since reversed connections are a common failure point. Test battery voltage with a multimeter (2.4V for NiMH, 3.7V for Li-ion).
Follow Correct Charging Protocol
For NiMH models like WP-450 and WP-462W, use the original 100mA charger. Charging time varies by capacity: 1300mAh takes about 13 hours while 2000mAh requires 27 hours total (18 hours charging plus 9 hours safety buffer). Plug in for 24 hours for the first charge to condition the battery.
For Li-ion models like WP-560, charge for 4 to 6 hours using only the compatible charger. Overvoltage can trigger safety shutdown.
Never use the flosser while charging. Allow a full cycle before first use.
Troubleshoot Common Post-Repair Issues
Even careful repairs can have hiccups. Use this quick-reference guide to diagnose problems.
Device Won’t Power On
Poor solder connection, reversed polarity, or a dead battery typically cause this. Recheck wire connections and resolder if needed. Test voltage with a multimeter.
Motor Runs But No Water Flow
A disconnected tube or clogged pump usually causes this. Inspect the piston pump and inlet and outlet hoses for blockages or disconnections.
Charging Socket Misaligned
The inner plate is not seated correctly. Reopen and realign the charging port with the housing.
Blue Button Stuck or Loose
The release mechanism is misaligned or missing. Reinsert the button and ensure the lever clicks into place properly.
Intermittent Operation
Loose wires or weak solder joints cause this. Reinforce all connections and insulate with heat-resistant tape.
Corrosion on Terminals
Old NiMH battery leakage causes this. Clean with a vinegar-dipped swab and replace the battery immediately.
Safety and Skill Requirements
This repair is not beginner-friendly. Know your limits before starting.
Required Skill Level
You need intermediate to advanced DIY experience. Soldering proficiency is essential with no room for guesswork. You must be able to follow wiring diagrams and understand polarity rules.
Safety Precautions
Work in a well-ventilated area when soldering. Wear safety glasses during prying. Never short battery terminals since sparks can damage circuits.
Li-ion batteries pose special risks. Overheating during soldering can cause fire or explosion. Disconnect the battery immediately if it swells, leaks, or gets hot.
Extend Life and Reduce Waste
Battery replacement is economically smart and environmentally responsible.
Cost Comparison
A new Waterpik flosser costs $70 to $100. A replacement battery costs $10 to $30. If you already own the tools, your total savings reach $45 to $70 per repair.
Maintenance Tips
Clean contacts every 3 to 6 months with vinegar to prevent corrosion. Store with 40 to 60% charge if unused for weeks. Avoid full discharges especially for NiMH batteries. Use original chargers to prevent overcharging.
Frequently Asked Questions About Changing Waterpik Battery
Can I replace the battery in my Waterpik water flosser?
Yes, but only certain cordless models support replacement. The WP-450, WP-462W, and WP-560 are confirmed repairable. Sealed models like the Cordless Express cannot be opened without permanent damage.
What battery does a Waterpik WP-450 use?
The WP-450 uses a NiMH (Nickel-Metal Hydride) battery at 2.4V with 1300mAh capacity. You can upgrade to a 2000mAh pack for longer runtime between charges.
How do I know if my Waterpik battery is dead?
Signs include the device not holding charge, the motor not starting even after extended charging, and the unit dying quickly during use. Test with a multimeter: NiMH should read around 2.4V and Li-ion around 3.7V when fully charged.
Is it safe to replace Waterpik battery yourself?
It is safe if you have intermediate DIY skills and soldering experience. Follow all safety precautions, work in a ventilated area, and never overheat Li-ion batteries. If you are uncomfortable with soldering, consider professional repair.
How long does a Waterpik battery replacement take?
Plan for 1 to 2 hours including disassembly, soldering, and reassembly. First-time repairs may take longer. Allow additional time for the initial 24-hour charge cycle for NiMH models.
What happens if I reverse the battery polarity?
Reversed polarity can destroy the motor and charging circuit permanently. Always connect red wire to positive and black wire to negative. Double-check connections before soldering.
Key Takeaways for Changing Your Waterpik Battery
Replacing the battery in your Waterpik water flosser is a smart, sustainable fix that saves $45 to $70 per repair. With careful disassembly, precise soldering, and thorough testing, you can extend your device’s life by years while reducing e-waste.
Confirm your model supports replacement before starting. Gather all tools and the correct battery type (NiMH for WP-450/462W, Li-ion for WP-560). Document everything with photos, work in a ventilated area, and never overheat the battery during soldering.
If you followed each step and double-checked polarity, your Waterpik should now run like new. Keep the charger nearby, avoid over-discharging, and enjoy the benefits of a fully restored cordless flosser.