
A broken tooth can strike suddenly—whether from biting down on something hard, suffering trauma, or dealing with long-term decay—and leave you in sharp, throbbing pain. When a tooth fractures, especially if it’s loose, jagged, or exposing the nerve, the instinct might be to pull it out yourself. But how to remove a broken tooth safely isn’t a DIY project. Attempting extraction at home can lead to infection, nerve damage, or even jaw injury. The truth is, only a dentist can determine whether your tooth can be saved with a crown or root canal—or if extraction is truly necessary. This guide walks you through the professional procedures used to remove broken teeth, why home methods are dangerous, and exactly what to expect during recovery. You’ll also learn how to manage pain temporarily and when to seek emergency care.
When Extraction Is Necessary
Not every broken tooth needs to come out. Some fractures can be repaired with bonding, crowns, or root canals. But when the damage is too severe, removal becomes the safest option to prevent complications.
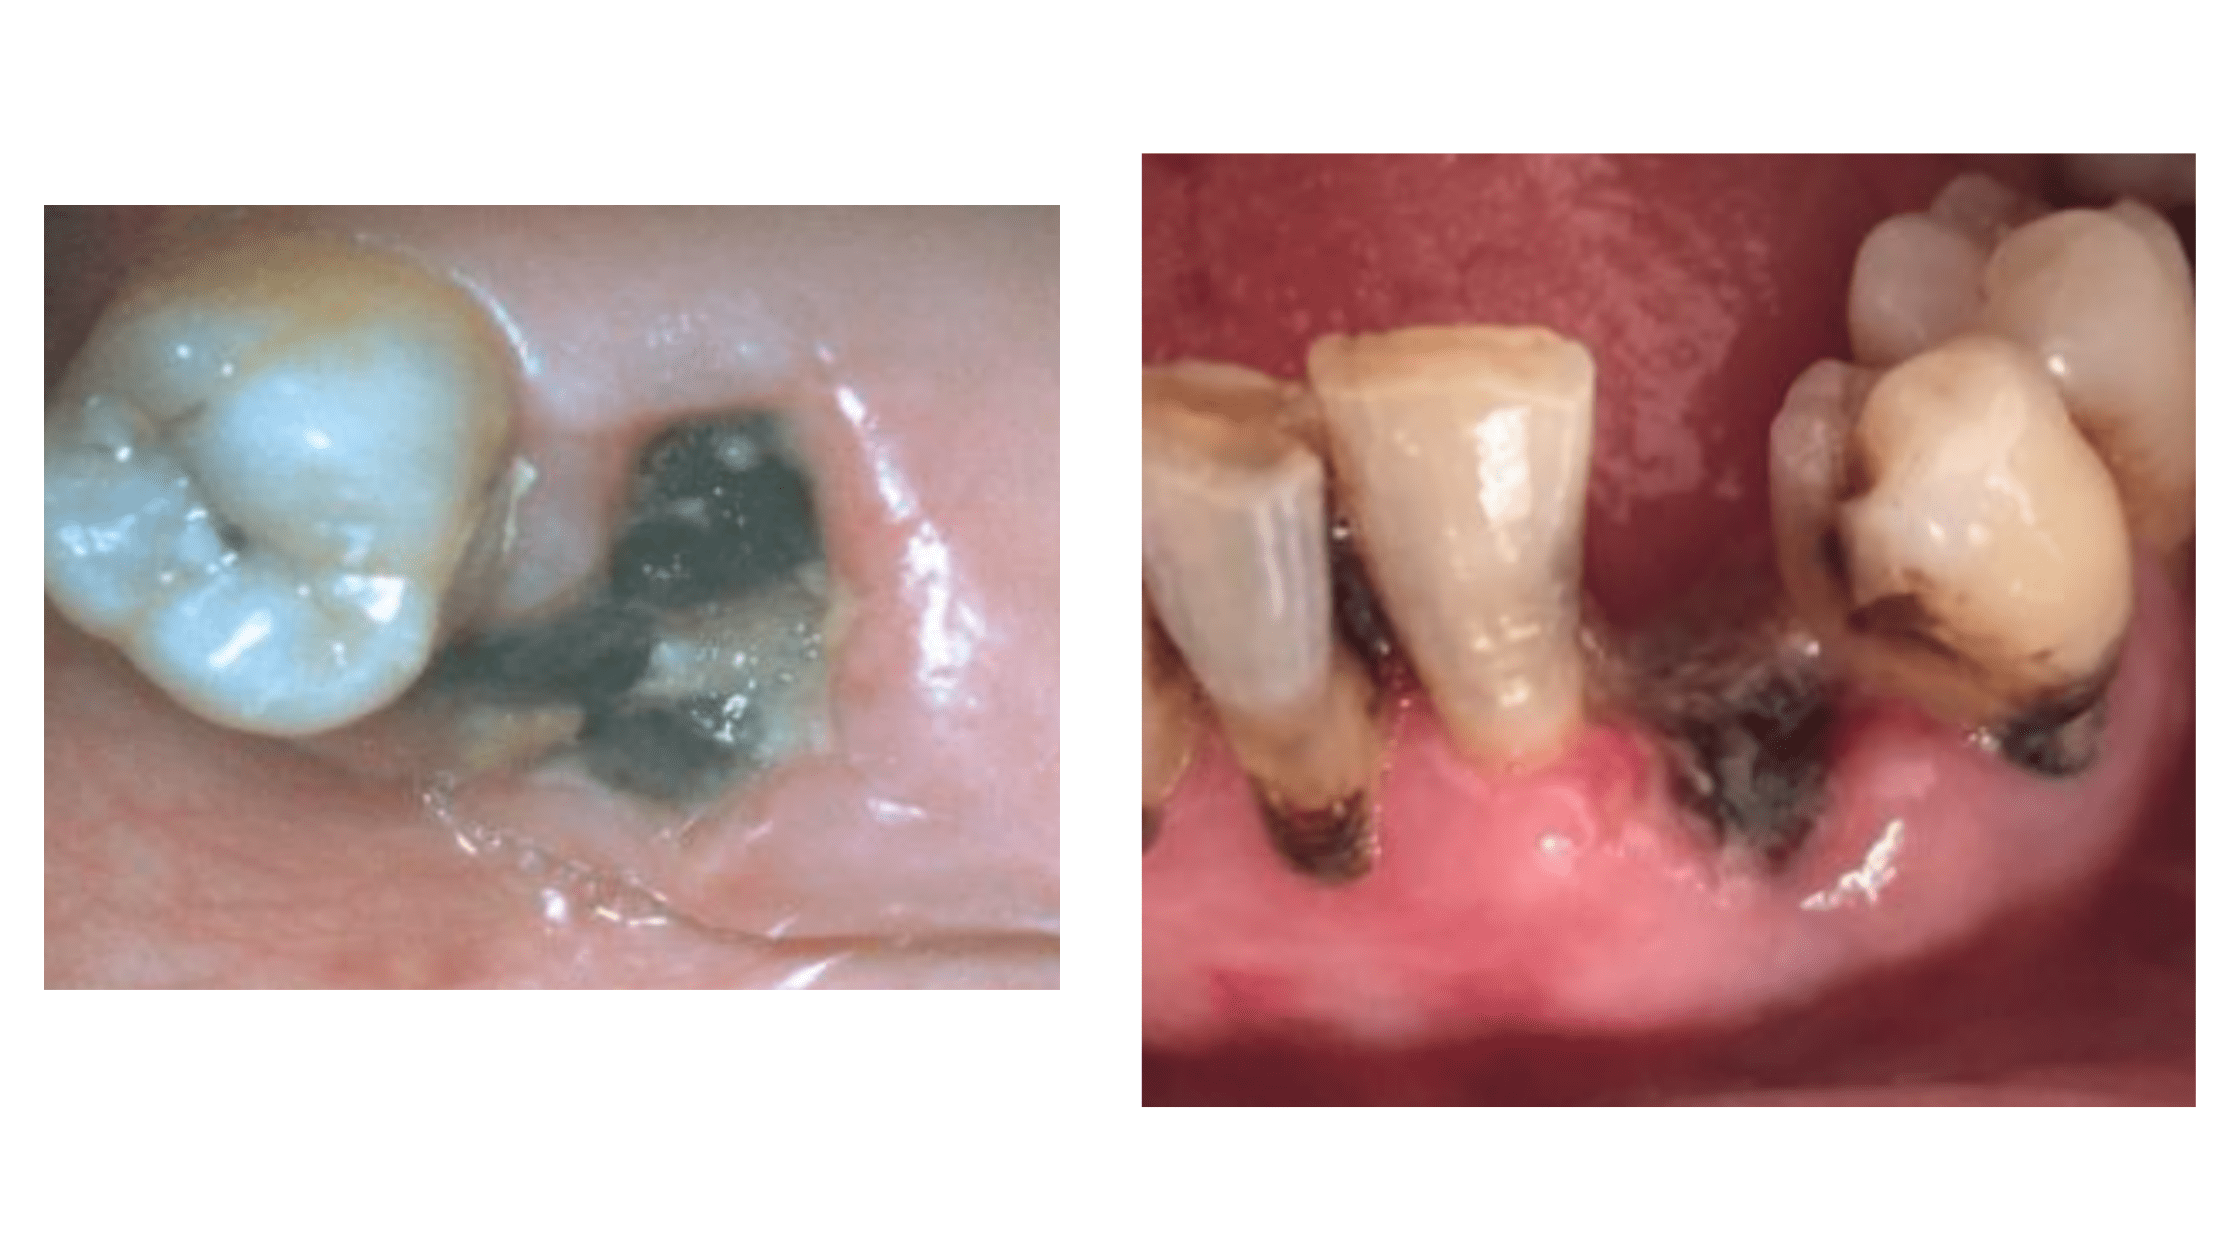
Fracture Below the Gumline
If your tooth breaks at or below the gumline, it lacks enough structure for restorative treatment. There’s nothing for a crown or filling to grip onto, and the exposed root is vulnerable to infection. In these cases, extraction is almost always required. X-rays help your dentist confirm how far the fracture extends and whether infection has reached the jawbone.
Vertical or Split Root Fractures
A vertical crack that runs down into the root is often invisible during a visual exam but causes persistent pain, especially when chewing. These fractures can’t be fixed with a root canal and usually result in tooth loss. Once diagnosed via imaging, extraction is the only reliable solution to stop pain and prevent abscess formation.
Failed Root Canal or Severe Decay
Teeth that have undergone root canal treatment lose moisture and become brittle. If one breaks after a root canal—especially with pre-existing decay—there may be little healthy structure left. Infections that don’t respond to antibiotics or drainage also signal that the tooth must be removed to stop the spread of bacteria.
Loose Fragments: Risk of Swallowing
If a piece of your broken tooth is wiggling and could come loose at any moment, it poses a choking hazard, especially for children or elderly patients. If the fragment can’t be stabilized, prompt professional removal prevents accidental aspiration or swallowing.
Simple Extraction: For Visible Tooth Fragments
If the broken part of your tooth is still above the gumline and not fused to bone, a simple extraction may be possible. This is a routine outpatient procedure with minimal recovery time.
Signs You May Qualify
You’re likely a candidate for simple extraction if:
– The broken piece is clearly visible
– The root is intact and not curved or impacted
– There’s no active infection or abscess
– The tooth isn’t tightly bound by surrounding bone
Your dentist will confirm eligibility using a clinical exam and X-ray.
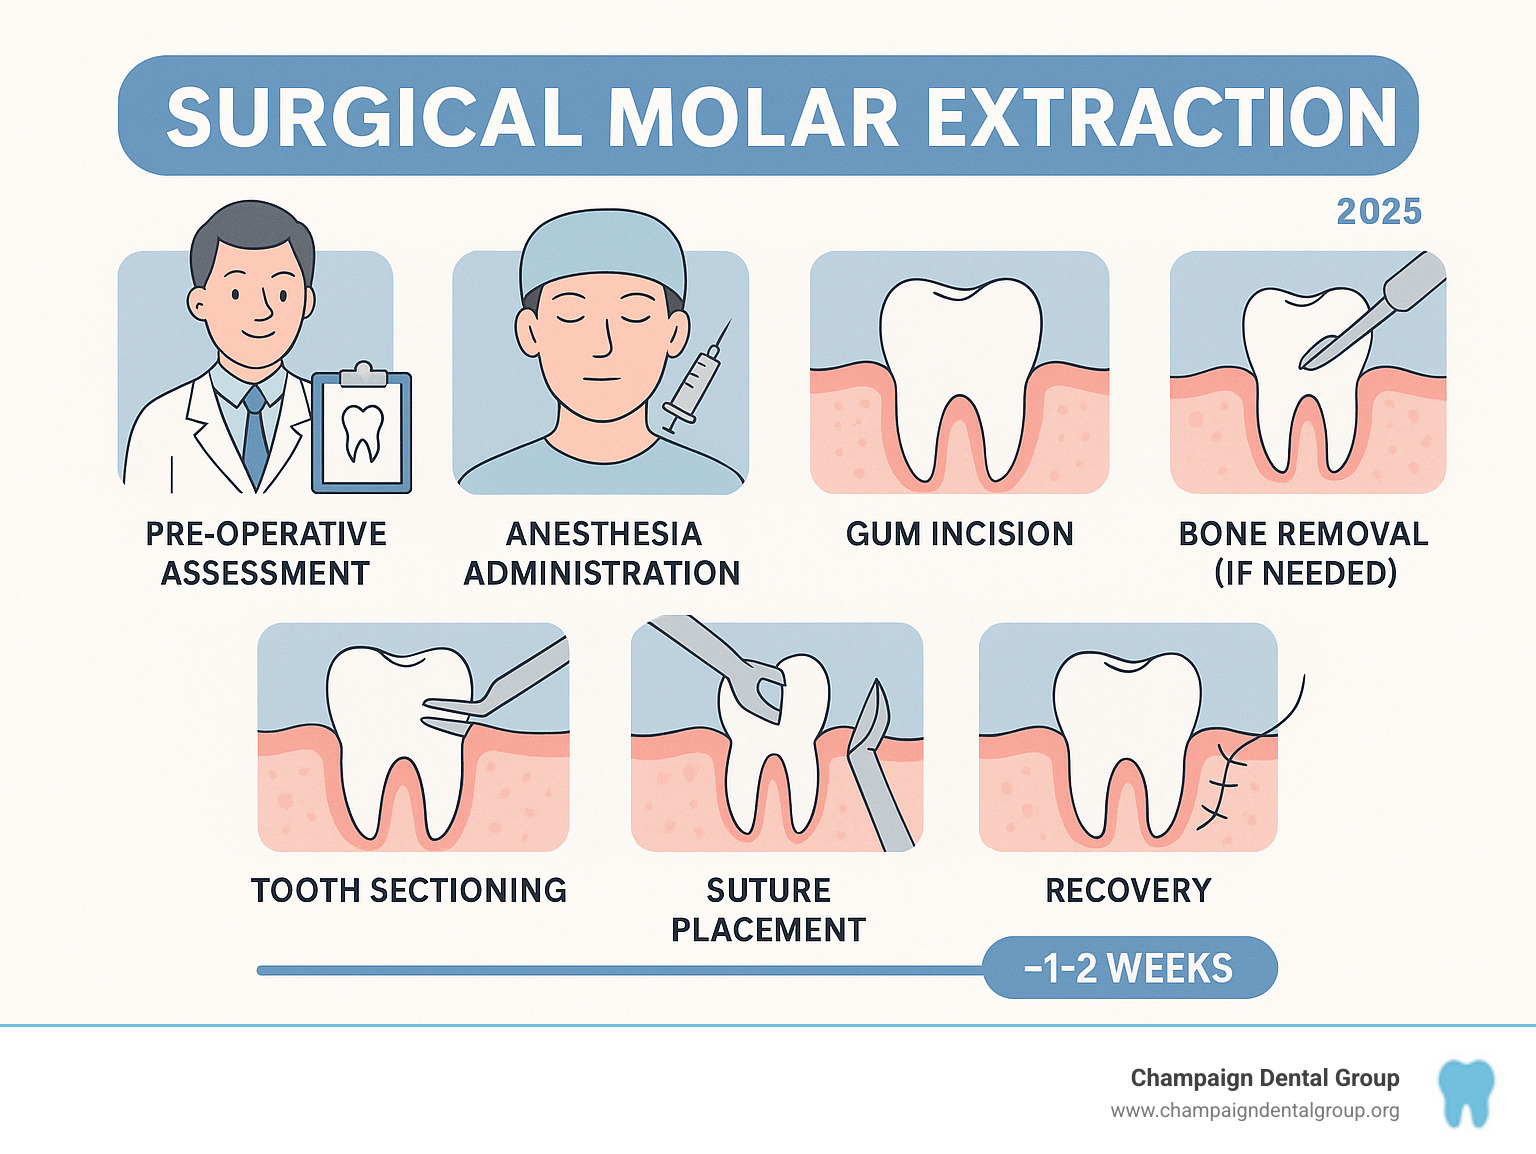
Step-by-Step Procedure
1. Anesthesia Administration
The area around the tooth is numbed with a local anesthetic like lidocaine. You’ll feel pressure but no pain as the tooth is loosened and removed.
2. Loosening the Tooth
A dental elevator is inserted between the tooth and the socket. Gentle twisting and rocking motions break down the periodontal ligament that holds the tooth in place.
3. Final Removal with Forceps
Once loose, the dentist uses specialized forceps to grip the visible fragment and lift it out with controlled rocking motions. The entire process usually takes just a few minutes.
4. Socket Cleaning and Clot Formation
The socket is rinsed with sterile saline to remove debris. A blood clot forms naturally—this is critical for healing and must remain undisturbed.
Tools Used by Dentists
- Dental mirror and probe – for assessment
- Anesthetic syringe – to numb the area
- Elevator (straight or cryer) – for luxation
- Forceps (universal or cowhorn) – for removal based on tooth location
Surgical Extraction: For Hidden or Complex Cases
When the tooth is broken below the gumline or only root fragments remain, a surgical extraction is needed. This is common with broken molars, especially wisdom teeth.
Indications for Surgery
Surgical extraction is required when:
– The tooth is completely below the gums
– Only root tips are left
– The tooth is fused to bone
– Previous extraction attempts failed
A panoramic X-ray or 3D cone-beam CT scan helps map the root’s position and proximity to nerves or sinuses.
Detailed Surgical Steps
1. Preoperative Imaging
Imaging reveals root curvature, bone density, and the tooth’s relationship to the inferior alveolar nerve (in lower teeth) or maxillary sinus (in upper molars).
2. Incision and Flap Creation
After numbing the area, a small cut is made in the gum. A flap is lifted to expose the bone covering the root.
3. Bone Removal and Tooth Sectioning
A dental drill removes a small amount of bone to access the root. Multi-rooted teeth are often sectioned into pieces for safer removal.
4. Fragment Removal
Each root segment is carefully lifted using surgical elevators. Fine instruments ensure no fragments are left behind.
5. Socket Management and Closure
The socket is cleaned and irrigated. A hemostatic agent may be placed to control bleeding. The gum flap is stitched closed with dissolvable or removable sutures.
Recovery Timeline After Surgery
- Days 1–2: Swelling peaks; use ice packs
- Days 3–7: Pain decreases; soft tissue heals
- Day 7–10: Sutures removed (if non-resorbable)
- Weeks 4–6: Bone begins to fill the socket
- Months 3–6: Full healing completes
Why Home Removal Is Dangerous
High Risk of Infection
Using pliers, tweezers, or unsterilized tools introduces bacteria into the socket, potentially causing a life-threatening abscess.
Incomplete Extraction
DIY attempts often leave root fragments behind, which can become infected and require more complex surgery later.
Nerve and Tissue Damage
Uncontrolled force can injure the inferior alveolar nerve, leading to permanent numbness in the lip or chin. Adjacent teeth can also be chipped or loosened.
Dry Socket Risk Increases
Suction from spitting, straws, or aggressive rinsing can dislodge the blood clot, leading to dry socket—one of the most painful complications after extraction.
Common DIY Methods (Not Recommended)
String-and-Pull Technique
Tying floss around the tooth and yanking it only works if the tooth is already extremely loose. Resistance means roots are still anchored—pulling harder risks fracturing the jaw.
Wiggling with Fingers or Pliers
Gentle wiggling is okay for baby teeth, but adult teeth require precision. Household pliers can crush the crown, making professional removal harder.
Use of Heat or Alcohol
Heating tools or swabbing with alcohol doesn’t numb the area and increases infection and tissue damage risks.
Pro Tip: If you’re in severe pain and can’t see a dentist immediately, focus on pain relief and infection control—not removal. Use OTC meds and saltwater rinses until you can get care.
Immediate Aftercare: Protect the Blood Clot
Control Bleeding Properly
Bite down on gauze for 30–45 minutes. Replace as needed. Light oozing is normal for 24 hours, but active bleeding beyond 12 hours needs urgent attention.
Reduce Swelling with Ice
Apply ice to your cheek in 15-minute intervals for the first 48 hours to minimize swelling.
Avoid Clot-Disrupting Actions
Do not:
– Use straws
– Smoke or vape
– Spit forcefully
– Rinse vigorously
– Drink hot liquids
These actions create suction or heat that can dislodge the clot.
Pain Management and Natural Remedies
Over-the-Counter Medications
- Ibuprofen 600 mg every 6 hours – reduces pain and inflammation
- Acetaminophen 500–1000 mg every 6 hours – for those who can’t take NSAIDs
Combining both (under guidance) can enhance pain relief.
Clove Oil Application
Clove oil contains eugenol, a natural anesthetic. Apply a small amount with a cotton swab—do not overuse, as it may delay healing.
Saltwater Rinses
After 24 hours, rinse gently with ½ tsp salt in 8 oz warm water, 2–3 times daily to keep the area clean.
Diet and Activity Restrictions
Foods to Eat After Extraction
Stick to soft, cool foods:
– Yogurt
– Mashed potatoes
– Smoothies (no straw)
– Applesauce
– Cool broth-based soups
Avoid hot, spicy, or crunchy foods for 3–5 days.
Activities to Avoid
- No smoking for 72 hours – delays healing
- Avoid exercise for 48 hours – reduces bleeding risk
- Wait 24 hours before brushing near the site
Serious Complications to Watch For

Dry Socket (Alveolar Osteitis)
- Pain starts 2–4 days post-op, often radiating to the ear
- Empty-looking socket with bad breath
- Treated with medicated dressing and pain relief
Infection Signs
Seek help if you have:
– Pus
– Fever over 101°F
– Swelling that worsens after 48 hours
– Increasing pain after day 3
Nerve Injury
Numbness or tingling in the lip, chin, or tongue may occur—most resolve within weeks, but permanent damage is possible.
Sinus Communication
Upper molar extractions can create a hole to the sinus. Symptoms include air or fluid leaking from the nose when drinking. Small openings heal on their own; larger ones may need repair.
Healing Timeline and Follow-Up
| Day | Healing Stage |
|---|---|
| 0–1 | Clot forms; bleeding stops |
| 2–3 | Swelling peaks; dry socket risk highest |
| 4–7 | Pain fades; granulation tissue forms |
| 7–10 | Sutures removed; soft tissue heals |
| 4–6 weeks | Bone remodeling begins |
| 3–6 months | Socket fully fills with new bone |
Attend all follow-ups to ensure proper healing.
Prevention and Tooth Replacement Options
Prevent Future Breakage
- Wear a custom mouthguard during sports
- Avoid chewing ice or hard candies
- Use a night guard if you grind your teeth
- Visit your dentist every 6 months
Replace the Missing Tooth
Leaving a gap causes teeth to shift and bone loss. Options include:
– Dental implant – most durable
– Bridge – supported by adjacent teeth
– Partial denture – removable and affordable
Emergency Signs: When to See a Dentist Immediately
Go to a dentist or ER if you have:
– Uncontrolled bleeding >12 hours
– Severe pain unrelieved by meds
– Fever or chills
– Pus or foul odor
– Swelling spreading to face or neck
– Numbness >24 hours
– Difficulty breathing or swallowing
These could signal a life-threatening infection.
Final Advice: Always Seek Professional Help
How to remove a broken tooth safely comes down to one rule: don’t do it yourself. Only a dentist can diagnose the extent of damage, take X-rays, and perform a sterile, pain-free extraction. While waiting for care, manage symptoms with OTC remedies—but never attempt extraction without training. Early intervention may even save your tooth. Trust professional care for a safe, smooth recovery and long-term oral health.