
If your Waterpik water flosser has lost pressure, stopped powering on, or just needs a deep maintenance check, disassembling it can help diagnose and fix the issue. While Waterpik designs most models for durability over repairability, many units like the WP-360, WP-100W, and WP-150W can be safely opened with the right tools and approach. This guide walks you through how to disassemble a Waterpik water flosser across multiple models, revealing internal components, common failure points, and maintenance opportunities.
Whether you’re replacing a thermal fuse, lubricating gears, or troubleshooting weak performance, this actionable teardown guide gives you full access safely and effectively.
Prepare Before You Disassemble
Before cracking open your Waterpik, take essential steps to protect both the device and yourself.
Unplug and Discharge
For AC-powered models including WP-100W, WP-150W, and Aquarius, unplug the unit and wait at least 2 hours to let internal capacitors discharge. This prevents electric shock during disassembly. For cordless models like WP-580 and WP-360, fully drain the battery if possible and remove from the charger before beginning work.
Empty and Dry the Unit
Remove the water reservoir and empty all liquid completely. Run the flosser briefly if functional to flush residual water from tubing and pump chamber. Wipe down the exterior with a dry cloth before proceeding.
Gather Required Tools
You will need precision tools to avoid causing damage during disassembly.
Philips #0 or #00 screwdriver for most internal screws. Torx T6 or T8 driver for newer models with security screws. Plastic prying tools or spudgers for safely separating snap-fit housings. Precision flat-head screwdriver for prying off caps and releasing clips. Dental picks or toothpicks for seal removal and debris extraction. Needle-nose pliers for bending or removing metal motor tabs. Multimeter for electrical testing. Soldering iron if replacing battery or bypassing fuse. Dremel with cutting disc for sealed motors. Anti-static wrist strap when handling PCBs.
Pro Tip: Take photos at every step. Label screws by location since many models use multiple sizes in different spots.
Identify Your Waterpik Model
Disassembly varies significantly by model, so knowing yours ensures you use the correct method and avoid damaging sealed components.
Common Models and Key Traits
WP-360 uses rechargeable NiMH battery with medium reservoir and offers battery replacement and gear access. WP-100W is AC-powered with small reservoir and features simple circuit with thermal fuse that is fixable. WP-150W is AC-powered with medium reservoir and allows motor brush inspection. WP-580 uses Li-ion battery with 7 oz reservoir but is sealed with limited access. Aquarius WP-660 is AC-powered with 26 oz reservoir and uses ultrasonic welds making it non-serviceable.
Focus on WP-100W or WP-360 if you are new to repairs. Avoid Aquarius unless you have significant repair experience.
Disassemble Waterpik WP-360 — Battery & Lubrication Access
The WP-360 is one of the most repairable cordless models, allowing battery replacement and gear lubrication with basic tools.
Remove Nozzle and Reservoir
Pull off the flossing tip first. Then grasp the blue reservoir and gently pull upward while pressing down on the white housing upper lip. Use even pressure to avoid breaking plastic clips. Set both parts aside after removal.
Open the Motor Housing
Flip the white base over and remove two Philips screws from the bottom. Slide out the internal assembly including motor, pump, and battery from the casing. The internal module should slide out smoothly. If stuck, check for hidden clips or adhesive before forcing.
Access and Replace the Battery
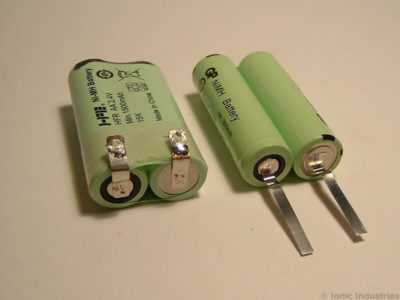
Inside the housing you will find two NiMH AA or sub-C cells at 1.2V each for 2.4V total, connected via soldered wires.
To replace the battery, desolder the old battery leads and install a new matched pair of NiMH cells with same capacity and age. Solder wires back and insulate with heat shrink. Reinsert into housing.
Warning: Never use mismatched batteries since this causes imbalance and premature failure.
Lubricate the Pump and Gears
Dry lubricant is a common cause of weak pressure and noisy operation. Lubrication points include the piston bore where the piston slides, gear teeth especially on the large driven gear, and the bearing inside pump housing.
To lubricate, pry the pump assembly forward to expose the piston rod. Remove the piston carefully. Apply a pea-sized amount of PTFE-based food-grade lubricant such as Super Lube. Avoid over-lubricating since excess attracts debris. Reinsert piston and test movement, which should slide smoothly.
Pro Tip: Re-lubricate every 6-12 months for long-term performance.
Reassemble and Test
Slide the module back into the white casing and replace the top retaining ring using a flat-head screwdriver. Secure the two base screws and reattach the blue reservoir. Power on and test for strong pulsing water flow, no leaks, and quiet motor operation.
Disassemble Waterpik WP-100W — Fix Thermal Fuse Failure

The WP-100W commonly fails due to a blown thermal fuse rated at 114°C / 2A, often triggered by motor overheating during extended use.
Remove the Base Panel
Turn the unit upside down and remove six screws: four on the bottom and two hidden under rubber feet or labels. Lift off the plastic cap with a flat-head screwdriver. Pull the power connector straight up from the PCB. Lift out the bottom panel to expose internal components.
Locate the Thermal Fuse
The fuse is taped to the motor housing and appears as a small white or clear cylinder with two wires. Test with multimeter set to continuity mode. No beep indicates a blown fuse.
Bypass the Thermal Fuse
If the fuse is blown and replacement is not immediately available, you can perform a temporary fix. Cut both leads of the fuse and solder a jumper wire across the terminals. Insulate with electrical tape or heat shrink.
Critical Warning: Bypassing removes overheat protection. Run in 15-30 second bursts and monitor motor temperature closely. Consider adding a small heat sink to the motor for added safety.
Test Other Components
Follow the power path to diagnose other potential issues. Test the power switch for continuity in on/off states. Test the bridge rectifier with four diodes and replace if any diode is shorted. Inspect the capacitor for bulging or leakage. Check the resistor value which should be approximately 47 ohms and replace if charred. If all else tests good, the motor may be seized.
Disassemble Waterpik WP-150W — Diagnose Motor Brushes
The WP-150W uses a 120V DC motor with brushes that wear over time, reducing pressure and performance.
Open the Housing
Remove four Philips screws from the base. Pull out the jet strength knob before separating the case. Open the unit to expose the rack-and-pinion power switch, rectifier circuit, and motor and pump assembly.
Inspect the Motor
The motor runs on rectified DC, not AC, and always runs at full speed while pressure is adjusted mechanically through the flow control dial.
To open the motor for advanced inspection, locate two metal tabs on the motor casing. Use a Dremel to cut off the tabs. Remove the white plastic end cap. Inspect the commutator and brushes for black conductive dust indicating vaporized brush material, and check for pitting or wear on copper segments.
Fix: Replace brushes if possible, or consider motor replacement if wear is severe.
Check the Backflow Prevention Valve
Located under the wand plug, the backflow prevention valve is a tan-colored flap with mesh texture. It ensures water does not siphon back into the reservoir. Clean or replace if stiff or cracked.
WP-580 and Aquarius — Limited Disassembly Options
Newer models like the WP-580 and Aquarius are designed for longevity rather than repairability.
WP-580 Cordless Advanced 2.0
This model uses a lithium-ion battery with 5.0V 1.0A magnetic charging. The battery is not user-replaceable and the unit likely uses ultrasonic welding, meaning opening damages the housing.
To attempt access, remove the nozzle and reservoir first. Check for hidden screws under rubber feet. If none are found, disassembly requires cutting the housing which is not recommended.
Reality Check: Battery replacement requires advanced soldering and BMS knowledge. Consider professional repair or replacement instead.
Aquarius WP-660 — Complex but Non-Serviceable
The Aquarius features a digital display, 10 pressure settings, and automatic tip ejection. There are no visible screws and the unit is likely ultrasonically sealed, making reassembly extremely difficult.
What you can do includes cleaning nozzles and reservoir regularly, descaling with vinegar solution (1:1 water/vinegar, run through system), and avoiding disassembly since reassembly is nearly impossible.
Common Failure Causes and Fixes
Use this quick-reference table to diagnose issues after disassembly.
No power indicates a blown thermal fuse on WP-100W, which requires bypass or replacement. Weak pressure suggests worn motor brushes on WP-150W requiring inspection and replacement. Intermittent operation points to dry or sticky gears on WP-360, which need cleaning and re-lubrication. Leaks come from cracked O-rings or seals that require replacement with food-grade silicone. Short battery life results from degraded NiMH cells on WP-360 requiring replacement with matched pair. No water flow means blocked nozzle or intake requiring flush with warm water and vinegar.
Maintenance Tips to Extend Lifespan
Even if you do not disassemble often, routine care prevents the need for repairs.
Clean After Every Use
Rinse the reservoir and nozzle with warm water. Wipe the exterior to prevent mineral buildup from forming.
Descale Monthly
Fill the reservoir with 50% white vinegar and 50% water. Run the device for 1-2 minutes. Rinse thoroughly with clean water afterward.
Re-Lubricate Gears
Every 6-12 months, apply food-grade PTFE lubricant to piston and gears to maintain smooth operation.
Store Properly
Keep the unit upright to prevent water pooling. Remove the battery if storing long-term, especially on WP-360 models.
Final Thoughts: Should You Disassemble?
Disassembling a Waterpik water flosser is worth it if you own a WP-100W or WP-360, are experiencing diagnosable issues like blown fuse or dry gears, and have basic tools and soldering skills available.
Avoid disassembly if you own a WP-580 or Aquarius due to sealed design, lack repair experience, or the unit is still under warranty which would void coverage.
For older or discontinued models, disassembly is often the only way to restore function. With careful handling, you can extend your Waterpik life by years, saving money and reducing e-waste.
Frequently Asked Questions About Disassembling a Waterpik Water Flosser
Can I disassemble my Waterpik WP-360 to replace the battery?
Yes, the WP-360 is one of the most repairable models. You can replace the NiMH battery by desoldering the old cells and installing a matched pair of new ones with same capacity and age.
What tools do I need to disassemble a Waterpik water flosser?
You will need precision screwdrivers including Philips #0 or #00 and possibly Torx drivers, plastic prying tools, a multimeter for electrical testing, a soldering iron for battery or fuse work, and a Dremel for sealed motors.
How do I fix a Waterpik that won’t turn on?
For AC-powered models like WP-100W, the most common cause is a blown thermal fuse rated at 114°C / 2A. Test with a multimeter and either replace or bypass the fuse temporarily.
Is the Waterpik Aquarius WP-660 repairable?
No, the Aquarius uses ultrasonic welds and is designed for durability rather than repair. Most users should avoid disassembly and instead focus on cleaning and descaling.
How often should I lubricate my Waterpik internals?
Lubricate the piston and gears every 6-12 months using food-grade PTFE lubricant to maintain pressure and reduce noise from gear wear.
What causes weak water pressure in a Waterpik?
Weak pressure typically comes from worn motor brushes on WP-150W, dried lubricant on WP-360, or a blocked nozzle. Disassembly helps diagnose which component is at fault.
Key Takeaways for Disassembling Your Waterpik
Disassembling a Waterpik water flosser opens up opportunities for battery replacement, thermal fuse repair, gear lubrication, and motor brush inspection depending on your model. The WP-360 and WP-100W offer the best repair options for DIY enthusiasts, while newer cordless and premium models are generally not worth opening due to sealed construction. Always document your disassembly with photos, use proper safety precautions including capacitor discharge time, and consider whether professional repair might be more cost-effective than voiding your warranty.