
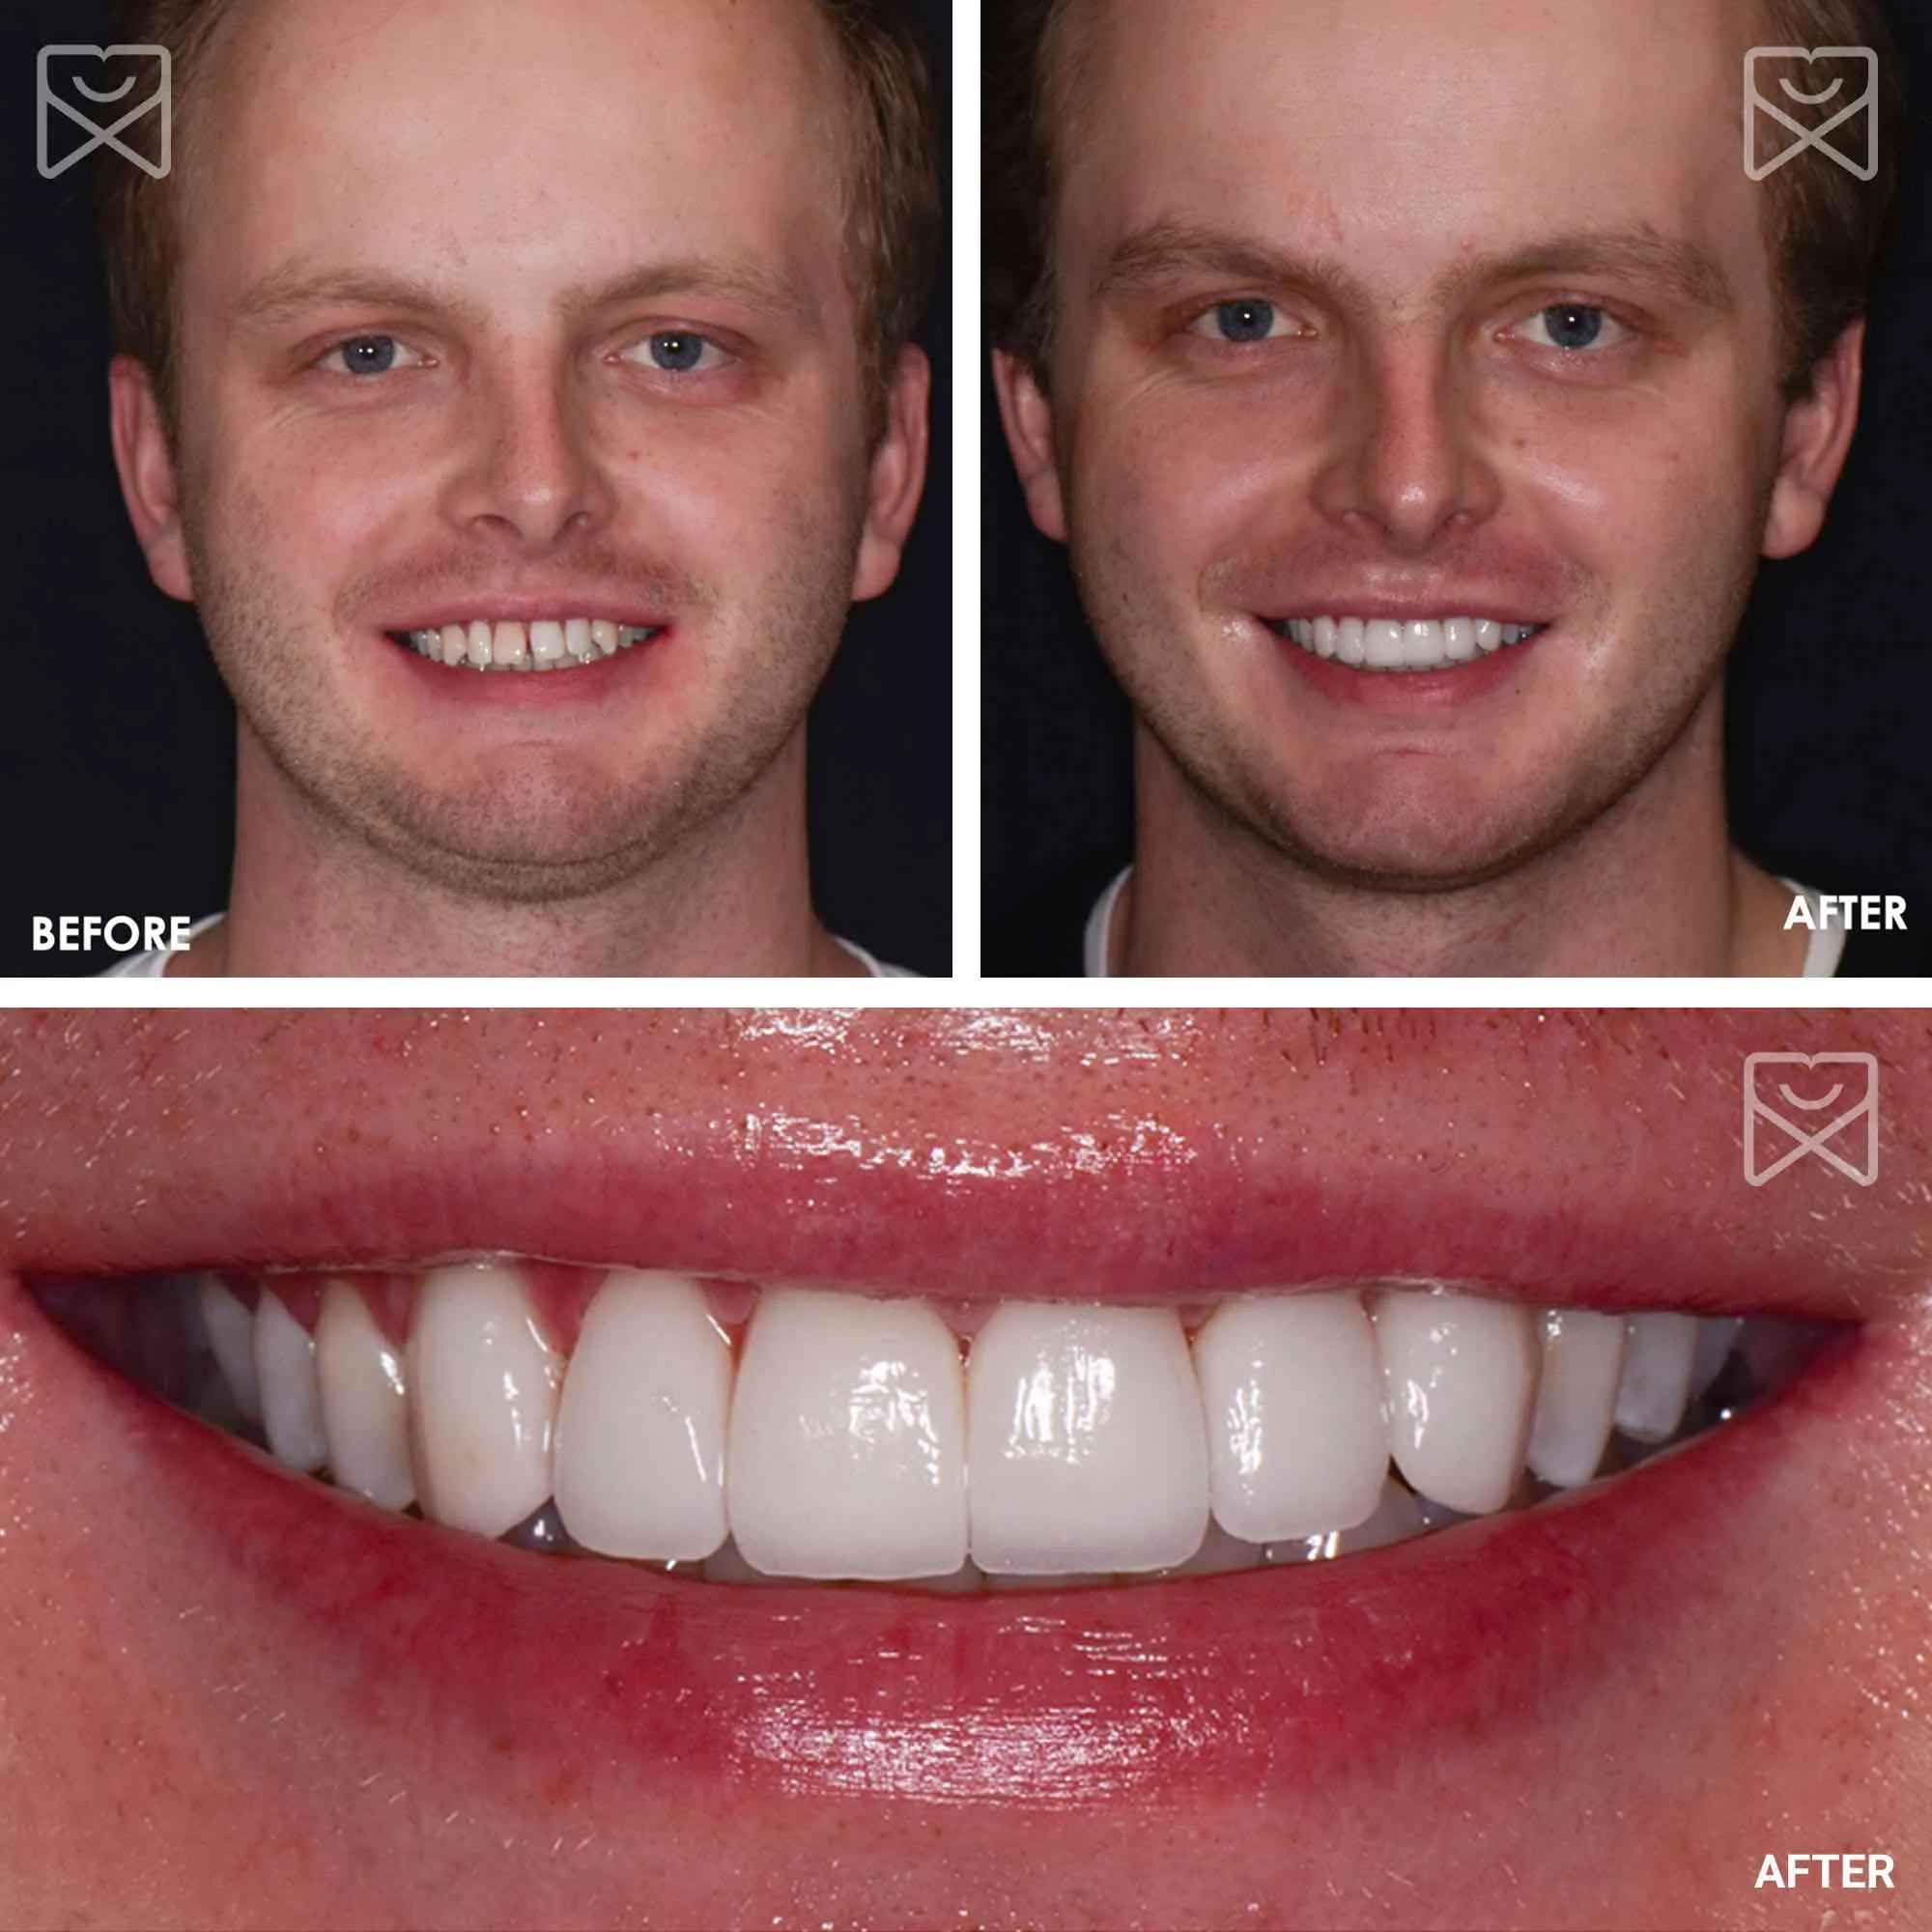
If you’ve ever admired a celebrity’s flawless smile, chances are dental veneers played a role. Tooth veneers work by bonding ultra-thin, custom-crafted shells to the front surface of your teeth, instantly enhancing their appearance. These shells mask imperfections like stains, chips, gaps, and misshapen edges, delivering a bright, uniform smile—often in just two or three visits. Unlike traditional orthodontics, which can take months, veneers offer a fast, effective cosmetic transformation.
Veneers don’t replace your natural teeth—they enhance them. Think of them as a precision-engineered facade that blends seamlessly with your existing smile while functioning just like real enamel. Once bonded, they allow normal eating, speaking, and smiling without restriction. While porcelain veneers are the most popular due to their durability and lifelike appearance, options like composite, no-prep, and removable veneers provide alternatives based on budget, invasiveness, and desired outcomes. Understanding how tooth veneers work—from tooth preparation to final bonding—is essential for deciding if this treatment aligns with your smile goals.
Veneer Bonding Process Explained
Enamel Removal and Tooth Prep
Before veneers can be placed, the tooth must be prepared to ensure a natural, flush fit. For traditional porcelain veneers, 0.3 to 0.5 millimeters of enamel—about the thickness of a fingernail—is carefully removed from the front surface. This step prevents the veneer from making the tooth look bulky or protruding. Although enamel removal is irreversible, it’s crucial for achieving a seamless, long-lasting result.
Local anesthesia is typically used to minimize discomfort, though many patients report only mild pressure. No-prep veneers, such as Lumineers, skip this step entirely, preserving natural tooth structure. These ultra-thin options are ideal for patients with healthy enamel and minor cosmetic concerns. However, they aren’t suitable for everyone—those with significant misalignment or large gaps may still need traditional prep to avoid a bulky or unnatural look.
Etching and Adhesive Bonding
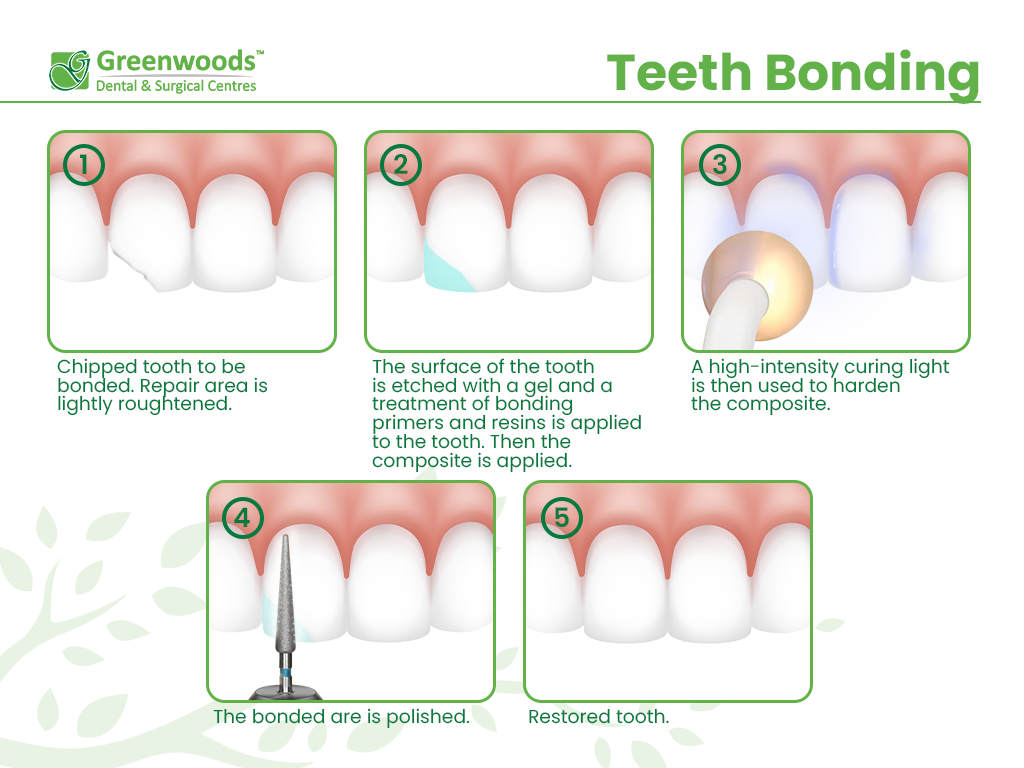
Once the tooth is shaped, it undergoes acid etching with a phosphoric acid solution. This creates microscopic pores in the enamel, dramatically increasing the surface area for stronger adhesion. After rinsing and drying, a dental bonding agent—a liquid resin—is applied to act as a molecular bridge between the tooth and veneer.
The custom-fabricated veneer is then positioned over the tooth using a color-matched dental cement. Excess cement is removed, and a high-intensity blue light is used to cure (harden) the adhesive in seconds. This photo-polymerization process locks the veneer securely in place, creating a bond strong enough to withstand everyday chewing forces and biting pressure.
Final Fit and Bite Adjustment
After bonding, your dentist evaluates the fit, color, and bite. You’ll be asked to bite down on special paper to identify any high spots that could cause discomfort or uneven wear. Minor adjustments are made using dental instruments to polish the edges or reshape the veneer slightly. A follow-up visit within one to two weeks ensures your gums are adapting well and your bite feels balanced.
This final phase is critical—poorly fitted veneers can lead to chipping, gum inflammation, or speech issues. Digital tools like occlusal analysis help distribute pressure evenly across all teeth. When done correctly, the result is a smooth, natural-feeling surface that blends perfectly with your smile.
Types of Veneers and How They Differ

Porcelain Veneers: The Gold Standard
Porcelain veneers work by mimicking the light-reflective properties of natural enamel, offering unmatched aesthetics and durability. Made from lithium disilicate or zirconia-based ceramics, they’re custom-fabricated in a lab to match your desired shape, size, and shade. These veneers resist staining from coffee, wine, and tobacco far better than natural teeth.
They typically last 10 to 20 years or more with proper care, making them a long-term investment. The process requires two to three dental visits: consultation, preparation, and bonding. While more expensive—ranging from $900 to $2,500 per tooth—patients consistently report high satisfaction due to their lifelike appearance and resilience.
Best for: Severe discoloration, chipped or worn teeth, minor gaps, and misshapen teeth.
Composite Veneers: Quick and Affordable
Composite veneers work by applying tooth-colored resin directly to the tooth, sculpted and hardened in a single visit. Made from a mix of acrylic and glass or boron fibers, they require little to no enamel removal, making the procedure less invasive and often reversible.
While more affordable—costing $250 to $1,500 per tooth—composite veneers are less durable than porcelain, lasting 4 to 8 years. They’re also more prone to staining over time, especially with heavy coffee or smoking. However, they’re easily repairable if chipped and offer a budget-friendly option for temporary enhancement.
Best for: Minor cosmetic flaws, patients seeking immediate results, or those testing a new smile design.
No-Prep Veneers: Minimal Enamel Removal
No-prep veneers work by using ultra-thin porcelain shells (0.2–0.3 mm) that fit over existing teeth without grinding down enamel. Brands like Lumineers and Vivaneers fall into this category. Because they preserve natural tooth structure, they’re considered minimally invasive and often reversible.
These veneers are ideal for patients with mild spacing or slight discoloration who want a conservative approach. They usually don’t require anesthesia and have little to no sensitivity afterward. However, they may not suit people with crowded or severely misaligned teeth, as they can appear bulky in such cases.
Best for: Minor aesthetic improvements, enamel preservation, and quick recovery.
Removable Veneers: Temporary Smile Fix
Removable veneers work like snap-on dental covers, made from acrylic or flexible resin and worn over natural teeth. They’re not bonded, so they can be taken out for eating or cleaning. Marketed as “instant smiles,” they’re popular for special events or as a trial before committing to permanent veneers.
While convenient and non-invasive, they come with risks: poor fit can cause gum irritation, tooth shifting, or bacterial buildup. They also don’t function like real teeth—chewing is limited, and speech may be affected. Long-term use is discouraged by dentists due to potential oral health complications.
Best for: Temporary cosmetic enhancement, budget-limited patients, or smile previews.
Veneer Placement: Step-by-Step Guide
Consultation and Smile Assessment
Your journey starts with a comprehensive dental evaluation. The dentist checks for gum disease, tooth decay, enamel thickness, and bruxism (teeth grinding). If issues like periodontitis or cavities exist, they must be treated first. X-rays, intraoral photos, and digital scans help assess your candidacy.
You’ll discuss your aesthetic goals—whiter teeth, closing gaps, reshaping edges. Using digital smile design (DSD) software, the dentist simulates your final look. Wax-up models or temporary mock-ups may be created to preview the outcome. Shade guides help match or whiten your smile based on preference.
Custom Design and Impression Taking
Once the plan is approved, an impression or digital scan of your teeth is taken. For porcelain veneers, this is sent to a lab where technicians fabricate the shells—usually taking 1 to 4 weeks. In the meantime, temporary veneers may be placed to protect prepared teeth and let you experience the new look.
During this phase, you can provide feedback on shape and size. Some clinics use CAD/CAM technology to design veneers in-office, though same-day options are rare and often less precise than lab-made ones.
Trial Fit and Final Bonding
When the veneers arrive, a trial fit checks color, shape, and alignment. Try-in pastes allow shade adjustments before permanent cementation. You’ll approve the look before bonding begins.
The final bonding follows the etching and curing process described earlier. After placement, your dentist polishes the edges and ensures your bite is balanced. Any rough spots are smoothed to prevent gum irritation.
Benefits of Choosing Veneers
Instant Smile Transformation
Veneers deliver dramatic cosmetic changes in just a few visits. Gaps close, chips disappear, and yellowed teeth become bright and uniform. Over 50% of Americans feel self-conscious about their smiles—veneers directly address this by boosting confidence and willingness to smile.
Unlike braces (which take months), veneers offer a rapid solution for minor alignment issues and discoloration resistant to whitening.
Natural Look and Function
Porcelain reflects light like real enamel, avoiding the flat, opaque look of older dental work. Custom shaping ensures symmetry with your facial features. Once bonded, they feel like natural teeth—no special cleaning or eating restrictions beyond avoiding hard foods.
Long-Term Protection and Durability
Veneers can protect weakened enamel from further wear. Porcelain resists chipping and staining under normal use, lasting over a decade with care. Lithium disilicate variants offer even greater strength, suitable for patients with moderate bite forces.
Limitations and Risks to Know
Not Suitable for Everyone
Veneers aren’t recommended if you have:
– Active gum disease or untreated cavities
– Severe misalignment (orthodontics is better)
– Bruxism (grinding can chip veneers—use a night guard)
– Insufficient enamel (needed for bonding)
They also can’t replace missing teeth—implants or bridges are required in those cases.
Potential Complications
- Tooth sensitivity: Temporary after enamel removal.
- Debonding: Veneers may loosen if bonding fails.
- Chipping: From biting hard foods or trauma.
- Gum irritation: Caused by excess cement or poor fit.
- Irreversibility: Traditional veneers permanently alter teeth.
Caring for Your Veneers Long-Term
Daily Maintenance Tips
- Brush twice daily with a non-abrasive, fluoride toothpaste (low RDA).
- Floss daily to prevent decay at the margins.
- Use a soft-bristled toothbrush to avoid scratching surfaces.
- Avoid whitening toothpastes or at-home kits—they won’t affect veneers and can create color mismatches.
Diet and Lifestyle Adjustments
- Limit staining foods and drinks like coffee, tea, red wine, and tobacco.
- Avoid biting hard objects—ice, nuts, candy apples, or opening bottles with teeth.
- Wear a custom night guard if you grind your teeth.
Professional Checkups
Visit your dentist every 6 months for cleanings and evaluations. They’ll check for:
– Gum health around the veneer edges
– Signs of chipping or debonding
– Bite alignment and wear patterns
Early detection prevents costly repairs.