
If your Waterpik water flosser isn’t spraying as powerfully as it used to, or you’ve noticed a strange odor when using it, you’re not alone. These are classic signs that it’s time to clean your device. Over time, mineral buildup, bacteria, mold, and biofilm can accumulate in the reservoir, tubing, and flosser tips, compromising both performance and hygiene.
The good news? With the right steps, cleaning your Waterpik takes just minutes and can restore full water pressure, eliminate odors, and extend the life of your device by years. This guide covers exactly how to clean every part of your Waterpik using safe, effective methods backed by manufacturer guidelines.
Weekly Exterior Wipe Down
Unplug Before Cleaning
Always disconnect your Waterpik from power before wiping it down. Even a quick clean near electrical components can be risky if the unit is plugged in. Wait until the device is completely off and unplugged to avoid any electrical hazards.
Wipe With Damp Cloth Only
Use a soft, non-abrasive cloth lightly dampened with mild soap or water to clean the outside of the base unit. Focus on areas around the handle connection, air vents, and power cord entry point where dust and moisture can gather. Avoid using bleach, alcohol, or abrasive cleaners. These can damage the plastic finish and degrade seals over time.
Never submerge the base unit or let water enter internal components. Even a small amount of moisture in the motor housing can cause permanent damage.
Dry Completely Before Use
After wiping, go over the unit with a dry towel and let it sit for a few minutes to ensure no residual moisture remains. If you’ve accidentally spilled water near the base, allow it to dry for at least 24 hours before plugging it back in.
Clean the Reservoir and Check Valve
Remove the Tank for Deep Cleaning
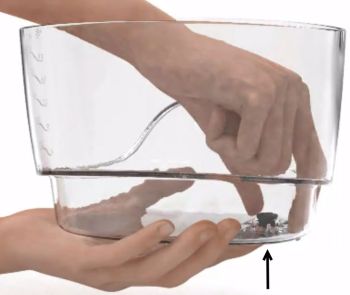
Take the water reservoir off the base. Most models allow a simple lift-off, but consult your manual if it’s stuck. Once removed, inspect the bottom of the tank for a black rubber check valve. This small one-way valve prevents backflow and plays a big role in water flow.
Remove and Massage the Check Valve
Push the black valve up from underneath to remove it. Run it under warm water for 30 to 45 seconds, gently massaging it between your fingers to dislodge trapped debris or mineral deposits. When clogged or stiff, this tiny part can cause leaks or reduced pressure.
Replace the valve if it’s brittle, torn, or no longer flexible. A damaged valve won’t seal properly.
Dishwasher or Hand Wash the Reservoir
You can clean the reservoir in the top rack of your dishwasher, but disable the heated-dry setting to avoid warping the BPA-free plastic. Alternatively, wash by hand with warm, soapy water and a long-handled bottle brush to scrub corners where biofilm hides.
Rinse thoroughly and air-dry upside down on a clean rack. Storing it open and inverted prevents moisture buildup and mold growth.
Flush Internal Tubing Monthly
Use Vinegar Solution for Descaling
Mix 1 part white distilled vinegar with 2 parts warm water, or use 1 to 2 tablespoons of vinegar per full reservoir. This mild acid dissolves limescale and kills bacteria without damaging internal seals.
Never use bleach, CLR, or undiluted vinegar. These can corrode pump parts and leave harmful residues.
Run Full Cleaning Cycle
Reinsert the cleaned check valve into the reservoir. Fill the tank with the vinegar solution. Reattach to the base and attach any flosser tip. Point the nozzle into the sink and turn on the device. Run the entire solution through the system using normal pulsing mode. This flushes out mineral deposits from the pump and tubing.
Rinse Twice With Clean Water
After the vinegar cycle, refill the reservoir with clean warm water and run it through completely. Repeat once more if you detect any lingering vinegar smell. Skipping this step may leave an unpleasant taste during your next flossing session.
For hard water users, pause halfway through the vinegar cycle, turn off the unit, and let the solution sit for 5 to 10 minutes to dissolve stubborn buildup before finishing the flush.
Soak and Sanitize Flosser Tips

Rinse Immediately After Use
After each use, detach the tip and rinse it under warm water to remove toothpaste, saliva, and debris. Shake gently to expel trapped water from the nozzle.
Deep Clean With Vinegar or Peroxide
Once a week, soak tips in one of these solutions. Use a 2:1 water-to-vinegar mix or a 1:1 water-to-3% hydrogen peroxide. Soak for 5 minutes only. Longer can degrade rubber seals inside the tip.
Never mix vinegar and peroxide. They form a corrosive compound called peracetic acid.
Scrub and Air-Dry
Use a soft toothbrush to clean around the nozzle if spray seems weak. Rinse thoroughly and store tips upright in a ventilated holder. Avoid sealed containers, which trap moisture and promote mold.
Replace Every 3 to 6 Months
Check for cracks or discoloration, warped nozzles, and inconsistent spray pattern. Orthodontic users should replace tips every 3 months due to higher debris accumulation from braces.
Handle Cleaning for Countertop Models

Submerge Only the Wand
For models like the Ultra or Aquarius, remove the flosser tip and submerge the handle only in a 2:1 water-to-vinegar solution for 5 to 7 minutes. Do not exceed this time. Prolonged exposure can weaken internal O-rings.
Cordless models like the WP-660 have sealed handles. Do not submerge. Wipe externally only.
Rinse and Shake Dry
After soaking, rinse the handle under warm water and shake out excess. Let it air-dry completely before reattaching tips. Moisture left inside can lead to mold or electrical issues.
Prevent Mold and Odors With Proper Storage
Empty Reservoir After Each Use
Leaving water in the tank between uses creates a breeding ground for pink slime (Serratia marcescens) and other bacteria. Always empty the reservoir and leave it off the base when not in use.
Store Upside Down or Open
Place the reservoir upside down on a drying rack or leave it detached with the cap off. This allows airflow and prevents stagnant moisture.
Use Filtered Water in Hard Water Areas
If your tap water is hard, switch to filtered or bottled water. It significantly reduces limescale buildup, cutting your cleaning frequency from every 2 weeks to once a month.
Troubleshoot Common Cleaning Issues
Low Water Pressure After Cleaning
This issue typically stems from incomplete rinsing, air trapped in tubing, or a clogged tip. Run 1 to 2 extra water-only cycles. Detach and soak the tip in vinegar. Check that the black valve is properly seated.
Leaking from Reservoir Base
A damaged or improperly installed check valve causes this problem. Remove, clean, and reinsert the black valve. Replace it if stiff or cracked.
Spitting or Sputtering
Air pockets in the system cause this issue. Run several full water cycles. Ensure the reservoir is fully seated on the base.
Persistent Vinegar Smell
Inadequate rinsing leaves this smell behind. Run two full reservoirs of clean water through the system. Let the unit sit for 10 minutes between rinses.
Unit Won’t Turn On
Moisture in the base unit causes this problem. Unplug and let dry for 24 hours in a warm, ventilated area. Never operate a damp device.
Optimize Maintenance With a Schedule
Create a Monthly Cleaning Routine
Set a recurring reminder to flush with vinegar solution, clean reservoir and check valve, soak all flosser tips, and inspect handle and seals. Hard water users should do this every 2 to 3 weeks.
Track Tip Replacement Dates
Label tips with colored rings or tape to identify users in multi-person households. Note replacement dates directly on the storage case.
Pre-Mix Cleaning Solution
Keep a spray bottle with 2:1 water-to-vinegar in the bathroom for quick wipe-downs of the handle and base. Avoid overspray near electrical parts.
Avoid These Dangerous Mistakes
Never Use Bleach or Alcohol
These chemicals degrade rubber seals and leave toxic residues that can enter your mouth during use.
Don’t Use Heated Dry in Dishwasher
Heat warps BPA-free plastic. Always air-dry the reservoir.
Don’t Mix Cleaning Agents
Vinegar plus hydrogen peroxide equals corrosive peracetic acid. Stick to one solution per cleaning cycle.
Don’t Ignore the Check Valve
A stiff or damaged valve causes leaks and poor performance. Replace it every 6 to 12 months if needed.
Extend Your Waterpik’s Lifespan
Follow Best Practices for 5 Plus Year Use
Users who clean monthly report their devices lasting over five years with no drop in performance. Regular maintenance preserves pump integrity and keeps water pressure strong.
Keep Warranty Valid
Most Waterpik models have a 3-year limited warranty, but misuse like submerging the base or using harsh chemicals can void coverage. Stick to manufacturer-approved methods.
Test Performance Monthly
Observe spray strength and consistency. If water feels weaker, run a cleaning cycle before assuming hardware failure.
Frequently Asked Questions About Cleaning a Waterpik Water Flosser
How often should I clean my Waterpik water flosser?
Clean the exterior weekly, the reservoir monthly, and flush internal tubing every 1 to 3 months. Hard water users should descale every 2 to 3 weeks.
Can I put my Waterpik base unit in the dishwasher?
No. Never submerge or place the base unit in the dishwasher. The motorized housing contains electrical components that will be damaged. Only the removable reservoir goes in the dishwasher, and only on the top rack without heated dry.
Why does my Waterpik smell bad?
Odors come from biofilm, bacteria, or mold growing in the reservoir, tubing, or tips. Run a vinegar flush through the system, deep clean the reservoir, and soak tips in vinegar solution. Always empty and air-dry the reservoir between uses.
What is the black thing at the bottom of my Waterpik reservoir?
That’s the black check valve. It’s a one-way valve that prevents backflow. Remove it monthly and massage under warm water to clear debris. Replace it if it becomes stiff or cracked.
Can I use hydrogen peroxide to clean my Waterpik?
Yes, you can use a 1:1 water-to-3% hydrogen peroxide solution to soak tips and run through the system. Just never mix vinegar and peroxide in the same cleaning cycle.
How do I know when to replace my flosser tip?
Replace tips every 3 to 6 months. Look for cracks, discoloration, warped nozzles, or inconsistent spray patterns. Orthodontic patients should replace every 3 months.
Final Tips for Long-Term Success
By following this routine, you’ll keep your Waterpik running like new, protect your oral health, and avoid costly replacements. A few minutes of maintenance every month pays off in powerful, hygienic flossing for years to come.
Run a quick water-only flush after each use to clear residual toothpaste. Use citric acid tablets if you dislike vinegar smell. They’re equally effective and odor-free. Pack a travel-sized vinegar bottle for cleaning after trips. Consult your model’s manual for disassembly limits, since some parts aren’t meant to be taken apart.