
Losing a tooth—especially a front one—can happen suddenly, leaving you self-conscious and eager for a quick fix. Whether it’s due to an accident, decay, or a failed dental restoration, waiting weeks for a professional appointment doesn’t make the need to smile with confidence go away. The good news: you can temporarily cover a missing tooth at home using safe, affordable, and surprisingly realistic methods.
These solutions aren’t permanent, but they work well for short-term use—ranging from a few days to several months—until you can get proper dental care. From FDA-approved thermoplastic repair kits to emergency orthodontic wax, there are practical options that restore your appearance, protect your gums, and help you navigate job interviews, social events, or daily interactions without hesitation. This guide walks you through the most effective at-home techniques, step-by-step instructions, realistic expectations, and essential safety tips so you can act quickly without risking your oral health.
Use Thermoplastic Tooth Repair Kits for Best Results
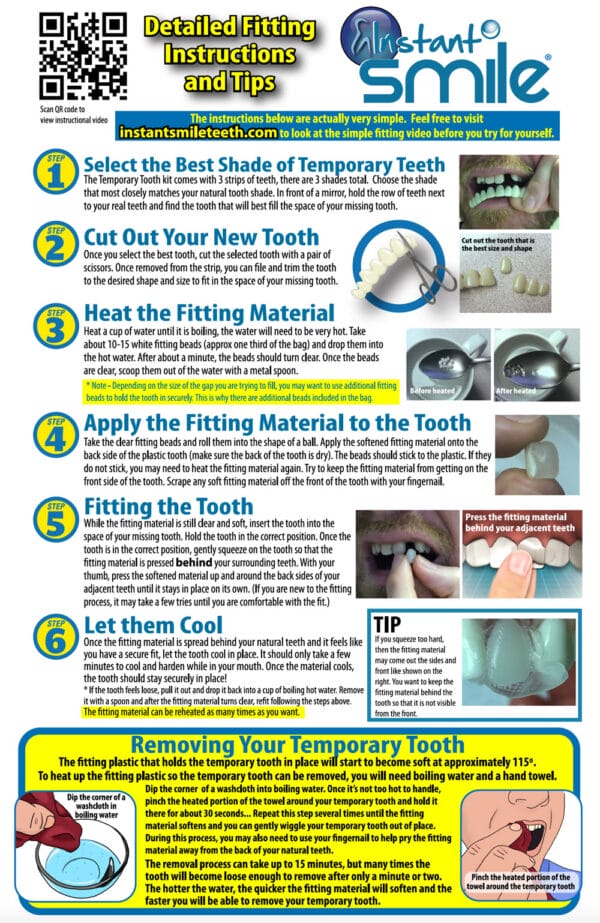
The most reliable way to cover a missing tooth at home is with a thermoplastic tooth repair kit. These kits use medical-grade, moldable beads made from polycaprolactone, a non-toxic, FDA-approved material that softens in hot water and hardens in your mouth to fit precisely into the gap. Brands like Temptooth, Complete Your Smile, and PrimeDent QuickFix are designed specifically for this purpose and deliver professional-looking results when used correctly.
How to Mold a Realistic Temporary Tooth
- Boil water in a small cup—about ½ cup is sufficient.
- Drop the thermoplastic bead into the boiling water for 30–60 seconds until it turns clear and pliable.
- Remove with tweezers or a spoon—never touch it with bare fingers to avoid burns.
- Press into the gap:
– For single-tooth kits: Place the softened bead directly into the socket.
– For crown-style kits: Attach the bead to the back of a pre-made tooth piece and press into place. - Shape carefully using your fingers, a mirror, and included tools to match the size and curve of adjacent teeth.
- Let it cool in your mouth for 1–2 minutes; full hardening takes up to 1.5 hours.
- Trim and file any excess material after it sets for a seamless, natural fit.
✅ Pro Tip: If the bead hardens too fast, simply reheat it. To blend the color, dip the finished tooth in cold tea or coffee for 1–2 minutes to stain it slightly and match your natural tooth shade.
Choosing the Right Kit for Your Needs
- Temptooth: The most trusted option—includes multiple beads, tools, shade-matching options, and access to video tutorials.
- Complete Your Smile Kit: Budget-friendly with extra beads and a deluxe tool set—ideal for practice or multiple uses.
- PrimeDent QuickFix: Simpler design, best suited for single-tooth gaps.
These kits typically cost between $20 and $50 and can make up to 10 temporary teeth, making them a cost-effective solution for adjustments or replacements.
How Realistic and Secure Are DIY Teeth?
When properly shaped and colored, thermoplastic teeth can be nearly indistinguishable from real ones. Many users report successfully using them in job interviews, weddings, and even fooling dentists at first glance. The fit is secure—snapping into place using the gum line and neighboring teeth—no adhesive required.
However, success depends on patience, attention to detail, and manual dexterity. First attempts may feel bulky or fall out. With practice, most users achieve a stable, natural-looking result.
Apply Orthodontic Wax for Emergency Coverage
If you don’t have a tooth kit, orthodontic wax is the fastest emergency fix. Available at most pharmacies, it’s designed for braces but can be molded to fill a tooth gap temporarily.
How to Use Orthodontic Wax as a Quick Fix
- Take a pea-sized piece of white orthodontic wax.
- Warm it between your fingers until soft and pliable.
- Press it into the empty space where the tooth was.
- Shape it with a toothpick or clean fingernail to mimic the curve of a real tooth.
✅ Best for: Photo ops, short meetings, or overnight use when no other option is available.
Why Wax Isn’t Ideal for Daily Use
- Melts easily with hot food or drinks.
- Falls out during eating or talking.
- Looks less natural—often appears flat or overly bulky.
While it’s not a long-term solution, orthodontic wax can be a lifesaver in emergencies when you’re caught off guard.
Try OTC Temporary Dentures or Veneer Strips for Multiple Gaps
If you’re missing more than one tooth or have a larger gap, over-the-counter (OTC) temporary dentures or moldable veneer strips offer a better solution than single-use kits.
How to Fit a Moldable Veneer Strip
- Heat the strip in hot (not boiling) water for 30 seconds.
- Place it over your teeth, aligning the false tooth with the gap.
- Press down gently and bite to shape it to your dental arch.
- Cool with cold water to set the form.
- Trim excess material with scissors or a file for a snug fit.
Many of these strips come with adhesive for added stability and can be removed and reused after cleaning.
Pros and Cons of OTC Dentures
- ✅ Covers 2–3 missing teeth at once.
- ✅ Reusable and easy to adjust.
- ❌ May feel bulky or affect speech.
- ❌ Less precise than custom dental appliances.
Best used as a short-term bridge while waiting for a dentist-made flipper or implant.
Avoid Non-Heating Waxes and Pastes—They Don’t Work Well
Some products claim to fix missing teeth with ready-to-use wax or dental paste that doesn’t require heating. While convenient, these are not effective for fully missing teeth.
Why They Fail
- Low retention: Easily dislodged by saliva, talking, or eating.
- Poor shaping control: Difficult to sculpt into a realistic tooth shape.
- Designed for chips, not gaps: Most pastes are meant for cracked or broken teeth, not complete tooth loss.
Stick to heated thermoplastic kits for reliable, secure, and realistic results.
Can You Eat With a DIY Temporary Tooth?
Not recommended—most at-home solutions aren’t designed for chewing.
What Happens When You Eat?
- Risk of dislodging the tooth.
- Material softens with hot food.
- Sticky or hard foods (like gum, nuts, or apples) can pull it out.
✅ Best Practice: Remove the temporary tooth before eating and reinsert after brushing.
If you must eat with it, stick to soft foods like yogurt, mashed potatoes, or soup—and avoid biting directly into food.
Keep Your Gums Healthy While Using a Temporary Tooth
Even with a temporary tooth in place, gum health is critical. A missing tooth exposes the socket to food debris and bacteria, increasing the risk of infection and bone loss.
Daily Cleaning Routine
- Remove the temporary tooth.
- Rinse the socket with warm salt water or antiseptic mouthwash.
- Brush gently around the area with a soft-bristled toothbrush.
- Clean the temporary tooth with water and mild soap—avoid toothpaste, which can scratch the surface.
- Dry and store in a clean case.
This routine prevents plaque buildup, gum disease, and jawbone deterioration, keeping the site healthy for future implants.
Prevent Long-Term Dental Damage From an Unfilled Gap
Leaving a gap untreated—even temporarily—can lead to serious dental problems.
Risks of Not Covering a Missing Tooth
- Teeth shift: Adjacent teeth drift into the space, affecting bite alignment.
- Jawbone loss: Without root stimulation, the bone begins to resorb, weakening future implant success.
- Speech issues: Front tooth gaps can cause lisping or whistling sounds.
- Chewing imbalance: Leads to jaw pain or TMJ disorders.
A temporary fix helps maintain dental structure and buys time for proper treatment.
Replant a Knocked-Out Tooth If It’s Fresh and Healthy
If a healthy tooth was recently knocked out, you may be able to save it with immediate action.
Steps to Replant a Tooth
- Pick it up by the crown—never touch the root.
- Rinse gently under running water—do not scrub.
- Reinsert into the socket if possible.
- Hold in place by biting on gauze or closing your teeth gently.
- See a dentist within 30 minutes.
Can’t Reinsert? Keep It Moist
- Place between cheek and gum (ideal).
- Store in milk—preserves cells better than water.
- Use a Save-a-Tooth® kit (contains HBSS solution) for best results.
✅ Time is critical: The tooth’s viability drops after 30–60 minutes, but some survive up to 24 hours in proper storage.
This method only works for healthy, recently lost teeth—not those missing for days or lost to decay.
Know the Risks of DIY Fixes
While convenient, at-home solutions come with important warnings.
Potential Problems
- Gum irritation or sores from ill-fitting devices.
- Infection if the area isn’t cleaned.
- Bite misalignment from uneven tooth height.
- Swallowing risk if the tooth comes loose unnoticed.
- Delaying professional care—DIY is not a substitute.
✅ Stop using if you feel pain, swelling, or discomfort. See a dentist immediately.
Also, be cautious of overhyped reviews. Most DIY teeth last weeks, not years.
Compare DIY vs. Professional Options
| Feature | DIY Solutions | Professional Options |
|---|---|---|
| Cost | $20–$50 | $100–$1,000+ |
| Time to Use | Minutes | Days to weeks |
| Realism | High (with skill) | Very high |
| Durability | Days to months | Years |
| Eating | Not recommended | Possible with care |
| Custom Fit | User-made | Dentist-made |
| Best For | Short-term fix | Permanent solution |
DIY wins for speed and affordability; dentistry wins for safety and longevity.
Final Note: Covering a missing tooth at home is a practical, confidence-boosting solution when done right. Thermoplastic kits offer the best balance of realism and durability, while wax works in emergencies. Always prioritize oral hygiene, avoid eating with the device, and see a dentist for long-term care. With the right tools and technique, you can smile with confidence—starting today.