
If you’re using a water flosser to keep your gums healthy, one thing you shouldn’t overlook is how to disinfect a water flosser properly. Left uncleaned, the internal tubing, reservoir, and nozzle can harbor bacteria, mold, and biofilm, especially if water sits overnight. Stagnant moisture turns your device into a breeding ground for microbes like Pseudomonas aeruginosa and mold spores, which can harm your oral health over time. The good news is that with a consistent, science-backed cleaning routine, you can keep your water flosser hygienic, effective, and long-lasting. This guide delivers a complete, step-by-step disinfection protocol based on manufacturer guidelines and microbiology principles so you never have to guess what’s safe or effective.
Empty and Dry Your Flosser After Every Use
The foundation of water flosser hygiene starts with daily habits. Skipping this step is the number one reason users develop mold and slime in just days.
Drain All Standing Water
After each flossing session, empty the reservoir completely. Do not leave it filled overnight. Even a few ounces of stagnant water can support biofilm formation within 24 to 48 hours. Tilt the unit side to side to flush out trapped water in corners.
Clear Internal Tubing
With the nozzle pointed into the sink, run the device for 2 to 3 seconds to push residual water from the internal tubing. This prevents moisture buildup where mold and bacteria thrive.
Wipe and Air-Dry
Remove the nozzle and rinse it under warm water to wash away saliva and debris. Wipe the base, handle, and buttons with a soft, damp cloth. Leave the reservoir lid off or the tank door open to allow full air-drying. Storing it closed traps humidity and accelerates microbial growth.
Pro Tip: In humid climates, users who skip drying report mold growth within 3 to 5 days. A dry flosser is a safe flosser.
Clean the Reservoir Weekly

The reservoir is the most vulnerable part. Its wide surface and hidden corners collect limescale, biofilm, and visible mold if you do not clean it weekly.
Dishwasher Cleaning Method
If your model allows it, remove the reservoir and detach the black valve, which is a small rubber piece at the bottom. Clean the valve under warm water, massaging it for 30 seconds to remove buildup.
Place both parts on the top rack of the dishwasher. Run a normal cycle, but disable the heated-dry function because high heat can warp plastic. After washing, let everything air-dry completely before reassembling.
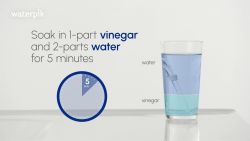
Hand-Wash with Vinegar
For non-dishwasher-safe units or deep cleaning, wash the reservoir with warm, soapy water and a small bottle brush. Focus on corners, ridges, and the valve seat, which are common spots for debris traps.
For mineral or biofilm buildup, soak in a 1-to-2 vinegar-to-water solution for 10 to 15 minutes first. Then scrub and rinse thoroughly. Air-dry upside down on a clean rack.
Warning: Never use abrasive pads or bleach. These scratch surfaces and leave toxic residues.
Flush Tubing Monthly with Vinegar
Mineral deposits and biofilm hide in internal tubing where you cannot see them. A monthly vinegar flush dissolves buildup and kills mold and bacteria.
Prepare the Vinegar Solution
Mix 1 part white vinegar to 2 parts warm water, or use 1 to 2 tablespoons of vinegar per full reservoir. Do not use undiluted vinegar regularly because it can degrade rubber seals over time.
Run the Flush Cycle
Fill the reservoir with the solution, reattach it to the base, and place the nozzle over the sink. Turn on the device and run the solution through until empty. Immediately follow with one full reservoir of clean warm water. Repeat the rinse a second time if you detect any vinegar smell.
Expert Note: Limit vinegar flushes to once every 1 to 2 weeks in hard water areas. Monthly is sufficient otherwise.
Deep Clean Unused or Moldy Units

If your flosser has been stored for months or shows signs of mold, a two-step disinfection is essential.
Step 1: Kill Mold with Vinegar
Fill the reservoir with undiluted white vinegar or a 1-to-1 vinegar-water mix. Run it through the system completely. For stubborn buildup, let the solution sit in the tubing for 5 to 10 minutes before flushing. This step breaks down biofilm and dissolves mineral scale.
Step 2: Sanitize with Hydrogen Peroxide
Prepare a solution of equal parts 3% hydrogen peroxide and water. Run it through the system until empty. Follow with two full reservoirs of clean water to remove all traces of peroxide.
Why Not Alcohol? Some users suggest isopropyl alcohol, but it can damage rubber seals. Hydrogen peroxide is safer, effective, and breaks down into water and oxygen.
Step 3: Revive or Replace
After deep cleaning, keep the unit if water flows smoothly, no odor remains, and no discoloration is visible. Replace it if you see persistent slime, cracks, or pressure loss, which indicate irreversible damage.
User Insight: A properly cleaned old unit can be safe and effective. Just ensure you complete the vinegar to peroxide to double rinse process.
Sanitize Nozzles and Handle
These parts touch your mouth directly and need regular disinfection.
Soak Nozzles in Vinegar or Peroxide
Remove the tip and soak it in one of these solutions for 5 minutes: 2-to-1 water-to-vinegar or 1-to-1 water-to-3% hydrogen peroxide. Agitate gently if debris is visible. Rinse thoroughly and air-dry on a clean towel.
Never boil, microwave, or autoclave tips unless the manufacturer specifies it. Heat can warp plastic and ruin precision jets.
Clean the Handle
For countertop models, detach the handle and soak in 2-to-1 water-to-vinegar for 5 to 7 minutes. Rinse well and air-dry. Do not submerge cordless handles or charging bases. Use a damp cloth only to wipe exterior surfaces.
Follow Model-Specific Rules
Different brands have unique components and care needs.
Waterpik Care Tips
Waterpik models require specific care. Remove and clean the black valve monthly because it is a common clog point. The reservoir and lid are dishwasher-safe on the top rack, but the handle and nozzle are hand-clean only. Never submerge cordless models. Use distilled water in hard water areas to reduce mineral buildup.
Oral-B Water Flosser Guidelines
Oral-B reservoir and lid are top-rack dishwasher safe. Clean the handle and nozzle manually with warm water and mild soap. Internal flushing with vinegar or peroxide solutions is safe. Always run the device briefly after use to clear tubing. Never leave the device unattended during cleaning cycles.
Both brands warn against bleach, alcohol, and abrasive cleaners because these void warranties and damage components.
Replace Tips Every 3 to 6 Months
Nozzles wear out and become hygiene risks over time.
When to Replace
Change tips if water pressure drops despite cleaning, jets are clogged or misaligned, plastic looks cloudy cracked or discolored, or bad taste or odor persists. Even with perfect care, nozzles degrade after 3 to 6 months of daily use.
Recommended Tips
The Oral-B Water Flosser Advanced Precision Jet Nozzle is ideal for targeted cleaning. Interchangeable tips, including orthodontic periodontal and tongue cleaner options, should be cleaned and replaced on the same schedule.
Shared Households: Use color-coded tips to prevent cross-contamination, especially for immunocompromised users.
Prevent Mold and Biofilm Long-Term
Avoid future problems with smart daily habits.
Use Distilled or Filtered Water
Tap water with high mineral content causes limescale. Switching to distilled or filtered water reduces descaling needs by up to 60%.
Store in a Dry Ventilated Area
Avoid damp bathroom cabinets near showers. Humid environments accelerate mold growth. Store the unit with the reservoir open to promote airflow.
Inspect Monthly
Check for cloudy tubing, slimy film in the reservoir, cracks in the black valve, and leaks at the base. Catch issues early before they compromise performance.
Key Fact: Regular vinegar flushing restores lost water pressure caused by calcium buildup, especially in hard water users.
Recognize When It Is Time to Clean
Do not wait for visible mold. These signs mean your flosser needs immediate attention.
Reduced Water Pressure
This could mean mineral clogs or partial biofilm blockage. Repeat the vinegar flush and check the nozzle for debris.
Sputtering or Irregular Spray
This indicates airlocks or biofilm in tubing. Run a vinegar flush, then two rinse cycles.
Cloudy Reservoir or Film on Walls
This is biofilm or hard water deposits. Hand-wash with vinegar soak and consider switching to distilled water.
Bad Smell or Taste
This means leftover bacteria or mold. Perform a full vinegar and peroxide cycle, followed by double rinse.
Leaking at the Base
This is often a damaged black valve or improper seating. Inspect, clean the seal area, and replace the valve if cracked.
Quick Fix: Prime the pump by running clean water if no flow occurs after cleaning.
Maximize Lifespan and Performance
A well-maintained water flosser can last 5 to 7 years. Follow these durability tips.
Use Filtered Water Daily
This reduces mineral accumulation and extends time between deep cleans.
Empty Reservoir Even If Unused
This prevents surprise mold growth during travel or illness.
Store Components Separately and Dry
Detaching and drying parts minimizes moisture traps.
Check Warranty Requirements
Some brands require proof of maintenance for warranty claims. Follow their cleaning schedule.
Replace Nozzles on Schedule
Worn tips reduce plaque removal efficiency. Fresh nozzles ensure optimal gum stimulation and cleaning.
Frequently Asked Questions About Disinfecting a Water Flosser
How often should I disinfect my water flosser?
You should empty the reservoir after every use, clean the reservoir weekly, and perform an internal vinegar flush monthly. Users in hard water areas should flush every 1 to 2 weeks.
Can I use alcohol to clean my water flosser?
No. Isopropyl alcohol can damage rubber seals and plastics inside the device. Use white vinegar or hydrogen peroxide instead, which are safer and equally effective.
Why does my water flosser smell bad?
Bad smells indicate bacteria or mold buildup. Perform a full vinegar and peroxide disinfection cycle, followed by two rinses with clean water.
Can I put my water flosser in the dishwasher?
Only the reservoir and lid are dishwasher-safe, and only on the top rack. Never dishwasher the handle, nozzle, or base unit. Disable the heated-dry function to prevent warping.
How do I know when to replace my water flosser nozzle?
Replace nozzles every 3 to 6 months or sooner if you notice cracked or cloudy plastic, clogged jets, decreased pressure, or persistent bad taste or odor.
What type of water should I use in my water flosser?
Use distilled or filtered water, especially in hard water areas. This reduces mineral buildup and extends the time between deep cleaning sessions.
Key Takeaways for Disinfecting Your Water Flosser
Disinfecting your water flosser is not just about cleanliness. It protects your oral health and ensures you get the full benefit from every use. The most important habits are emptying the reservoir after every use, performing weekly reservoir cleaning, and doing monthly vinegar flushes to prevent biofilm and mineral buildup.
For deep cleaning moldy or stored units, follow the two-step vinegar and hydrogen peroxide protocol with thorough rinsing. Replace nozzles every 3 to 6 months, use distilled water, and store your device with the reservoir open to promote airflow.
By following this daily, weekly, and monthly routine, you will prevent mold, maintain strong water pressure, and extend your device’s life. Whether you use it every day or seasonally, a few minutes of care ensures your water flosser stays safe, effective, and ready to deliver a healthier smile.