
Commercial water flossers can cost over $100, but you can build an effective alternative using common household tools. Whether you’re traveling, on a budget, or just love DIY solutions, making a water flosser at home is entirely possible using a modified garden sprayer or medical syringe. These methods use the same hydrodynamic cleaning principle as clinical oral irrigators, delivering pressurized water to remove plaque and debris from between your teeth and along the gumline.
This guide walks you through building both systems safely, choosing the right cleaning solutions, avoiding common mistakes, and maintaining your device for long-term oral hygiene. You’ll learn which additives work, which ones to avoid, and how to use your DIY flosser effectively.
Build a DIY Water Flosser: Two Proven Methods

Two reliable approaches exist for creating a functional water flosser at home. Each offers distinct advantages depending on your needs, whether that’s full-mouth cleaning or targeted spot treatment.
Use a Garden Sprayer for Full-Mouth Cleaning
A modified garden sprayer creates a reusable oral irrigator with continuous flow and adjustable pressure. This method works best for daily routine cleaning.
Attach a Dental Nozzle
Start with a new, unused 1-quart handheld garden sprayer made from BPA-free plastic. Remove the original nozzle and replace it with a Waterpik-compatible dental tip. Standard, orthodontic, or periodontal tips all work. If the fit feels loose, slip a 3/8″ silicone O-ring onto the sprayer’s outlet stem before attaching the tip. This creates a tight seal and prevents leaks during use.
Pro Tip: Curved tips improve access to back molars and braces. Never use sprayers that previously held pesticides or chemicals.
Fill and Pressurize the Reservoir
Fill the tank with lukewarm water around 98.6°F to prevent gum sensitivity. For added antibacterial benefits, you can mix in one capful of alcohol-free mouthwash, or half a teaspoon of non-iodized salt in 8 ounces of water, or diluted hydrogen peroxide using a 1:1 ratio with water.
Pump the handle 3 to 5 times to build pressure, typically reaching 30 to 60 psi. Squeeze the trigger to release a steady stream. Adjust flow intensity by varying trigger pressure. Gentler pressure works for sensitive gums, while firmer pressure helps remove plaque.
Warning: Never use vinegar, baking soda, essential oils, or undiluted solutions. These can corrode seals or clog tubing.
Optimize Your Technique
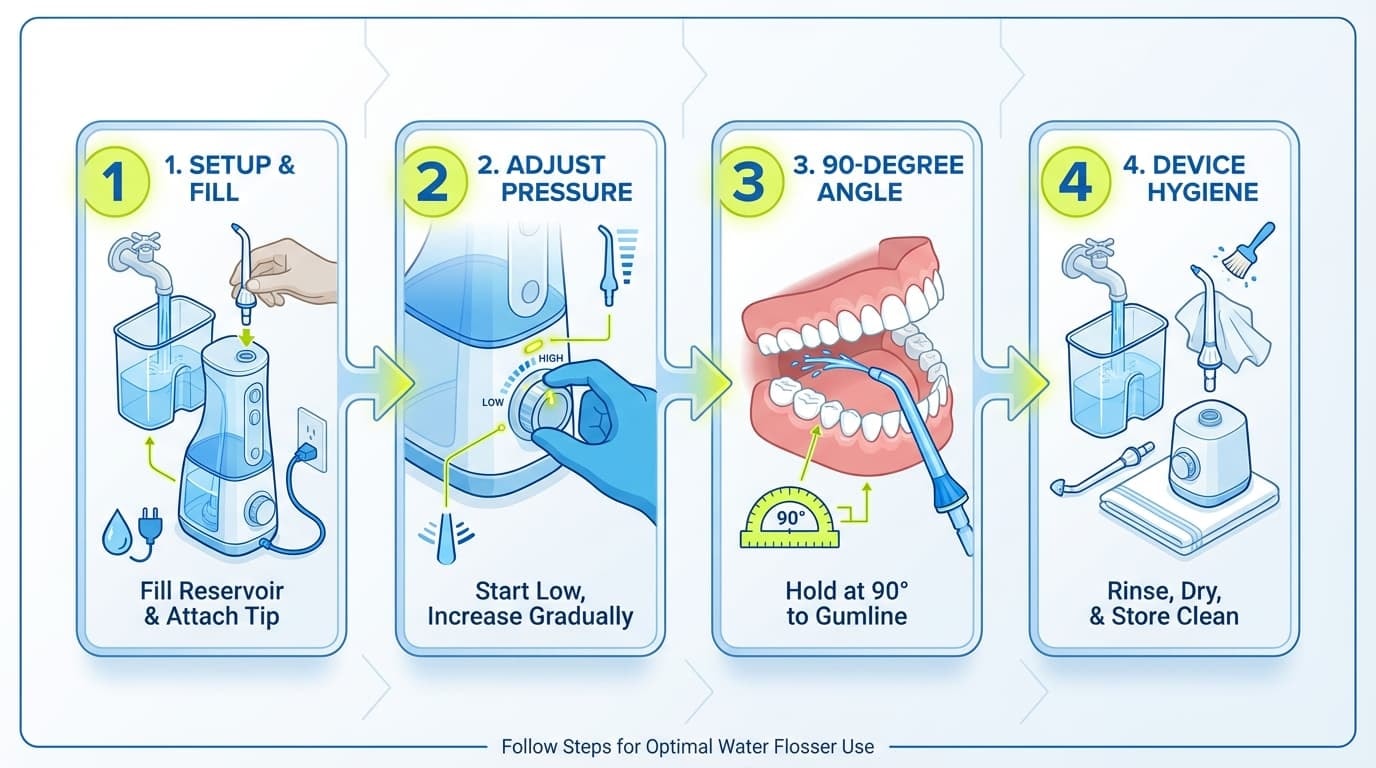
Hold the tip at a 90-degree angle to your gumline, not pointed directly into the gums. Move systematically from back teeth to front, pausing between each tooth to flush out debris. To simulate pulsation, rhythmically squeeze and release the trigger.
Clean and Store Properly
After each use, rinse the reservoir and nozzle with clean water, then disassemble and air dry completely. Store empty and disassembled to prevent bacterial growth. Once a month, deep clean with a 1:2 vinegar-water solution, then flush with plain water to remove mineral buildup.
Use a Syringe for Targeted Gum Cleaning
When you need precision around implants, braces, or surgical sites, a plastic medical syringe offers unmatched control.
Choose the Right Syringe
Use a 30 to 60 mL Luer-lock syringe with a curved tip such as the Monoject 412. These are available at pharmacies or online. Luer-lock fittings prevent accidental disconnection, and the curved design improves access to rear teeth.
Load and Deliver the Solution
Draw lukewarm water or saline into the syringe. Position the tip near the gumline at a 90-degree angle, then gently press the plunger to release a short burst. Refill after each discharge. This limits continuous flow but allows fine pressure control.
User Benefit: Many users report less gum irritation compared to powered flossers, making this ideal for post-surgery care or sensitive tissue.
Modify for Better Use
To reduce hand fatigue and improve reach, attach a short piece of flexible IV tubing to the tip. Use a 60 mL syringe to minimize refills. Wrap the barrel in foam or use a 3D-printed grip for easier handling.
Maintain Hygiene
If reusing the syringe, boil it for 1 to 2 minutes after each use or clean with food-safe disinfectant. Disposable syringes eliminate contamination risks, making them ideal for immunocompromised users.
Limitation: Two-handed operation makes this awkward for full-mouth cleaning. Reserve this method for spot treatment.
Compare DIY Options: Which Is Right for Your Needs?
Not all DIY water flossers work equally well. Your choice depends on how often you plan to floss, your dexterity level, and your specific dental needs.
Garden Sprayer vs. Syringe Comparison
Garden Sprayer delivers adjustable pressure through manual pumping, provides up to 60 seconds of continuous flow per fill, costs $10 to $20, and works best for full-mouth cleaning. The main drawbacks are moderate bulkiness and the need to pump before use.
Plastic Syringe offers manual plunger force control, delivers 1 to 2 second bursts per fill, costs only $1 to $5, and excels at spot treatment. The limitations include frequent refilling needs and awkward two-handed operation.
Bottom Line: Use the garden sprayer for daily routine care and the syringe for targeted cleaning or emergencies.
When to Avoid DIY Systems
While both methods work well for many people, certain situations call for commercial equipment. Avoid DIY systems if you have severe periodontitis requiring precise regulated pressure, braces or implants that benefit from pulsating flow and specialized tips, arthritis or limited hand strength making manual operation difficult, or a compromised immune system with higher infection risks.
Dentist Insight: One practitioner recommended the Monoject 412 syringe for patients with crowns or bridges, proving that even professionals see value in low-tech solutions.
Safe DIY Flossing Solutions to Use
What you put in your homemade flosser matters. The wrong additive can damage your device or irritate your gums.
Approved Rinse Formulas
Salt Water Rinse: Mix half a teaspoon of non-iodized salt in 8 ounces of lukewarm water. This soothes inflamed gums and reduces bacteria. Note that Waterpik warns against salt water in cordless models due to corrosion risk. Use only in DIY systems and rinse thoroughly afterward.
Diluted Mouthwash: Combine 1 part alcohol-free mouthwash with 3 parts water. This enhances germ-killing power without damaging plastic. Crest Pro-Health and similar alcohol-free options work well.
Weak Hydrogen Peroxide: Use 3% hydrogen peroxide diluted 1:1 with water. This helps kill anaerobic bacteria and may reduce gingivitis. Do not use daily. Can degrade rubber seals and irritate tissue if overused. Consult your dentist first.
Additives to Never Use
Essential oils clog tubing and cause irritation. Undiluted mouthwash or peroxide causes tissue damage and equipment corrosion. Herbal teas or infusions promote bacterial growth. Vinegar as a rinse is corrosive, and should only be used diluted for descaling. Baking soda is abrasive and settles to block nozzles.
Expert Advice: Dr. Seema Shetty advises patients to consult a dentist before using any additive, especially with implants, braces, or gum recession.
Prevent Clogs and Damage
Proper maintenance determines whether your DIY flosser lasts or fails. Clogs and biofilm buildup are common, especially when using additives.
Clean After Every Use
Flush with plain water for 10 to 15 seconds. Disassemble the nozzle and reservoir. Wash with warm soapy water using a soft brush. Inspect the nozzle for blockages.
Remove Clogs Safely
Soak the tip in warm soapy water for 10 minutes. Use a pipe cleaner or interdental brush to gently clear debris. Never use sharp objects that can scratch or puncture seals.
Critical: Clean immediately after using mouthwash or peroxide to prevent residue buildup.
Deep Clean Monthly
Fill the reservoir with 1:2 white vinegar and water. Pump or flush through the system for 30 seconds. Follow with two full cycles of clean water to neutralize acidity.
Note: Do not use vinegar in metal-sealed commercial units due to corrosion risk. This method is safe for most DIY plastic systems.
Master Proper Flossing Technique
A powerful device delivers nothing without correct use. Technique determines effectiveness.
Aim at 90 Degrees to Gums
Never point the stream directly into gum pockets. Hold the nozzle perpendicular to the gumline to maximize plaque disruption without causing trauma.
Cover All Teeth Systematically
Start at the back molars and work forward, pausing between each tooth. Spend 3 to 5 seconds per gap to ensure thorough cleaning.
Use Daily But Do Not Replace String Floss
Water flossing does not remove plaque biofilm as effectively as physical floss. Use your DIY irrigator after brushing, but still floss with string once a day.
Reminder: Any interdental cleaning is better than none, but water flossing should complement, not replace, traditional floss.
Final Recommendations and Warnings
Building a water flosser at home is a smart, affordable solution when done safely.
Best DIY Setup: Garden Sprayer Version
Use a new 1-quart BPA-free garden sprayer, a Waterpik-compatible orthodontic tip, a silicone O-ring for leak prevention, lukewarm water plus diluted alcohol-free mouthwash, and rinse daily with monthly descaling.
Best for Spot Cleaning: Syringe Method
Use a 60 mL Luer-lock syringe with a curved tip, warm saline or diluted peroxide for occasional use, and sterilize after each use or use disposable versions.
Safety First: Critical Rules
Never repurpose chemical containers. Use only lukewarm water to avoid thermal shock. Dilute all additives. Do not store solutions overnight. Replace nozzles every 3 to 6 months.
Final Note: Always consult your dentist before starting a new oral care routine, especially if you have gum disease, implants, or braces. A DIY water flosser is a supplement, not a substitute, for professional oral hygiene.
Frequently Asked Questions About Making a Water Flosser at Home
Can I use a regular water bottle as a water flosser?
Regular squeeze bottles provide limited pressure and inconsistent flow. They require strong hand grip and cannot generate enough force for effective interdental cleaning. The garden sprayer and syringe methods documented here are the only DIY approaches shown to work reliably.
Is homemade water flossing as effective as using a Waterpik?
DIY water flossers lack the pulsation technology and precise pressure regulation of FDA-cleared commercial units. They can remove debris and reduce bacteria, but clinical studies only support commercial devices for validated plaque removal. Use DIY flossers as supplements to string flossing, not replacements.
How often should I replace parts on my DIY water flosser?
Replace dental nozzles every 3 to 6 months, or sooner if visibly worn. Inspect silicone O-rings monthly and replace if cracked or flattened. Sanitize all reusable components after each use to prevent bacterial growth.
Can I use essential oils in my DIY water flosser?
No. Essential oils leave oily residues that clog narrow tubing, are not water-soluble, and may cause mucosal irritation or allergic reactions. Stick to approved solutions like diluted alcohol-free mouthwash, saline, or occasional diluted hydrogen peroxide.
What if I have braces or implants?
Braces and implants benefit from the pulsating flow and specialized tips of commercial water flossers. While the garden sprayer method accepts Waterpik-compatible orthodontic tips, severe orthodontic cases or complex implant work may require professional equipment. Consult your orthodontist or periodontist for specific recommendations.
Can children use homemade water flossers?
Children old enough to use water flossers responsibly can use the syringe method with adult supervision. The gentle control allows for safer use. However, commercial pediatric water flossers with pressure regulators designed for smaller mouths remain the preferred choice for most families.
Key Takeaways for Making a Water Flosser at Home
You can build an effective water flosser using a garden sprayer for full-mouth cleaning or a plastic syringe for targeted treatment. The garden sprayer method costs $10 to $20, delivers adjustable pressure through manual pumping, and accepts Waterpik-compatible tips. The syringe method costs $1 to $5, offers precise control, and works best for spot cleaning around dental work.
Safe additives include diluted alcohol-free mouthwash, salt water rinse, and occasional diluted hydrogen peroxide. Never use essential oils, undiluted solutions, vinegar as a rinse, or baking soda. Clean your device after every use with plain water, and deep clean monthly with vinegar solution.
Always use proper technique by holding the nozzle at 90 degrees to your gumline and working systematically tooth by tooth. Remember that DIY water flossers supplement but do not replace string flossing. Consult your dentist before starting any new oral care routine, especially if you have gum disease, implants, braces, or oral sensitivities.