
You just unboxed your new water flosser and want to start using it the right way. Whether you’re new to oral irrigators or upgrading from string floss, knowing how to set up a water flosser correctly ensures maximum effectiveness and gum safety. Done wrong, improper setup can cause splashing, weak pressure, or even gum damage. But when done right, a water flosser removes up to 99.9% of plaque from treated areas and improves gum health significantly.
This guide walks you through every step, from plugging in and filling the reservoir to attaching the right tip and priming the system. You’ll learn the exact setup sequence, common mistakes to avoid, and how to customize your device for braces, implants, or sensitive gums. By the end, you’ll be ready to use your water flosser confidently, safely, and effectively every single time.
Power and Placement Setup
Before you begin, you need to get your device ready to operate. Proper power and placement setup prevents accidents and makes your flossing session smoother.
Plug In or Charge First
For corded models, plug into a standard bathroom outlet near the sink. For cordless or portable water flossers, charge fully before first use. This initial charge may take 3 to 6 hours depending on the model. Never use a cordless model while charging unless the manufacturer specifically permits it.
Place the device on a dry, stable surface close to the sink. Avoid edges where it could tip over. If using a countertop model with a long hose, leave enough slack for comfortable movement around your mouth.
Choose the Right Location
Most people use their water flosser at the bathroom sink. However, many find it easier to use in the shower, especially with cordless models. The shower manages splashing better and keeps your counter dry. If using the shower, ensure your device is rated for bathroom use and keep it away from direct water spray unless it’s waterproof.
Fill the Water Reservoir Correctly
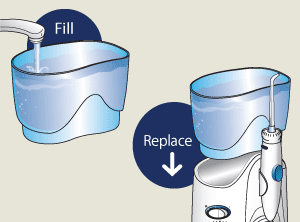
The reservoir is where your cleaning solution lives. Getting this step right prevents leaks and ensures you have enough water for a complete session.
Use Warm Water for Comfort
Fill the reservoir with lukewarm or room-temperature water. Cold water can cause sensitivity, especially if you have exposed roots or receding gums. Hot water should be avoided entirely because it can warp plastic parts. Warm water feels gentler and encourages consistent daily use.
Fill to the Max Line Only
Most reservoirs hold between 180 mL and 600 mL. Always fill only to the maximum fill line marked on the reservoir. Overfilling causes leaks or spills when reattaching the reservoir. If your model has a removable reservoir, detach it before filling. You can fill under the tap or with a measuring cup, then reattach securely until it clicks or locks into place.
Refill Mid-Use If Needed
On high-pressure settings, water depletes fast, sometimes in under 60 seconds. If your session isn’t complete, simply pause, refill, and continue. Most units allow mid-session refills without restarting the process.
Select and Attach the Right Tip
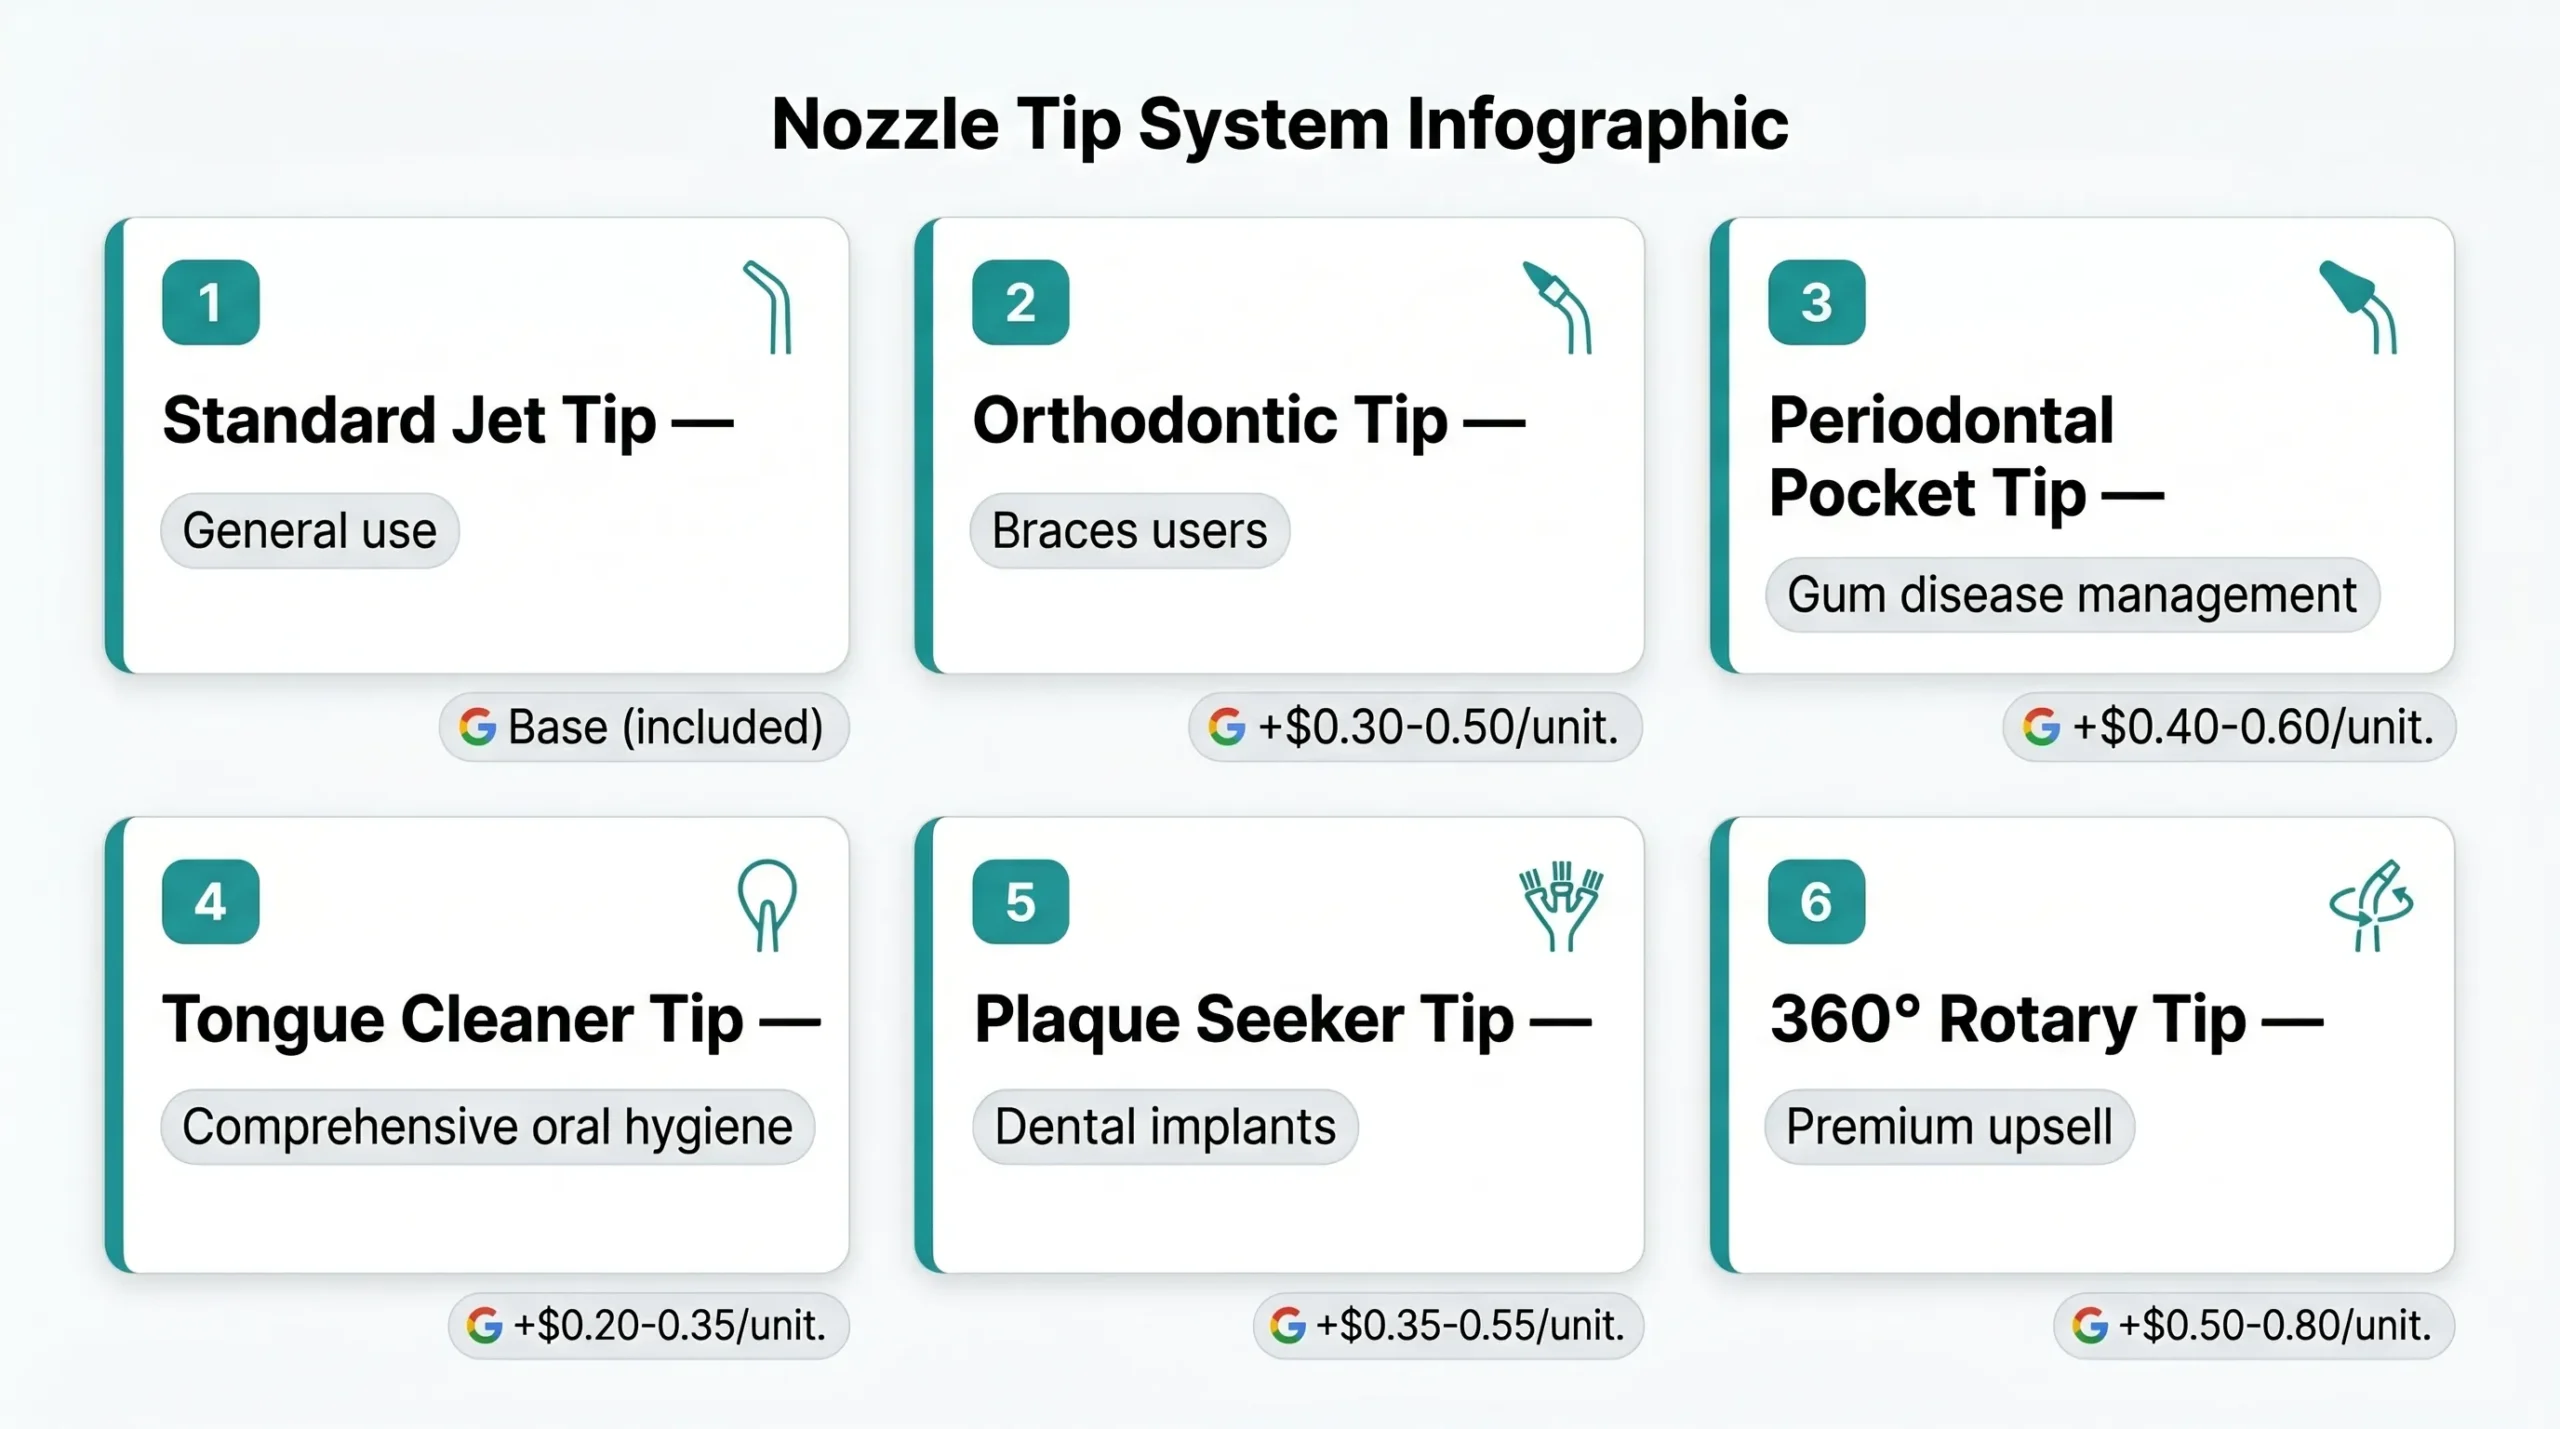
The tip you choose directly impacts cleaning effectiveness. Using the wrong tip reduces results and may cause discomfort.
Match the Tip to Your Needs
Not all tips are the same. Using the wrong one reduces effectiveness significantly. Here’s which tip to choose based on your dental situation.
Standard Jet Tip works best for general cleaning and most users. Orthodontic Tip is designed specifically for braces, wires, and bridges. Plaque Seeker Tip targets biofilm and plaque around crowns, implants, and tight interdental spaces. Periodontal Tip is used for deep pocket irrigation, typically under dental professional guidance. Tongue Cleaner Tip removes bacteria from the tongue surface for fresher breath. Ask your dentist which tip is best if you’re unsure, especially with implants, bridges, or gum disease.
How to Attach the Tip Securely
Hold the handle firmly and insert the tip straight in until you hear a distinct click. Wiggle it slightly to confirm it’s locked. A loose tip will leak or pop off during use. For multi-user households, color-code or label tips to prevent cross-contamination. Never force the tip. If it doesn’t click, remove and realign before trying again.
Prime the Pump (First-Time Only)
Air trapped in the tubing causes sputtering and weak pulsation. Priming removes air and ensures smooth, consistent water flow.
Why Priming Is Essential
Skipping this step means your flosser may pulse unevenly or stall entirely. Priming prepares the pump for reliable operation every time you use it.
Step-by-Step Priming Process
Set the pressure dial to high. Point the tip down into the sink. Turn the unit on and let water run continuously. Wait until the stream flows steady and sputter-free, usually 20 to 30 seconds. Turn off and reduce pressure back to low for actual use. This step needs to be done once per device unless you’ve disassembled it or stored it dry for months.
Adjust Pressure Settings Safely
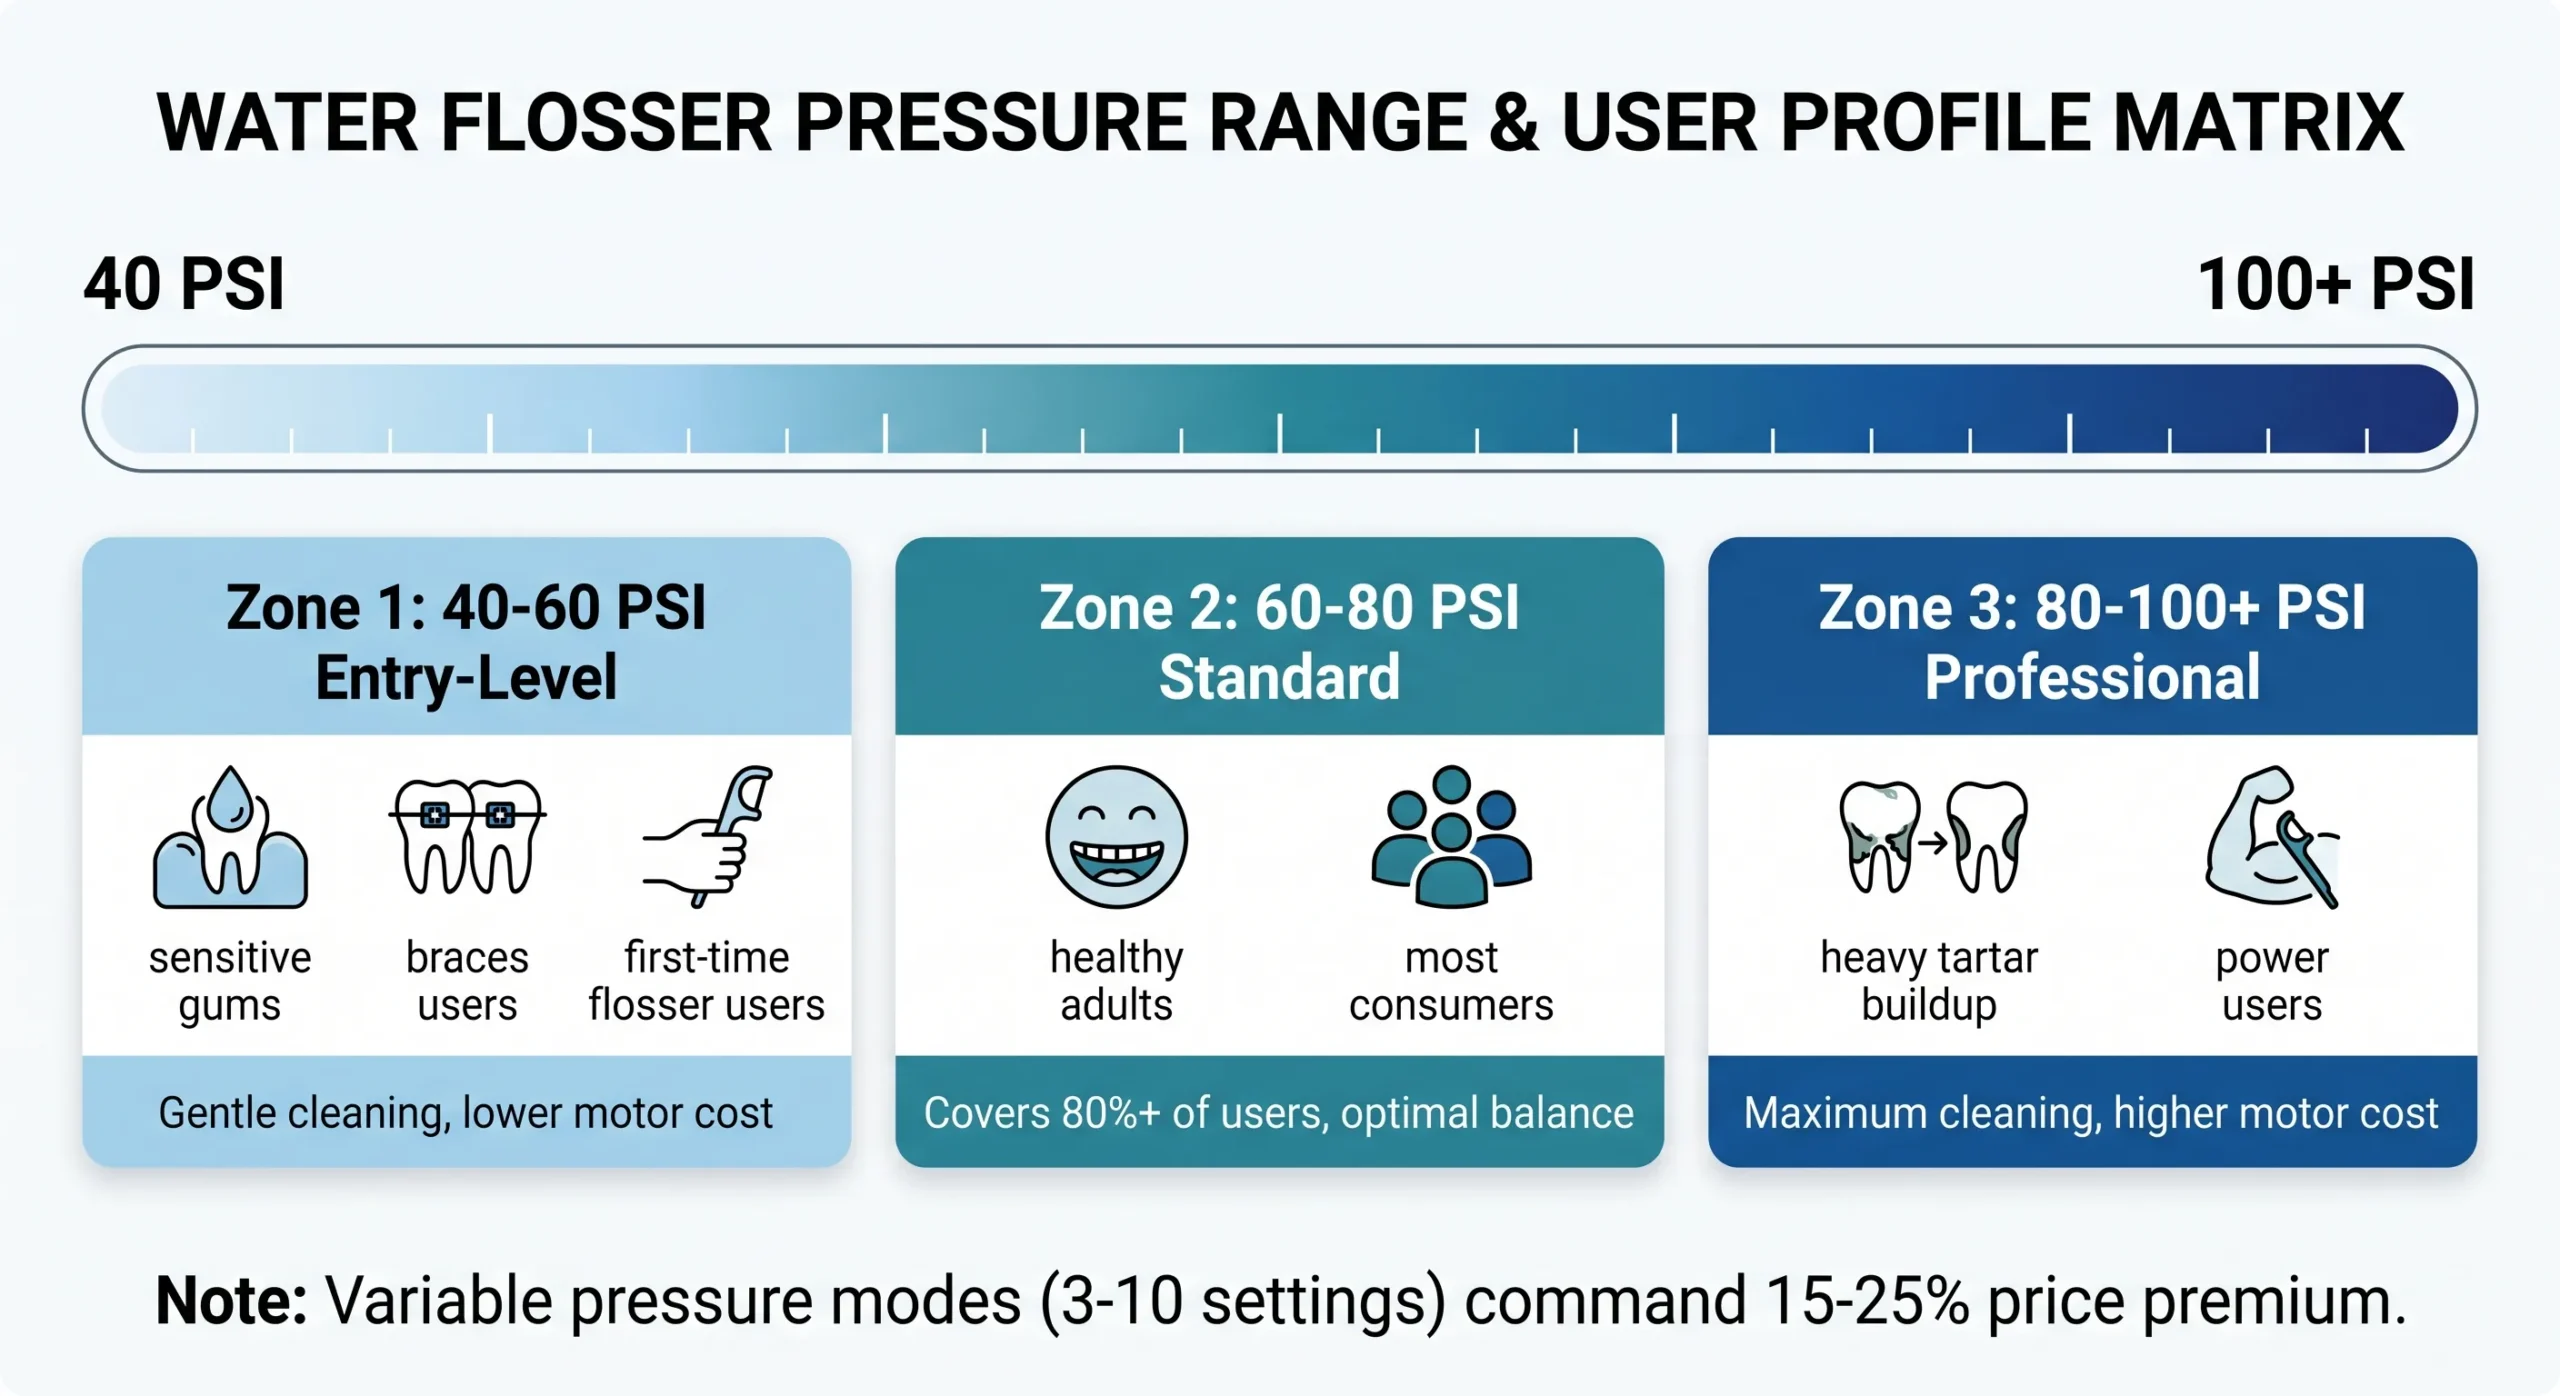
Pressure control lets you customize the cleaning intensity. Getting this right protects your gums while maximizing plaque removal.
Start Low, Then Increase
Always begin at the lowest pressure setting, usually 1 or 2. High pressure too soon can bruise gums or cause bleeding. As you get used to the sensation, gradually increase to your comfort threshold. Most users find ideal results between settings 3 and 6. Settings above 8 should only be used by experienced users under dental guidance.
Know the Pressure Ranges
Low pressure ranges from about 30 to 40 psi, ideal for sensitive gums and post-surgery care. Medium pressure ranges from about 50 to 80 psi and works best for daily use. High pressure ranges from about 90 to 120 psi and is for stubborn plaque, not for beginners. Avoid max pressure unless recommended by your dentist because it can contribute to gum recession.
Position Yourself to Avoid Mess
Where you stand and how you hold your head affects how much cleanup you’ll have afterward. Good positioning reduces splashing dramatically.
Lean Forward Over the Sink
Stand with your head slightly forward, mouth open over the basin. Don’t tilt your head back because this increases splash and gag risk. Many users prefer facing down into the sink, not up at the mirror, especially when starting. Once comfortable, you can adjust for visibility.
Try Using It in the Shower
For mess-free flossing, use your water flosser in the shower. Portable models are perfect for this. The water drains instantly and you save time on cleanup. Bonus: you can floss while showering, great for busy mornings.
Turn On After Mouth Insertion
Starting the device outside your mouth causes a sudden jet of water that sprays everywhere. This is a common mistake that creates a mess.
Never Start Outside the Mouth
Always insert the tip into your mouth first, then turn on the device. Starting outside causes an uncontrolled spray. Use the pause button, if available, to stop flow when switching sides or spitting.
Use the Pause Button Smartly
On models with a thumb-activated pulse control, press to start and release to pause. This lets you move between teeth without turning the unit off and on repeatedly.
Aim the Stream Properly
The angle at which you direct the water determines how effectively it cleans without causing harm.
Hold at 90 Degrees to Gumline
Position the tip so it’s horizontal to your teeth, aiming along the gumline, not into it. The ideal angle is 90 degrees from the tooth surface. Never point straight down into gums because this can damage tissue and increase sensitivity.
Target Gaps, Not Just Teeth
Direct the pulsating stream into the spaces between teeth and just below the gumline. The water does the work, so there’s no need to press hard. Let the pulsations do the cleaning, not physical pressure.
Move Systematically Through Your Mouth
Working in a consistent pattern ensures you don’t miss any spots. Random movements lead to uneven cleaning.
Start at the Back Molars
Begin with the upper right molars, then slowly move along the gumline to the front. Repeat on the opposite side. Then switch to the lower arch. Work in a consistent pattern so you don’t miss spots.
Pause 2 to 10 Seconds Per Gap
Spend 2 to 5 seconds between front teeth and 5 to 10 seconds between molars or problem areas. Move slowly because rushing reduces effectiveness.
Clean All Tooth Surfaces
Floss both the outer cheek side and inner tongue side surfaces. Many users skip the inner side, but it’s just as prone to plaque buildup.
Time Your Sessions Right
How long you floss matters for thorough cleaning. Too short misses debris, too long wastes water.
Aim for 2 Minutes Total
Most dentists recommend 30 seconds per quadrant. Some models have a 90-second auto-shutoff, but extending to 2 minutes ensures full coverage. Daily use is key because consistency beats occasional long sessions.
Clean and Maintain After Use
Proper maintenance extends your device’s life and prevents bacteria buildup.
Empty and Rinse Immediately
After flossing, empty the reservoir completely and rinse the reservoir, tip, and handle with clean water. Wipe the base with a dry cloth. Leaving water inside promotes bacteria and mold growth.
Wash Weekly with Mild Soap
Once a week, wash the reservoir with mild dish soap and warm water. Use a soft brush to clean the nozzle opening. Rinse thoroughly to remove all soap residue.
Descale Monthly to Prevent Clogs
Mineral buildup from hard water clogs internal tubing over time. Monthly descaling prevents this.
Use Vinegar Solution Every 30 Days
Mix equal parts white vinegar and water. Fill the reservoir with the solution and run the device for 1 to 2 minutes. Flush with 3 to 4 cycles of clean water. Do this even if you use filtered water because it prolongs device life.
Replace Tips Every 3 to 6 Months
Worn tips clean less effectively and may harbor bacteria. Regular replacement keeps your routine hygienic.
Know When to Swap Tips
Replace tips when they become discolored or cracked, bent or loose fit, or you notice reduced water pressure despite cleaning. Most manufacturers recommend replacement every 3 to 6 months or sooner with heavy use. Don’t share tips unless labeled for multiple users due to hygiene risks.
Store Properly for Longevity
Proper storage keeps your device working well for years.
Keep It Dry and Upright
After cleaning, store the reservoir upside down to air-dry. Leave the tip detached or stored in a clean case. Keep the cord loosely coiled, never tight wraps. Store in a cool, dry place away from direct sunlight.
Use Daily for Best Results
Consistency is what delivers real oral health benefits. Occasional use won’t give you the results you want.
Ideal Frequency: 1 to 2 Times Per Day
Use your water flosser after brushing, especially at night. Use it post-meal if food gets stuck. Use it twice daily if you have braces, implants, or gum disease. Daily use reduces bleeding within two weeks, a key sign of improving gum health.
Monitor Gum Response
Your gums tell you whether your technique and settings are right. Pay attention to the feedback.
Bleeding Is a Warning Sign
Healthy gums don’t bleed. If you see blood, lower the pressure immediately. Check your angle and make sure you’re not pointing directly into gums. Continue daily because bleeding usually stops within 10 to 14 days. If bleeding persists beyond two weeks, see your dentist because it may indicate gingivitis or periodontitis.
Avoid Common Mistakes
Knowing what not to do protects your gums and your device.
Top 5 Setup and Use Errors
Skipping the prime step causes sputtering and weak flow. Using cold or hot water leads to discomfort or damage. Starting at high pressure causes gum trauma. Leaving water in the reservoir promotes mold and bacteria. Not replacing tips reduces cleaning power. Follow the checklist below to avoid all five.
Final Setup Checklist
Before you start flossing, run through this checklist every time.
Plug in or fully charge the device and place it near the sink on a stable surface. Fill the reservoir with warm water to the max line. Attach the correct tip that clicks securely. Prime the pump on first use only. Set pressure to the lowest setting. Insert the tip into your mouth before turning on. Aim horizontally along the gumline. Move slowly and pause between teeth. Spend about 30 seconds per quadrant. Spit when full, resume until done. Turn off before removing the tip. Empty the reservoir immediately after use. Rinse all parts with clean water. Descale monthly with vinegar solution. Replace tips every 3 to 6 months. Store dry and upright.
Frequently Asked Questions About Setting Up a Water Flosser
How long does it take to set up a water flosser for the first time?
The initial setup takes about 5 to 10 minutes. This includes charging a cordless model, reading the manual, filling the reservoir, attaching the tip, and priming the pump. Subsequent uses take less than 2 minutes.
Can I use tap water in my water flosser?
Yes, plain tap water works fine for daily use. However, if you have hard water, consider using filtered water or descaling monthly with vinegar solution to prevent mineral buildup in the tubing.
Do I need to prime my water flosser every time I use it?
No, you only need to prime the pump once when you first use the device or after long periods of storage. Regular use after that doesn’t require re-priming.
What happens if I don’t replace the water flosser tips?
Worn tips become less effective at removing plaque. They may also crack or discolor, harbor bacteria, and deliver uneven pressure. Replacing tips every 3 to 6 months maintains cleaning effectiveness and hygiene.
Can I use my water flosser with mouthwash?
You can add diluted mouthwash to the reservoir, but only if your manufacturer approves it. Some mouthwashes can damage internal components. Always rinse the reservoir thoroughly after using additives.
Is it normal for gums to bleed when starting a water flosser?
Some bleeding is common in the first one to two weeks as your gums adjust to the stimulation. If bleeding continues beyond two weeks or is heavy, reduce your pressure setting and consult your dentist.
Key Takeaways for Setting Up Your Water Flosser
Setting up a water flosser correctly takes less than 5 minutes, but doing it right makes all the difference in your oral health results. The key steps are charging or plugging in first, filling the reservoir with warm water to the max line, selecting the appropriate tip for your dental needs, and priming the pump on first use only. Always start at low pressure and aim the stream horizontally along your gumline at 90 degrees.
With proper setup and daily use, you’ll enjoy cleaner teeth, healthier gums, and fresher breath. Combine your water flosser with regular brushing and occasional string flossing for a complete oral care routine. When in doubt, consult your dentist to personalize your technique and tip selection for your specific oral health needs.