
You just unboxed your new Waterpik water flosser and want to start using it right away, but where do you begin? Setting up a Waterpik isn’t complicated, but doing it correctly ensures maximum effectiveness, device longevity, and a comfortable flossing experience. Whether you have braces, implants, sensitive gums, or just want to upgrade your oral hygiene, proper setup is the first step toward healthier teeth and gums.
In this guide, you’ll learn how to set up your Waterpik step by step, select the right tip, prime the system, adjust pressure, maintain the device, and avoid common mistakes. Let’s get started.
Unbox and Identify All Components
Before you begin setup, lay out all parts from the box and confirm everything is included. This prevents frustration later when you realize something is missing.
Check Your Kit Contents
Most Waterpik models come with these essential components:
- Base unit (motor and pump)
- Removable water reservoir
- Flossing handle or wand
- Multiple interchangeable tips (Classic Jet, Orthodontic, Plaque Seeker, Pick-Pocket, Tongue Cleaner)
- Tip storage compartment in reservoir lid
- Quick Start Guide and Owner’s Manual
Higher-end models like the Ultra Plus or Sonic-Fusion 2.0 may include extra tips, dual devices, or USB charging bases. Take a moment to identify each piece before proceeding.
Attach and Fill the Reservoir
The reservoir holds the water that powers your flossing sessions. Getting this step right prevents leaks and ensures consistent performance.
Snap Reservoir Into Base
Hold the reservoir by the sides and align it with the base unit. Press down firmly until it clicks into place. Ensure it sits securely. Loose seating causes leaks or power issues during use.
Fill With Warm Water
Use lukewarm water for comfort, especially if you have sensitive teeth. Fill up to the max fill line marked on the reservoir. Overfilling causes overflow during operation.
Reservoir capacities vary by model type. Countertop models like the Ultra and Aquarius hold approximately 600 mL, giving you about 90 seconds of use. Cordless models like the Select and Pearl hold 200 to 300 mL, lasting 45 to 60 seconds. Travel models like the Sidekick hold 100 to 200 mL for shorter sessions.
Optional: Add 1 part mouthwash to 3 parts water for fresher breath. Never use undiluted chemicals, alcohol, or abrasive cleaners. They damage internal seals and void your warranty.
Choose and Install the Correct Tip
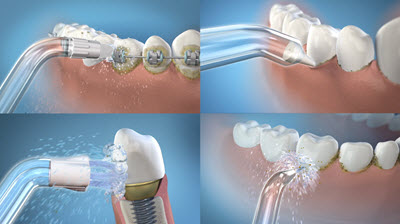
Selecting the right tip for your dental needs maximizes cleaning effectiveness. Using the wrong tip reduces performance even with perfect technique.
Match Tip to Your Needs
Here is a quick reference for tip selection:
- Classic Jet Tip: Standard cleaning for general use
- Orthodontic Tip: Braces, wires, and aligners
- Plaque Seeker Tip: Implants, crowns, and bridges
- Periodontal Tip: Deep gum pockets (sold separately)
- Tongue Cleaner Tip: Bad breath
- Pick-Pocket Tip: Stubborn plaque
In multi-user households, label each tip to prevent cross-contamination. Using someone else’s tip spreads bacteria and defeats the purpose of personal oral care.
Attach the Tip to the Handle
Insert the tip into the handle nozzle and push until you hear a firm click. Test for tightness by gently tugging. Wobbly tips reduce pressure and cause leaks during use.
To remove the tip after flossing, press the eject button on most models. If your model lacks an eject button, pull the tip straight out gently.
Prime the Pump for First Use
New Waterpiks contain air in the tubing. You must prime the pump before first use and after long storage to ensure steady water flow.
Prime in 4 Steps
- Set pressure dial to 10 (highest setting)
- Point the flossing tip into the sink
- Turn on the device and let water run
- Wait 10 to 30 seconds until the stream is smooth and bubble-free
If flow remains weak after priming, repeat the process. Re-prime if the unit has been stored empty for weeks. Priming removes airlock and ensures consistent pulsations.
Adjust Pressure and Start Flossing

Starting with the wrong pressure causes discomfort and may discourage consistent use. Build up gradually for the best experience.
Begin on Low Pressure
First-time users should start at settings 2 to 4. These low settings allow your gums to adapt without irritation. Gradually increase as comfort improves. Most users find settings 6 to 8 ideal for daily maintenance.
Never use maximum pressure unless you are comfortable with it. Excessive force irritates gums and defeats the purpose of gentle cleaning. Cordless models have 3 to 5 preset levels (low, medium, high, massage).
Activate In-Handle Controls
Models like the Ultra Plus have a button on the handle to turn water on and off without touching the base. Use the pause button to switch quadrants or take breaks during your session.
Use Proper Flossing Technique
Technique matters more than pressure. Even the best device fails if used incorrectly. Follow these steps for maximum plaque removal.
Step-by-Step Routine
- Lean over the sink with head slightly forward
- Put the tip in your mouth before turning on the device
- Partially close your lips to reduce splash while allowing water to drain
- Aim at the gumline, not directly into the gums
- Start at back molars and move forward tooth by tooth
- Pause 1 to 5 seconds per tooth to let pulsations clean between teeth
- Clean both outer and inner surfaces
- Turn off the device before removing the tip
For braces or implants, use the Orthodontic or Plaque Seeker tip and spend extra time around brackets and restorations. These areas trap more debris than natural teeth.
Clean and Maintain After Use
Proper maintenance prevents mold, mineral buildup, and performance issues. A few minutes after each session saves headaches later.
Daily Cleaning Steps
- Empty the reservoir never leave water inside overnight
- Rinse reservoir and cap with warm water
- Remove and rinse all tips under running water
- Wipe the base with a damp cloth
- Air dry all parts before reassembling
Store tips in the lid compartment to keep them clean and organized. Damp tips harbor bacteria and develop odors.
Perform Weekly Deep Cleaning
Mineral deposits and bacteria build up inside the system over time, even with daily rinsing. Weekly deep cleaning maintains performance and hygiene.
Run a Vinegar Flush
- Mix equal parts white vinegar and water
- Fill the reservoir with the solution
- Attach no tip and run the device for 30 to 60 seconds
- Follow with 2 to 3 cycles of clean water to rinse
Alternatively, use Waterpik cleaning tablets for hassle-free maintenance. Avoid bleach, alcohol, or abrasive cleaners. They degrade seals and plastic components.
Replace Tips Every 3 to 6 Months
Even tips that look fine wear out over time. Worn tips deliver reduced pressure and may damage gum tissue.
Signs It Is Time to Replace
- Discoloration or cloudiness
- Cracks or warping
- Reduced water pressure despite cleaning
- Frayed or bent nozzle
Use genuine Waterpik tips. Third-party versions may not fit properly or perform as well. Replacement tips are an investment in your oral health.
Troubleshoot Common Setup Issues
Even with careful setup, problems occur. Here is how to fix them fast without calling for support.
No Water Flow
Cause: Airlock, empty reservoir, or clogged tip. Fix: Prime the pump, refill reservoir, clean or replace the tip.
Weak Pressure
Cause: Clogged nozzle, low battery (cordless), or air in the line. Fix: Clean the tip, recharge, re-prime the system.
Leaking Reservoir
Cause: Improper seating, cracked tank, or loose cap. Fix: Re-seat firmly, inspect for damage, tighten the cap.
Unit Will Not Turn On
Cause: Disconnected power, tripped GFCI outlet, or dead battery. Fix: Check the plug, reset the outlet, recharge cordless models.
Bad Smell
Cause: Bacteria or mold in reservoir or tubing. Fix: Run vinegar flush, clean daily, dry after use.
Excessive Splashing
Cause: Lips too open or pressure too high. Fix: Close lips slightly, lower pressure, angle tip properly.
Store Properly for Longevity
If you will not use the Waterpik for more than a month, proper storage prevents damage and extends the device’s life.
Storage Checklist
- Empty and clean all parts
- Dry completely
- Remove battery (for cordless models)
- Store in a cool, dry place
- Keep disassembled to prevent mold and seal degradation
Avoid storing in humid bathrooms unless you use the device daily. Moisture promotes mold growth inside the tubing.
Follow Usage Recommendations
Consistency matters more than duration. Using your Waterpik correctly every day delivers better results than occasional intensive sessions.
How Often to Use
Use once daily for general oral health. Use 2 to 3 times daily if you have braces, aligners, dental implants, periodontal pockets, or active gum disease.
Best times are after brushing in the morning and before bed. Evening use removes food debris accumulated throughout the day.
Frequently Asked Questions About Setting Up a Waterpik
How do I know which Waterpik model is right for me?
Choose a countertop model (Ultra, Aquarius) for home use with multiple family members and 10 pressure settings. Choose a cordless model (Select, Pearl) for travel or small bathrooms. Choose Sonic-Fusion if you want a combined toothbrush and water flosser.
Can I use my Waterpik with mouthwash?
Yes, but always dilute mouthwash with water (1 part mouthwash to 3 parts water). Undiluted mouthwash damages internal seals and tubing. Plain water works perfectly for daily use.
Why does my Waterpik not shoot water?
First, check that the reservoir is properly seated and filled. Second, prime the pump to remove airlock. Third, clean or replace the tip if clogged. If none of these work, the motor or pump may need service.
How long does it take to see results from using a Waterpik?
Most users see improved gum health within 2 to 4 weeks of consistent daily use. Reduced bleeding and fresher breath often appear within the first week. Plaque removal is immediate but requires ongoing use for lasting benefits.
Do I still need to use string floss with a Waterpik?
Yes. Waterpik is an adjunct to, not a replacement for, interdental cleaning. Use string floss or proxy brushes for tight contacts where water cannot reach. Combine daily Waterpik use with brushing and interdental cleaning for complete oral hygiene.
Final Takeaways for Setting Up Your Waterpik
Setting up your Waterpik correctly ensures it works safely, effectively, and lasts longer. Take time to choose the right tip for your dental needs, prime the pump before first use, and start on low pressure. Clean the reservoir after each session and perform weekly vinegar flushes to prevent mineral buildup.
Replace tips every 3 to 6 months and store the device properly when not in use. With proper technique and consistent maintenance, you will see improved gum health in 2 to 4 weeks, less bleeding, fresher breath, and reduced plaque.
Remember: the Waterpik is an adjunct to your oral hygiene routine, not a replacement. Combine it with daily interdental brushing or flossing, twice-daily toothbrushing, and routine dental visits for complete oral health. Healthy gums do not bleed. Start your Waterpik routine today and feel the difference.