
Losing a tooth is one of childhood’s most exciting milestones—and a handmade tooth fairy pillow makes the moment even more special. More than just a place to tuck a wiggly molar, this tiny keepsake becomes part of a family tradition, blending whimsy, comfort, and craftsmanship. Whether you’re a beginner with a needle or a seasoned sewer looking for a quick, meaningful project, learning how to sew a tooth fairy pillow is simple, creative, and deeply rewarding.
This guide walks you step-by-step through every phase of creating a soft, durable pillow designed to hold a lost tooth safely overnight. From choosing the right fabric and attaching a secure pocket to adding personalized embroidery and a ribbon hanger, we’ll cover all the essential techniques—plus pro tips to avoid common mistakes. With options ranging from no-sew felt versions to machine-embroidered designs, there’s a method perfect for your skill level and style. By the end, you’ll have a charming, washable, and magical pillow ready to spark bedtime wonder.
Choose the Right Fabric and Gather Your Supplies
Select a Fabric That’s Easy to Work With and Durable
The first step in sewing a successful tooth fairy pillow is picking the right fabric. Cotton quilting fabric is ideal for beginners—it’s easy to cut, sew, and customize with embroidery or fabric paint. Pre-wash it to prevent shrinking later. For a no-fray alternative, felt is a top choice. It doesn’t unravel, so you can skip hemming and even let kids help with cutting and decorating.
If softness is your priority, consider flannel or minky fabric, though these can shift during sewing and may need extra pins or clips. Avoid slippery or stretchy materials like satin or jersey unless you’re experienced. For added structure, especially in cotton versions, fusible interfacing can be ironed onto the back of the front panel to keep the pillow crisp.
Collect All Necessary Tools Before You Begin
Having the right supplies on hand ensures a smooth, frustration-free process. You’ll need:
– Two main fabric pieces (7” x 7” or 7.5” x 9.5”)
– One pocket piece (3.5” x 5” or tooth-shaped)
– Polyester fiberfill for stuffing
– Matching thread and hand-sewing needle
– Scissors, pins or fabric clips, and an iron
– Water-soluble pen for marking
– Optional: ribbon (12”–18”), embroidery floss, buttons
Prepare everything before starting—this keeps your workflow efficient and helps you focus on the fun parts: designing and personalizing.
Cut and Prepare Your Fabric Pieces
Measure and Cut for Clean, Professional Results
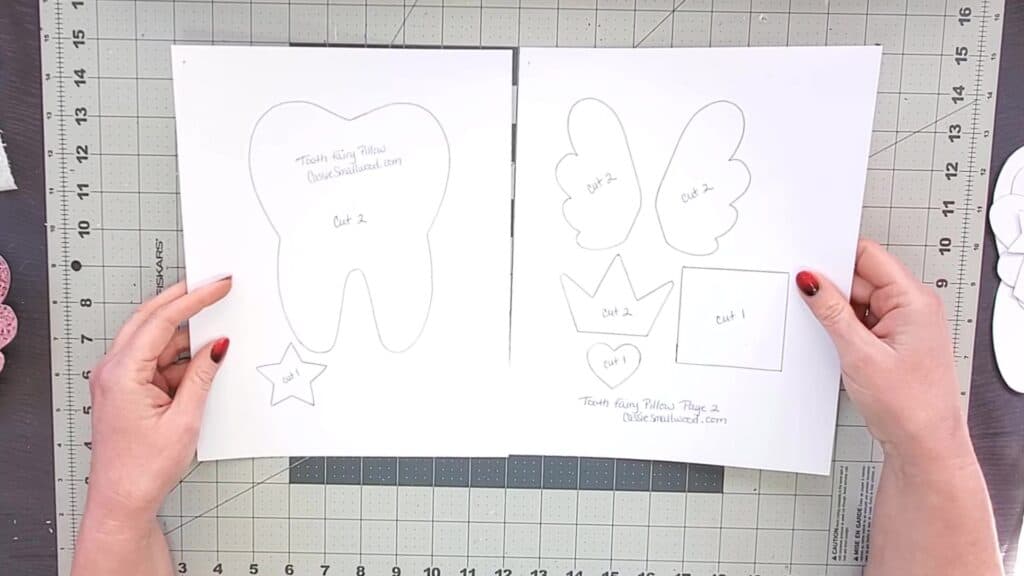
Accuracy matters when cutting fabric. Use a ruler and fabric pen to mark your pieces. For a standard pillow, cut two identical squares or rectangles—7.5” x 9.5” is a popular size that leaves room for a pocket and a bit of stuffing. If you’re making a whimsical tooth-shaped version, trace a printable stencil onto your fabric and cut two matching shapes.
For the pocket, cut a piece slightly smaller than the front panel—typically 3.5” x 5” for rectangles. If using a tooth-shaped pocket, cut from white felt or cotton using a 3” square as your base. Precision ensures even seams and a polished final look.
Press and Mark for Perfect Alignment
Iron all fabric pieces flat before assembling. This removes wrinkles and ensures layers align neatly. Use a water-soluble pen to mark the center of the front piece—this helps you position the pocket exactly where it should go.
If you’re adding a ribbon hanger, cut a 12”–18” length now. Heat-seal the ends with a lighter to prevent fraying, then set aside. Proper prep at this stage prevents crooked pockets and lopsided pillows later.
Attach the Pocket with Care and Precision

Hem the Top Edge for a Clean, Finished Look
To prevent fraying and create a polished opening, fold the top edge of the pocket down by ½”, press with an iron, then fold it again by another ½” to encase the raw edge. Stitch along the inner fold to secure the hem. This creates a smooth, durable top that won’t unravel when teeth are inserted and removed.
For thinner fabrics, a ¼” fold may be sufficient. The key is consistency—make sure both sides of the hem are even.
Position and Sew the Pocket Securely
Place the pocket on the right side of the front fabric piece, aligning it with your center mark. Pin it in place to prevent shifting. Sew along the left, right, and bottom edges using a ¼” seam allowance. Backstitch at the beginning and end to reinforce the corners.
Leave the top edge open—this is where the tooth goes. Avoid sewing over the hemmed edge so the pocket remains accessible. For added charm, sew a small decorative button just above the pocket to represent a second tooth or give the pillow a playful face.
Assemble the Pillow Layers Correctly
Pin Front and Back Together, Right Sides Facing
Place the front piece (with pocket attached) and the back piece right sides together. Align the edges carefully and secure with pins or clips. Be sure not to trap the pocket in the side seams—keep it flat and centered.
If using a ribbon hanger, now is the time to attach it. Pin the ends to the wrong side of the front piece near the top edge, then fold the ribbon forward so it’s sandwiched between the layers when you sew.
Sew Around the Edges, Leaving a Gap
Using a ¼” to ½” seam allowance, stitch around all four sides. Leave a 2”–3” gap on one side—usually the bottom or side—for turning and stuffing. Backstitch at both ends of the gap to strengthen the opening.
Sew slowly, especially around corners, to maintain control and ensure even stitches. A consistent seam allowance leads to a balanced, professional-looking pillow.
Turn, Stuff, and Shape with Attention to Detail
Clip Corners and Turn Right Side Out
After sewing, trim the corners diagonally to reduce bulk. This helps the corners turn out sharply without excess fabric bunching. Use small, sharp scissors and be careful not to cut the stitches.
Turn the pillow right side out through the gap. Use a chopstick, pencil, or turning tool to gently push out the corners. Work slowly to avoid tearing the fabric, especially on delicate materials.
Press for a Crisp, Polished Finish
Lightly press the entire pillow with a warm iron. Focus on flattening the seams and shaping the edges. Avoid pressing too hard on embroidered areas or delicate embellishments.
A well-pressed pillow looks store-bought and holds its shape better over time. This small step makes a big difference in the final appearance.
Stuff and Hand-Sew the Opening Closed
Add Stuffing Evenly and Avoid Overfilling
Begin stuffing with small handfuls of polyester fiberfill. Start from the center and work outward, pushing filling into the corners with a pencil or tool. The pillow should be plump but soft—overstuffing makes it stiff and can strain the seams.
If you’re making the pillow for a young child, ensure the stuffing is hypoallergenic and securely enclosed. You can always add more later, but removing excess is harder.
Close the Gap with an Invisible Ladder Stitch
Fold the raw edges of the opening inward so they meet neatly. Secure with a pin. Thread a hand needle with matching thread and use a ladder stitch (also called an invisible stitch) to close the gap:
1. Insert the needle under a fold on one side, then the opposite
2. Pull gently to close the seam
3. Repeat, taking small stitches
4. Knot securely and trim the thread
This creates a seamless finish that blends into the fabric, making the opening nearly invisible.
Personalize Your Pillow with Whimsical Details
Embroider a Smile, Eyes, or the Child’s Name
Bring your pillow to life with simple embroidery. Use backstitch for a curved smile and running stitch for eyes. Choose contrasting thread so features stand out. For personalization, embroider the child’s name above the pocket using backstitch for clean, legible letters.
Alternatively, use fabric paint or pen to draw a face. Let it dry completely before handling. These details turn a simple pillow into a cherished keepsake.
Attach a Ribbon Hanger for Easy Display
If not already attached, sew a ribbon loop to the top edge using a whip stitch or backstitch for strength. Choose pastel, sparkly, or themed ribbon to match the child’s personality. A hanger lets the pillow be hung on a doorknob, nightstand, or bedpost—keeping it visible and preventing it from getting lost under the bed.
Choose the Best Method for Your Skill Level
Use Felt for a No-Sew, No-Fray Option
Felt is perfect for last-minute gifts or kid-friendly crafts. Cut two 5” x 5” squares and a 5” x 3” pocket. Decorate with a felt tooth, buttons, or fabric paint before sewing. Layer all pieces, leaving a gap, then stitch around the edge. Turn, stuff, and hand-close. No hemming needed—felt won’t fray.
Try Machine Embroidery for Custom Designs
If you have an embroidery machine, create stunning appliqué designs like cats, unicorns, or fairies. Use a no-show mesh hoop with stabilizer and batting. Follow digital steps to position the pocket and decorate. After embroidery, attach the back fabric, leave an opening, stuff, and hand-stitch shut. The result is a professional, highly personalized pillow.
Make a Tooth-Shaped Pillow for Extra Whimsy
For a playful twist, cut two tooth-shaped pieces from felt or cotton. Place them right sides out, pin together, and sew around the edge, leaving a 2” gap at the top. Turn, stuff lightly, and hand-stitch shut with backstitch. Add embroidery and a ribbon for a unique keepsake.
Avoid Common Sewing Mistakes
Prevent Uneven Seams and Twisted Pockets
Pin or clip layers thoroughly before sewing. Misaligned edges lead to lopsided pillows. Check that the pocket lies flat and isn’t twisted before stitching the perimeter.
Don’t Overstuff the Pillow
A pillow that’s too firm feels uncomfortable and can burst at the seams. Add stuffing gradually, checking firmness as you go. It should feel soft and cuddly.
Never Skip the Iron
Pressing transforms a handmade look into a polished one. It flattens seams, sharpens corners, and helps the pillow lie flat. Even if you’re in a hurry, take a minute to press—it’s worth it.
Care for and Preserve Your Tooth Fairy Pillow
Keep It Clean and Safe for Repeated Use
Most tooth fairy pillows are machine-washable if made with cotton and polyester stuffing. Use a gentle cycle and mild detergent. For versions with buttons, embroidery, or delicate details, hand-wash and air-dry flat to preserve structure.
Always inspect for loose threads or weak seams before giving it to a child.
Store It Between Tooth Losses
After each exchange, store the pillow in a dry place. Many families reuse it for every lost tooth, turning it into a treasured milestone marker. Over time, it becomes a sentimental keepsake—some even save it for baby’s first tooth years later.
Sewing a tooth fairy pillow is more than a craft—it’s a tradition in the making. With this guide, you’ve got everything needed to create a magical, personalized keepsake that celebrates a childhood milestone. Whether you choose cotton, felt, or embroidery, the result is a soft, functional, and heartfelt gift that lasts through lost teeth and sweet dreams.