
If your gums bleed when you brush or you struggle to clean around braces or implants, you are not alone. Nearly half of adults have some form of gum disease, and many skip traditional flossing due to difficulty or discomfort. The Waterpik water flosser uses pulsating water to remove up to 99.9% of plaque from treated areas and is up to 50% more effective than string floss at reducing gingivitis. In this guide, you will learn step-by-step instructions, pressure settings, tip selection, and pro techniques to get the most out of your device without the mess.
Fill the Reservoir with Warm Water
Before using your Waterpik, fill the reservoir correctly to ensure smooth operation and user comfort. Using warm water improves comfort and encourages consistent daily use, while cold water may trigger tooth sensitivity.
Use Warm, Not Cold, Water
Always use warm tap water. Cold water can cause discomfort or sensitivity, while hot water may damage internal components. Warm water feels more comfortable and helps you maintain a consistent routine.
Fill to the Max Line
Most models feature a detachable reservoir for easy filling. Remove it from the base and fill to the max fill line marked inside. Overfilling can lead to leakage, and underfilling may require refilling mid-use.
Reattach Securely
Snap the reservoir back into place on the base until it clicks. Ensure it is seated firmly to prevent wobbling or spills during use.
Choose the Right Flossing Tip
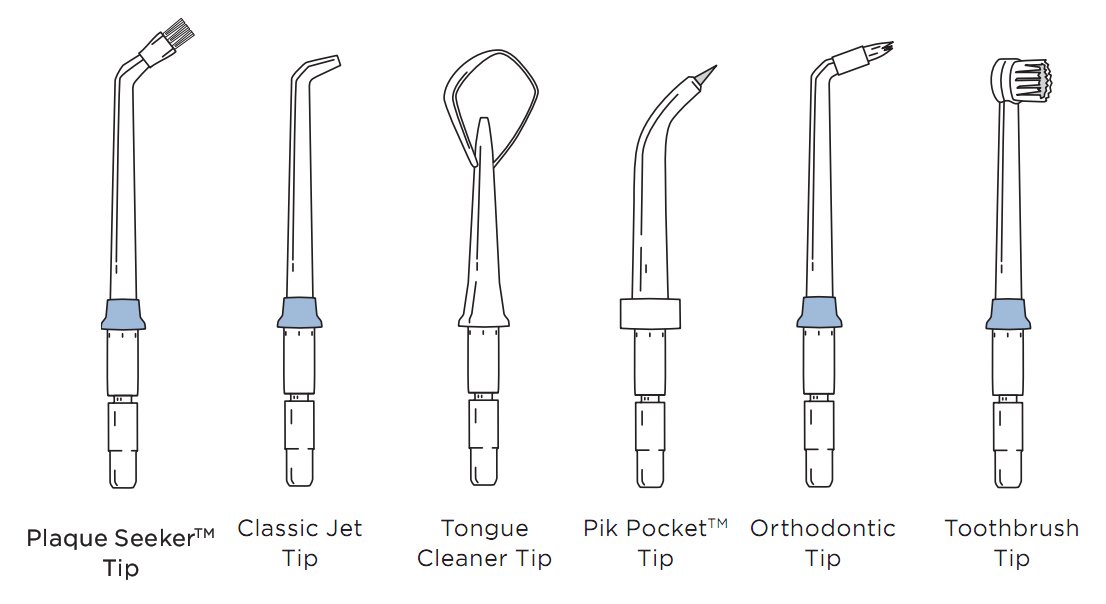
Selecting the correct tip is crucial for effectiveness and safety, especially if you have specific dental work or conditions. The right tip ensures you target problem areas effectively.
Standard Jet Tip for Daily Use
The round nozzle, known as the Standard Jet Tip, works well for most people. It cleans along the gumline and between teeth using targeted pulsations. This tip is ideal for general plaque removal and fresh breath.
Orthodontic Tip for Braces
If you wear braces, retainers, or clear aligners, use the Orthodontic Tip. Its tapered design slips around brackets and wires, flushing out trapped food and bacteria that brushing misses.
Plaque Seeker Tip for Implants
For those with crowns, bridges, or dental implants, the Plaque Seeker Tip is clinically proven to remove three times more plaque than string floss in hard-to-reach areas. It features dual jets that target biofilm buildup on restoration margins.
Periodontal Tip for Gum Disease
If you have deep gum pockets or periodontitis, the Periodontal Tip delivers a gentler, focused stream to clean below the gumline without irritation. Dentists recommend this tip for post-surgical care or chronic gum disease.
Tongue Cleaner Tip for Bad Breath
Combat halitosis with the Tongue Cleaner Tip. It removes bacterial coating from the tongue surface, significantly improving breath freshness over time.
Attach the Tip and Prime the Unit
Once you have chosen the right tip, secure it properly to avoid leaks or dislodging during use. Then, if this is your first use, prime the unit to ensure steady water flow.
Attach and Lock the Tip
Firmly insert the tip into the handle until it clicks into place. Gently tug to confirm it is locked. If the tip does not click, check for debris in the connector or try another tip.
Prime the Unit (First-Time Only)
Priming removes air from the hose and ensures steady water flow, which is critical for optimal performance. Set the pressure control dial to the highest setting. Hold the flosser over the sink with the tip facing downward. Turn on the device and let water flow for 10 to 20 seconds until the stream stabilizes. Once consistent, turn off the unit and adjust to a comfortable setting, typically 3 to 4.
Set Your Pressure and Position Yourself
Beginners should start gently to allow gums to adapt and prevent discomfort. Proper positioning prevents mess and makes the process smoother.
Start at Low Pressure
Begin at level 1 to 3 on a 1 to 10 scale. The sensation should feel like a gentle gum massage, not a jab or sting. After a few days of comfortable use, slowly raise the pressure to improve cleaning power. For most adults, settings 4 to 7 offer the best balance of efficacy and comfort.
Position Yourself Over the Sink
Stand or sit leaning over the sink. Keep your head angled down so water drains directly into the basin. Partially close your lips around the flosser tip like a light kiss to contain splashing while allowing used water to escape naturally. Do not swallow the water, as it flushes out debris and bacteria.
Activate and Aim the Water Flosser
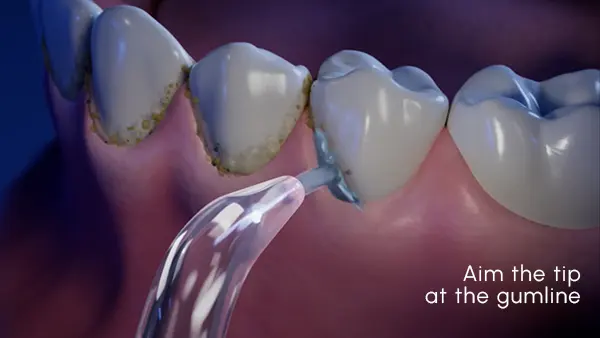
Follow the two-step activation method to avoid accidental sprays. Where you aim the stream determines how well you clean and whether you irritate your gums.
Activate in the Correct Order
Turn on the base unit first while the tip is still outside your mouth. Only then press the handle on/off button once the tip is inside your mouth and positioned correctly. This sequence gives you full control and prevents surprise bursts.
Aim at the Gumline, Not Teeth
Position the tip so the water hits the gumline at a right angle. Do not press it into the gums or tooth surface. Target the tiny groove where gums meet teeth, known as the sulcus. The pulsations will naturally penetrate up to 3 to 4 mm below the gumline. Let the water do the work rather than jamming the tip into tissues.
Move Systematically Through Your Mouth
A consistent pattern ensures no spot is missed. Following a routine helps you develop good habits and achieve better results.
Follow a Consistent Pattern
Start at the back molars in the upper right quadrant. Work your way across the top, then switch to the lower left. Pause between each tooth for 1 to 2 seconds to allow the pulsations to dislodge plaque and food particles. Clean both the cheek-side and tongue-side of each tooth by rotating your wrist or using a swivel base.
Floss for One Minute Daily
Most dentists recommend one full minute per session. Many Waterpik models automatically shut off at intervals to help pace you. Use your water flosser once daily, ideally after brushing at night. Results build over time, and many users notice less gum bleeding within 1 to 2 weeks of daily use.
Minimize Splashing and Mess
New users often worry about water everywhere. These tips keep your bathroom dry and make the experience more enjoyable.
Use the Two-Button Method
Turn on the base first, then activate the handle button only when the tip is in your mouth. This prevents startup bursts that cause splashing.
Practice Dry Runs
Go through the motions without water first to refine your angle, pressure, and movement. This builds coordination and reduces early messes.
Keep Head Leaned Forward
Gravity helps. The more upright you are, the more splashback you will get. Place a small towel in the sink to reduce noise and prevent water from bouncing out.
Adjust for Special Dental Work
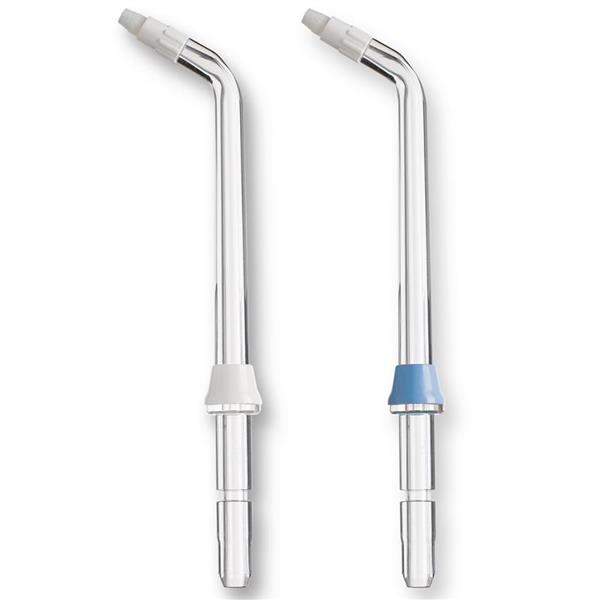
Customize your technique based on your unique dental situation. Using the right tip and pressure for your specific needs maximizes effectiveness.
With Braces
Use the Orthodontic Tip. Slide it behind wires and around brackets. Pause briefly at each bracket to flush out stuck particles.
With Implants
Use the Plaque Seeker Tip. Target the collar of the implant where bacteria accumulate. Clean daily to prevent peri-implantitis.
After Oral Surgery
Wait until cleared by your dentist. Then use the Periodontal Tip on low pressure to gently clean surgical sites and promote healing. If you have receding gums or sensitivity, always start at the lowest pressure and consult your hygienist for personalized advice.
Maintain and Clean the Device
Proper care extends your Waterpik life and hygiene. Regular maintenance keeps the device working effectively and safely.
Empty and Rinse After Each Use
Pour out remaining water. Rinse the reservoir and cap with clean water. Wipe the base unit with a damp cloth, but never immerse it in water.
Clean Tips Weekly
Rinse tips under running water after each use. Soak in white vinegar or manufacturer-recommended solution weekly to dissolve mineral deposits, especially in hard water areas. Replace all tips every 3 to 6 months or sooner if worn.
Store Upright and Dry
Keep the unit standing vertically. Detach the reservoir if storing for weeks. Store tips in the lid compartment or a clean cup.
Follow Safety Guidelines
Stay safe and protect your oral health by following these essential precautions.
Avoid Extreme Water Temperatures
Never use boiling or ice-cold water. Stick to lukewarm tap water for comfort and safety.
Do Not Force the Tip
Never shove the nozzle into tight spaces. Let the pulsations do the cleaning. Some initial light bleeding is normal when starting, especially with gum disease, but ongoing pain or swelling means stop and see your dentist.
Age Restrictions
Not recommended for children under age 6 unless supervised and approved by a pediatric dentist. Water flossing does not replace professional cleanings every six months.
Frequently Asked Questions About Waterpik Water Flossers
How often should I replace my Waterpik tips?
Replace all Waterpik tips every 3 to 6 months, or sooner if they show signs of wear. Worn tips become less effective at removing plaque and may cause discomfort.
Can I use mouthwash in my Waterpik?
You can add antimicrobial mouthwash to the water in a 1 to 1 dilution, but only if approved for your model. Avoid undiluted essential oils, bleach, or harsh chemicals, as they can degrade seals or tubing.
Is a water flosser better than traditional floss?
Clinical studies show Waterpik flossers are up to 50% more effective than string floss at reducing gingivitis and plaque. They are especially beneficial for people with braces, implants, or difficulty using traditional floss.
Can I use a Waterpik with braces?
Yes, use the Orthodontic Tip specifically designed for braces. It cleans around brackets and wires that brushing and traditional floss often miss.
Why does my Waterpik sputter at first?
Sputtering usually means air is still in the hose. Point the tip into the sink and run the device for 10 to 20 seconds until the stream becomes steady and pulsating.
Is water flossing safe for sensitive gums?
Yes, start at the lowest pressure setting and gradually increase as your gums adapt. If pain or bleeding persists, consult your dentist for personalized guidance.
Key Takeaways for Using Your Waterpik Effectively
Using a Waterpik water flosser properly transforms your oral health routine. Fill the reservoir with warm water to the max line, then select the appropriate tip for your dental needs, whether it is the Standard Jet Tip for daily use, Orthodontic Tip for braces, or Plaque Seeker Tip for implants. Prime the unit only on first use, then set your pressure to a low starting level of 1 to 3 before gradually increasing to 4 to 7 for optimal cleaning.
Position yourself leaning over the sink with lips partially closed, activate using the two-button method, and aim the stream at a 90-degree angle to the gumline. Move systematically through your mouth, pausing 1 to 2 seconds between each tooth, and complete your session in one minute daily. Consistent daily use reduces gum bleeding within 1 to 2 weeks and removes up to 99.9% of plaque from treated areas. Replace tips every 3 to 6 months, clean the device weekly, and consult your dentist for personalized pressure and tip recommendations tailored to your specific oral health condition.