
You’ve just unboxed your Philips water flosser and wondering what comes next. Whether you own the Sonicare AirFloss Ultra or the Cordless Power Flosser 3000, this guide walks you through every step from setup to daily use. Water flossers remove up to 99.9% of plaque from treated areas and are clinically proven as effective as traditional string floss, giving you better gum health in just 60 seconds a day.
In this complete how-to, you’ll learn the correct angle, pressure settings, cleaning sequence, and maintenance tips to get the most from your device. We’ll also cover common mistakes to avoid and troubleshooting solutions so you can achieve a healthier smile without the hassle of threading dental floss.
Charge Before First Use
Your Philips water flosser comes with a rechargeable lithium-ion battery that needs proper conditioning before first use.
Perform a 24-Hour Initial Charge
Plug in your device using the included charging cable. For the Cordless Power Flosser 3000, use the USB-C cable. For the AirFloss Ultra, use the proprietary charger.
The LED indicator shows your charging status. A red light means charging is in progress, while a green light indicates the battery is fully charged.
Even if the device powers on out of the box, complete a full 24-hour charge cycle. This initial charge conditions the battery for optimal performance and longevity. Skip short top-ups before the first use.
Fill the Water Reservoir
The water reservoir holds enough capacity for a full cleaning session.
Use Lukewarm Water or Mouthwash
For the Cordless Power Flosser 3000, twist or lift open the hinged water tank located at the base. Fill it with lukewarm water to prevent gum discomfort. You can also use your favorite mouthwash for a fresher clean.
The reservoir capacity is 250 ml or 8.4 oz, which is enough for a full 60-second session.
Avoid using undiluted essential oils, alcohol-heavy rinses, or abrasive solutions. These can degrade internal seals and damage your device over time.
For the AirFloss Ultra, the reservoir is internal and automatically draws fluid when you dip the nozzle in water. No manual filling is required.
Attach the Correct Nozzle

Choosing the right nozzle affects your cleaning effectiveness.
Choose and Install Your Jet Tip
Select the appropriate nozzle based on your dental needs. The Classic Jet Tip provides standard plaque removal. The Quad Stream Tip emits an X-shaped spray pattern that Philips claims removes up to 9× more plaque, though real-world testing shows minimal difference in cleaning sensation.
To install the nozzle, insert it firmly into the head until it clicks into place. Store a spare nozzle in the handle compartment for travel.
The nozzle rotation is stiff and typically requires two hands. This is a known design limitation, so do not force it.
Philips also offers specialized tips for specific needs. The Orthodontic Tip works for braces. The Periodontal Tip targets deep gum pockets. The Tongue Cleaner Tip freshens breath. Consult your dentist to pick the best option for your needs.
Select Mode and Pressure Settings
Your Philips water flosser offers different modes and pressure levels for customized cleaning.
AirFloss Ultra: Choose Burst Settings
This model uses Micro Burst technology, delivering rapid micro-droplet bursts instead of a continuous stream.
Press the mode button to cycle through these options. Single Burst fires one micro-burst per press. Double Burst fires two bursts. Triple Burst is the default setting and works best for most users.
Hold the activation button and the device fires a 1-second delayed burst, giving you time to reposition between teeth.
Cordless Power Flosser 3000: Set Mode and Pressure
This model offers six cleaning combinations across two modes and three pressure levels.
The Clean mode provides standard pressure for daily use. The Gum Care mode uses reduced pressure for sensitive gums. The Deep Clean mode offers maximum pressure for heavy plaque.
Start with Gum Care mode for the first week. Gradually increase to Clean or Deep Clean as your gums adapt. Never press hard against your gums. The water pressure is designed to be effective without force. Let the pulses do the work.
Position Nozzle at the Right Angle
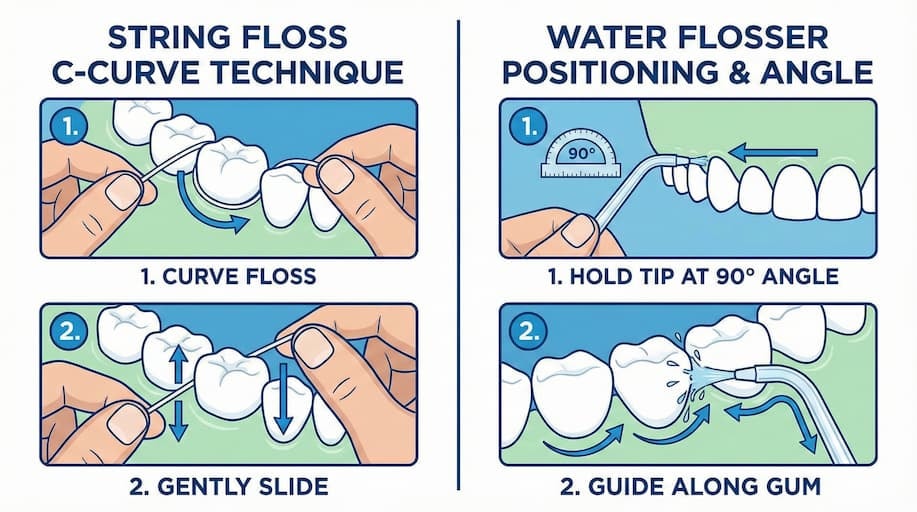
Proper positioning is critical for maximum plaque removal.
Aim Along the Gum Line
Place the nozzle tip at a 90-degree angle to the gum line. Position it directly between two teeth, just above the gum.
Softly close your lips around the tip to minimize splashback. Press and hold the activation button to release bursts or stream.
You should feel a pulsing sensation along the gum. It should be noticeable but not painful.
Avoid angling downward into gums or sideways across teeth. Misalignment reduces effectiveness and may cause discomfort.
Clean Each Quadrant Systematically
Following a systematic sequence ensures full coverage.
Follow a 60-Second Routine
Clean your mouth in this order. Start with upper right molars, then move to upper front teeth, upper left molars, lower left molars, lower front teeth, and finish with lower right molars.
The Cordless Power Flosser 3000 includes a built-in pacer that pauses every 15 seconds. Move to the next quadrant each time the pacer signals.
Spend 2 to 3 seconds per gap. Rushing reduces plaque removal.
A common mistake is skipping back teeth. These areas trap the most plaque and are often missed. The AirFloss Ultra finishes in under 60 seconds, making it one of the fastest interdental tools available.
Use After Brushing for Best Results
Timing matters for optimal oral hygiene.
Optimize Your Oral Care Routine
Philips recommends this sequence. First, brush your teeth with your electric or manual toothbrush. Second, use the water flosser. Third, rinse with mouthwash.
Brushing loosens debris. Flossing afterward flushes it out from between teeth, enhancing overall cleanliness.
Using the flosser first may push debris deeper. Using it after brushing makes it more effective.
Empty and Rinse After Use
Proper post-use care extends your device’s lifespan.
Clean the Nozzle and Tank
After each session, empty remaining liquid from the reservoir. Rinse the nozzle under running water to remove biofilm and debris.
Wipe the handle with a damp cloth. Never submerge the motor base in water.
Store the device upright or on the charger to dry. Store on the charger if not in use. Lithium-ion batteries last longer when kept topped up.
Replace nozzles every 3 to 6 months, or sooner if cracked, discolored, or less effective.
Maintain Battery and Performance
Regular maintenance keeps your flosser working optimally.
Maximize Long-Term Use
The AirFloss Ultra battery lasts up to 2 weeks per charge. The Cordless Power Flosser 3000 battery lasts up to 54 days on a single charge, far exceeding the advertised 14 days.
Charge time is approximately 12 hours for USB-C models.
The Cordless Power Flosser 3000 includes a travel pouch and onboard nozzle storage, perfect for hygiene on the go.
To prevent mineral buildup, descale every 1 to 3 months if using tap water. Run a 50/50 white vinegar and water solution through the device, then flush with clean water.
Troubleshoot Common Issues
Know how to handle common problems.
Fix Water Flow Problems
If no water streams out, check three things. First, verify the reservoir is properly seated. Second, check if the nozzle is clogged and rinse it under hot water. Third, ensure the device is charged. Low battery can disable function.
If the device leaks from the base, never immerse the handle in water. Wipe with a damp cloth only. Leakage usually indicates damaged seals. Contact Philips support.
If you experience discomfort or gum bleeding, switch to Sensitive mode. Start with shorter sessions of 30 seconds. Bleeding often stops within 7 to 10 days as gums adapt.
Mild bleeding at first is common. Persistent bleeding beyond two weeks means you should see your dentist.
Frequently Asked Questions About Philips Water Flossers
How long should I charge my Philips water flosser before first use?
Charge your Philips water flosser for a full 24 hours before first use. This initial charge conditions the lithium-ion battery for optimal performance and longevity.
Can I use mouthwash in my Philips water flosser?
Yes, you can use your favorite mouthwash in the water flosser. Philips confirms mouthwash compatibility. Avoid using undiluted essential oils or alcohol-heavy rinses that may damage internal components.
How often should I replace the water flosser nozzle?
Replace nozzles every 3 to 6 months. Replace sooner if the nozzle becomes cracked, discolored, or less effective at removing plaque.
Is water flossing better than string flossing?
Water flossers are clinically proven to be as effective as traditional floss for maintaining gum health. They remove up to 99.9% of plaque from treated areas and are often easier to use for people with dexterity issues or braces.
Why does my gum bleed when I first use a water flosser?
Mild bleeding is common when first using a water flosser. Your gums need time to adapt. Start with Sensitive mode and shorter sessions. Bleeding typically stops within 7 to 10 days.
How long does the battery last on a full charge?
The Cordless Power Flosser 3000 lasts up to 54 days on a full charge. The AirFloss Ultra lasts up to 2 weeks. Actual battery life varies based on usage frequency and pressure settings.
Key Takeaways for Using Your Philips Water Flosser
Using a Philips water flosser correctly transforms your oral hygiene routine. Start with Sensitive mode and increase pressure gradually as your gums adapt. Always use at a 90-degree angle along the gum line for maximum plaque removal.
Follow a systematic quadrant routine and never skip back teeth. Use the water flosser after brushing but before mouthwash for best results. Replace tips every 3 to 6 months and descale monthly if using hard water.
Store your device on the charger when not in use to extend battery life. With just 60 seconds a day, your Philips water flosser can give you healthier gums, fresher breath, and a more confident smile.