
Your Philips water flosser won’t charge. No light. No response. It just sits there, lifeless on the dock. You’re not alone. This is one of the most common issues reported across Philips Sonicare AirFloss and Power Flosser models like the AirFloss Pro, Ultra, Power Flosser 3000, and HX366W1. The problem often starts after 12 to 18 months of use, but sometimes brand-new devices fail to charge right out of the box.
The good news? Most charging failures are fixable without replacing the entire unit. Whether it’s corroded contacts, a dead battery, or a faulty adapter, this guide walks you through every step to diagnose, troubleshoot, and revive your Philips water flosser.
Test the Power Source First
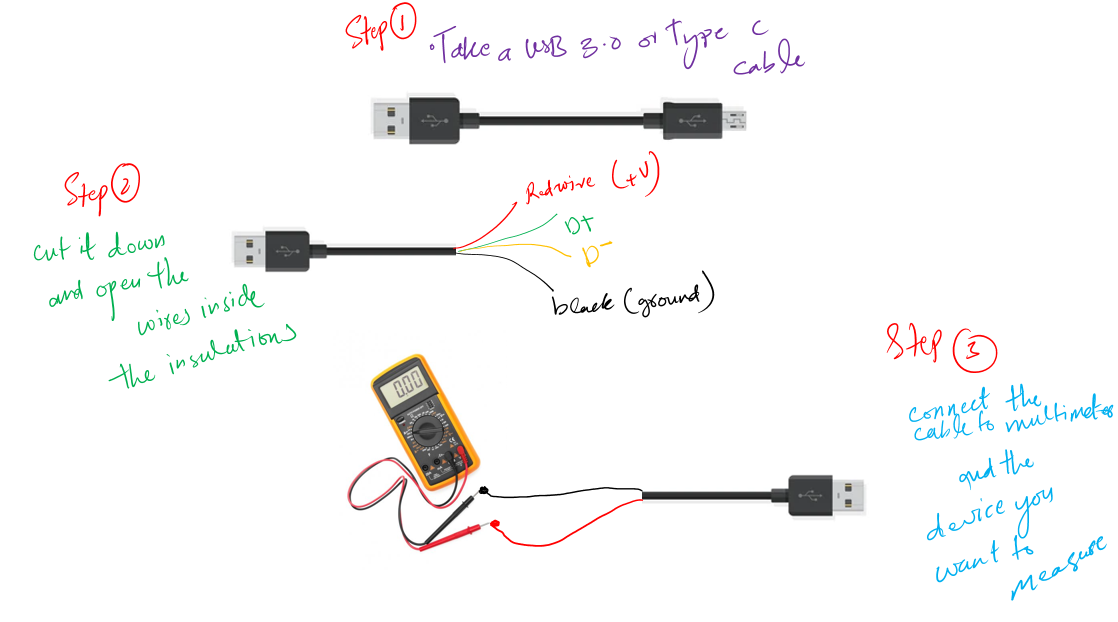
Before assuming the flosser is broken, confirm your power supply is working properly. Many charging failures trace back to the adapter or wall outlet, not the device itself.
Check Adapter Output with Multimeter
A weak adapter causes approximately 30% of no-charge cases. Even if the LED on the charger glows, voltage may still be insufficient. Follow these steps to test your adapter.
- Unplug the charger from the wall.
- Set a multimeter to DC voltage, 20V range.
- Insert the red probe into the USB plug’s center (positive), black to the outer metal (ground).
- Plug the charger back in and take a reading.
Expected reading: 5V DC. Below 4.5V or above 5.5V means you should replace the adapter.
Try Different Outlets and Cables
Not every outlet delivers consistent power. Test thoroughly to rule out electrical issues.
Plug the charger into another wall outlet, preferably on a different circuit. Test the outlet with another device like a phone charger to confirm power availability. If your model uses a removable USB cable, try a known-good cable. Avoid using extension cords or power strips during testing.
Warning: Some users report success with third-party phone chargers, but only if they deliver stable 5V DC. Cheap chargers can damage internal circuitry.
Clean Charging Contacts Thoroughly
Mineral buildup, toothpaste residue, and moisture cause poor electrical contact. This is the number one culprit in charging failure. Cleaning the contacts often resolves the issue completely.
Identify Corrosion Signs
Check both the flosser base and charging dock for these indicators.
White, green, or crusty deposits on metal contacts. Discoloration on flosser base or charging dock. Sticky or rough texture when touched.
Cleaning Tools Needed
Gather these supplies before starting.
Cotton swabs. 70% or higher isopropyl alcohol (best) or white vinegar. Soft, dry microfiber cloth. Compressed air (optional).
Step-by-Step Cleaning Process
- Unplug the charger from power.
- Dampen a cotton swab with isopropyl alcohol.
- Gently scrub contacts on the bottom of the flosser and matching points on the charging base.
- Use a dry swab to wipe away residue.
- Blow out debris with compressed air if available.
- Let all parts air-dry for at least 30 minutes before reconnecting.
Never reconnect until fully dry. Moisture can short-circuit the internal board and cause permanent damage.
Pro Tip: Wipe contacts dry after each use and do a deep clean monthly to prevent future issues.
Reset the Flosser to Restore Charging
Sometimes firmware glitches block charging. A reset can re-enable power recognition and restore normal function.
Perform a Soft Reset
This method works in about 40% of unresponsive units, especially after long storage.
- Place the flosser on the charging base.
- Press and hold the power button for 10 to 15 seconds.
- Watch for any LED flash or vibration.
- Remove from charger, wait 30 seconds, then return.
Try Factory Reset on Newer Models
Models with digital interfaces like the AirFloss Ultra may need a deeper reset.
- Hold Power and Mode buttons together for 20 seconds.
- Release only after the device vibrates or flashes.
- Place back on charger and observe for LED activity.
Note: Older models may not support factory reset. Contact Philips support for model-specific guidance.
Recondition a Dead Battery
Lithium-ion batteries degrade over time or enter deep discharge if left unused. Battery conditioning can revive many seemingly dead units.
When to Recondition
Suspect battery failure if the device powers off mid-use, charge lasts less than a week, or there’s no sign of life after 8+ hours on charger.
Battery Conditioning Procedure
- Fully discharge the unit by running it continuously until it stops. Do not attempt to charge during this phase.
- Place on charger and leave uninterrupted for 24 to 48 hours.
- Do not remove the device, even if no LED appears.
- After 24 hours, try turning it on.
- If still dead, repeat the 24-hour cycle 2 to 3 times.
Success Rate: Approximately 60% of non-responsive units recover after multiple conditioning cycles. Prolonged charging can revive deeply discharged cells that normal charging ignores.
Optimize Charging Environment
Even perfect hardware fails under poor conditions. The environment matters more than most users realize.
Ideal Charging Conditions
Charge your flosser in optimal conditions for best results.
Temperature should be 68 to 72°F (20 to 22°C). Humidity should be low, so avoid steamy bathrooms. Place the charger on a dry, flat surface elevated from sinks and showers.
Avoid Cold or Damp Storage
Devices stored in basements, garages, or refrigerated areas may need acclimatization before charging will work properly. Let the flosser warm to room temperature for 4 to 6 hours before charging.
Warning: Charging a cold or wet unit increases risk of condensation and circuit damage.
Replace Faulty Components
If troubleshooting fails, isolate and replace the broken part. This is often more cost-effective than buying a new unit.
Replace the Power Adapter
A new adapter resolves about 30% of charging cases. Cost ranges from $15 to $25. Purchase from the Philips official store, Amazon, or authorized retailers. The replacement must output 5V DC, so verify before use.
Replace the Charging Dock
If the dock is cracked, loose, or shows no power after cleaning and adapter testing, replace it. Cost ranges from $25 to $40. This is a model-specific purchase, so match the exact part number. Installation requires no tools.
Consider Internal Repair or Replacement
When component swaps don’t work, evaluate cost versus value to decide the best path forward.
Professional Battery Replacement
Cost ranges from $60 to $80. A technician opens the waterproof seal, solders in a new lithium-ion cell, then reseals and tests the device. Risks include voided warranty and possible loss of water resistance. This option works best for older models worth less than $80.
Use Authorized Service Center
Cost ranges from $30 to $50 for diagnosis and minor fix. Service includes circuit board inspection, firmware update, and contact repair. If the device is under 2 years old and registered, you may qualify for free warranty repair. Contact Philips support first.
Buy a New Unit
New units cost $80 to $150 depending on model. Consider replacement when the device is over 2 to 3 years old, repair cost exceeds 50% of replacement value, or multiple components have failed. With proper care, expect a replacement cycle of 3 to 5 years.
Handle New Device Charging Failures
Even unused Philips flossers can fail to charge. Don’t return it yet. Try these steps first.
What to Do with a New Unit That Won’t Charge
- Try a 24 to 48 hour charge cycle, even with no light showing.
- Test adapter output with a multimeter.
- Contact seller or Philips for warranty replacement if no response after 48 hours.
Fact: Lithium-ion batteries self-discharge over time. Unused units may need extended charging to wake up. This is normal and not necessarily a defect.
Prevent Future Charging Issues
Most problems are avoidable with simple habits. A little maintenance goes a long way.
Maintenance Schedule
Daily: Wipe the bottom of the flosser dry after each use. Store away from sink or shower.
Weekly: Inspect charging contacts and clean with a dry cloth if needed.
Monthly: Use isopropyl alcohol on a cotton swab for deep cleaning. Check the adapter for damage.
Smart Charging Habits
Keep the battery above 20% when not in use. Avoid full discharges. Charge at room temperature. Do not leave on charger indefinitely, as overcharging carries risks.
Best Practice: Treat your flosser like a smartphone. Regular top-ups extend battery life.
Frequently Asked Questions About Philips Water Flosser Not Charging
Why is my Philips water flosser not charging even after trying multiple outlets?
The issue likely isn’t the outlet. Common causes include corroded charging contacts, a faulty adapter, deep discharge battery, or internal circuit failure. Work through the troubleshooting steps systematically, starting with cleaning contacts and testing the adapter with a multimeter.
How do I know if my adapter is bad?
Test the adapter with a multimeter set to DC voltage, 20V range. Touch the red probe to the center pin and black probe to the outer metal of the USB plug. It should read 5V DC. Below 4.5V or above 5.5V indicates a bad adapter that needs replacement.
Can I fix a deeply discharged battery?
Yes, in many cases. Try the battery conditioning method: fully discharge the device, then leave it on the charger uninterrupted for 24 to 48 hours. Repeat this cycle 2 to 3 times if needed. About 60% of deeply discharged batteries recover this way.
Is it worth repairing an old water flosser?
If the device is over 2 to 3 years old and repair costs more than half the price of a new unit, replacement makes more sense. For newer devices under warranty, contact Philips for free or discounted repair options.
Why does my brand-new flosser won’t charge?
New devices can fail to charge due to battery dormancy from long warehouse storage, a factory-defective adapter, or internal circuit fault. Try a 24 to 48 hour charge cycle before assuming it’s defective. Contact the seller for warranty replacement if this doesn’t work.
How often should I clean the charging contacts?
Clean the charging contacts after each use (wipe dry) and do a deep clean with isopropyl alcohol monthly. This prevents mineral buildup and corrosion that causes most charging failures.
Key Takeaways for Fixing Your Philips Water Flosser
Most Philips water flosser charging failures are fixable at home. Start by testing the adapter with a multimeter to confirm it’s delivering 5V DC, then clean the charging contacts with isopropyl alcohol. Perform a soft reset by holding the power button for 10 to 15 seconds, or try a factory reset on newer models. If the battery is deeply discharged, condition it with 24 to 48 hour charge cycles, repeating 2 to 3 times if needed.
Replace the adapter ($15 to $25) or dock ($25 to $40) if testing confirms they’re faulty. For devices over 2 to 3 years old with multiple failures, compare repair costs against replacement prices. With proper care including regular contact cleaning and smart charging habits, your next water flosser can last 3 to 5 years.