
You’re enjoying your morning routine when suddenly your water flosser turns your entire bathroom into a splash zone. Mirrors get sprayed, your shirt gets soaked, and you’re left wondering if there’s a better way to floss. The good news: a water flosser spraying everywhere is almost always a technique problem, not a device defect. With a few simple adjustments, you can eliminate the mess and get your teeth truly clean.
This guide covers exactly why your water flosser sprays everywhere, the most common mistakes users make, and step-by-step fixes that dental professionals and experienced users recommend. You’ll learn proper positioning, pressure control, and environmental tweaks that turn a chaotic splash session into a mess-free routine.
Activate Your Flosser Correctly
One of the biggest reasons water flossers spray everywhere is activation timing. Turning on the device before placing the tip in your mouth causes high-pressure water to shoot directly onto your sink, face, or mirror. Similarly, removing the tip while the device still runs creates a final burst of spray.
Insert the flosser tip fully into your mouth before pressing the power button. Turn the device off before pulling the tip out. This two-step sequence eliminates the two most common sources of uncontrolled spray. One user described this as the golden rule: start it in your mouth, stop it before you take it out.
Adjust Your Body and Head Position
Standing upright while looking in the mirror places your mouth above your chin, allowing water to flow across your face instead of straight down into the sink. This open-mouth, upright position is a primary cause of facial splashing.
Lean forward over the sink so your head is lower than your torso. Look directly down into the basin rather than up at the mirror. Keep your back straight and your feet stable to prevent sudden movements that disrupt control. This gravity-assisted posture ensures water drains efficiently downward instead of spraying outward.
Master the Lip Seal Technique
Using your water flosser with your mouth wide open is a guaranteed way to create a mess. Water escapes laterally, creating splashback and airborne mist. However, clenching your lips too tightly creates backpressure that can cause sudden bursts when the seal breaks.
Close your lips gently around the flosser tip, similar to a soft kiss. This creates a contained channel that directs water downward while allowing excess to escape slowly through the corner of your mouth. Never press your lips tightly together, as that traps pressure and increases splash risk. Several users confirmed they never use their flosser with an open mouth.
Optimize Your Pressure Settings
Many users start at maximum pressure, thinking higher pressure means better cleaning. This approach backfires. High-pressure settings increase water velocity and splatter risk, causing reflexive mouth opening or flinching that makes the mess worse.
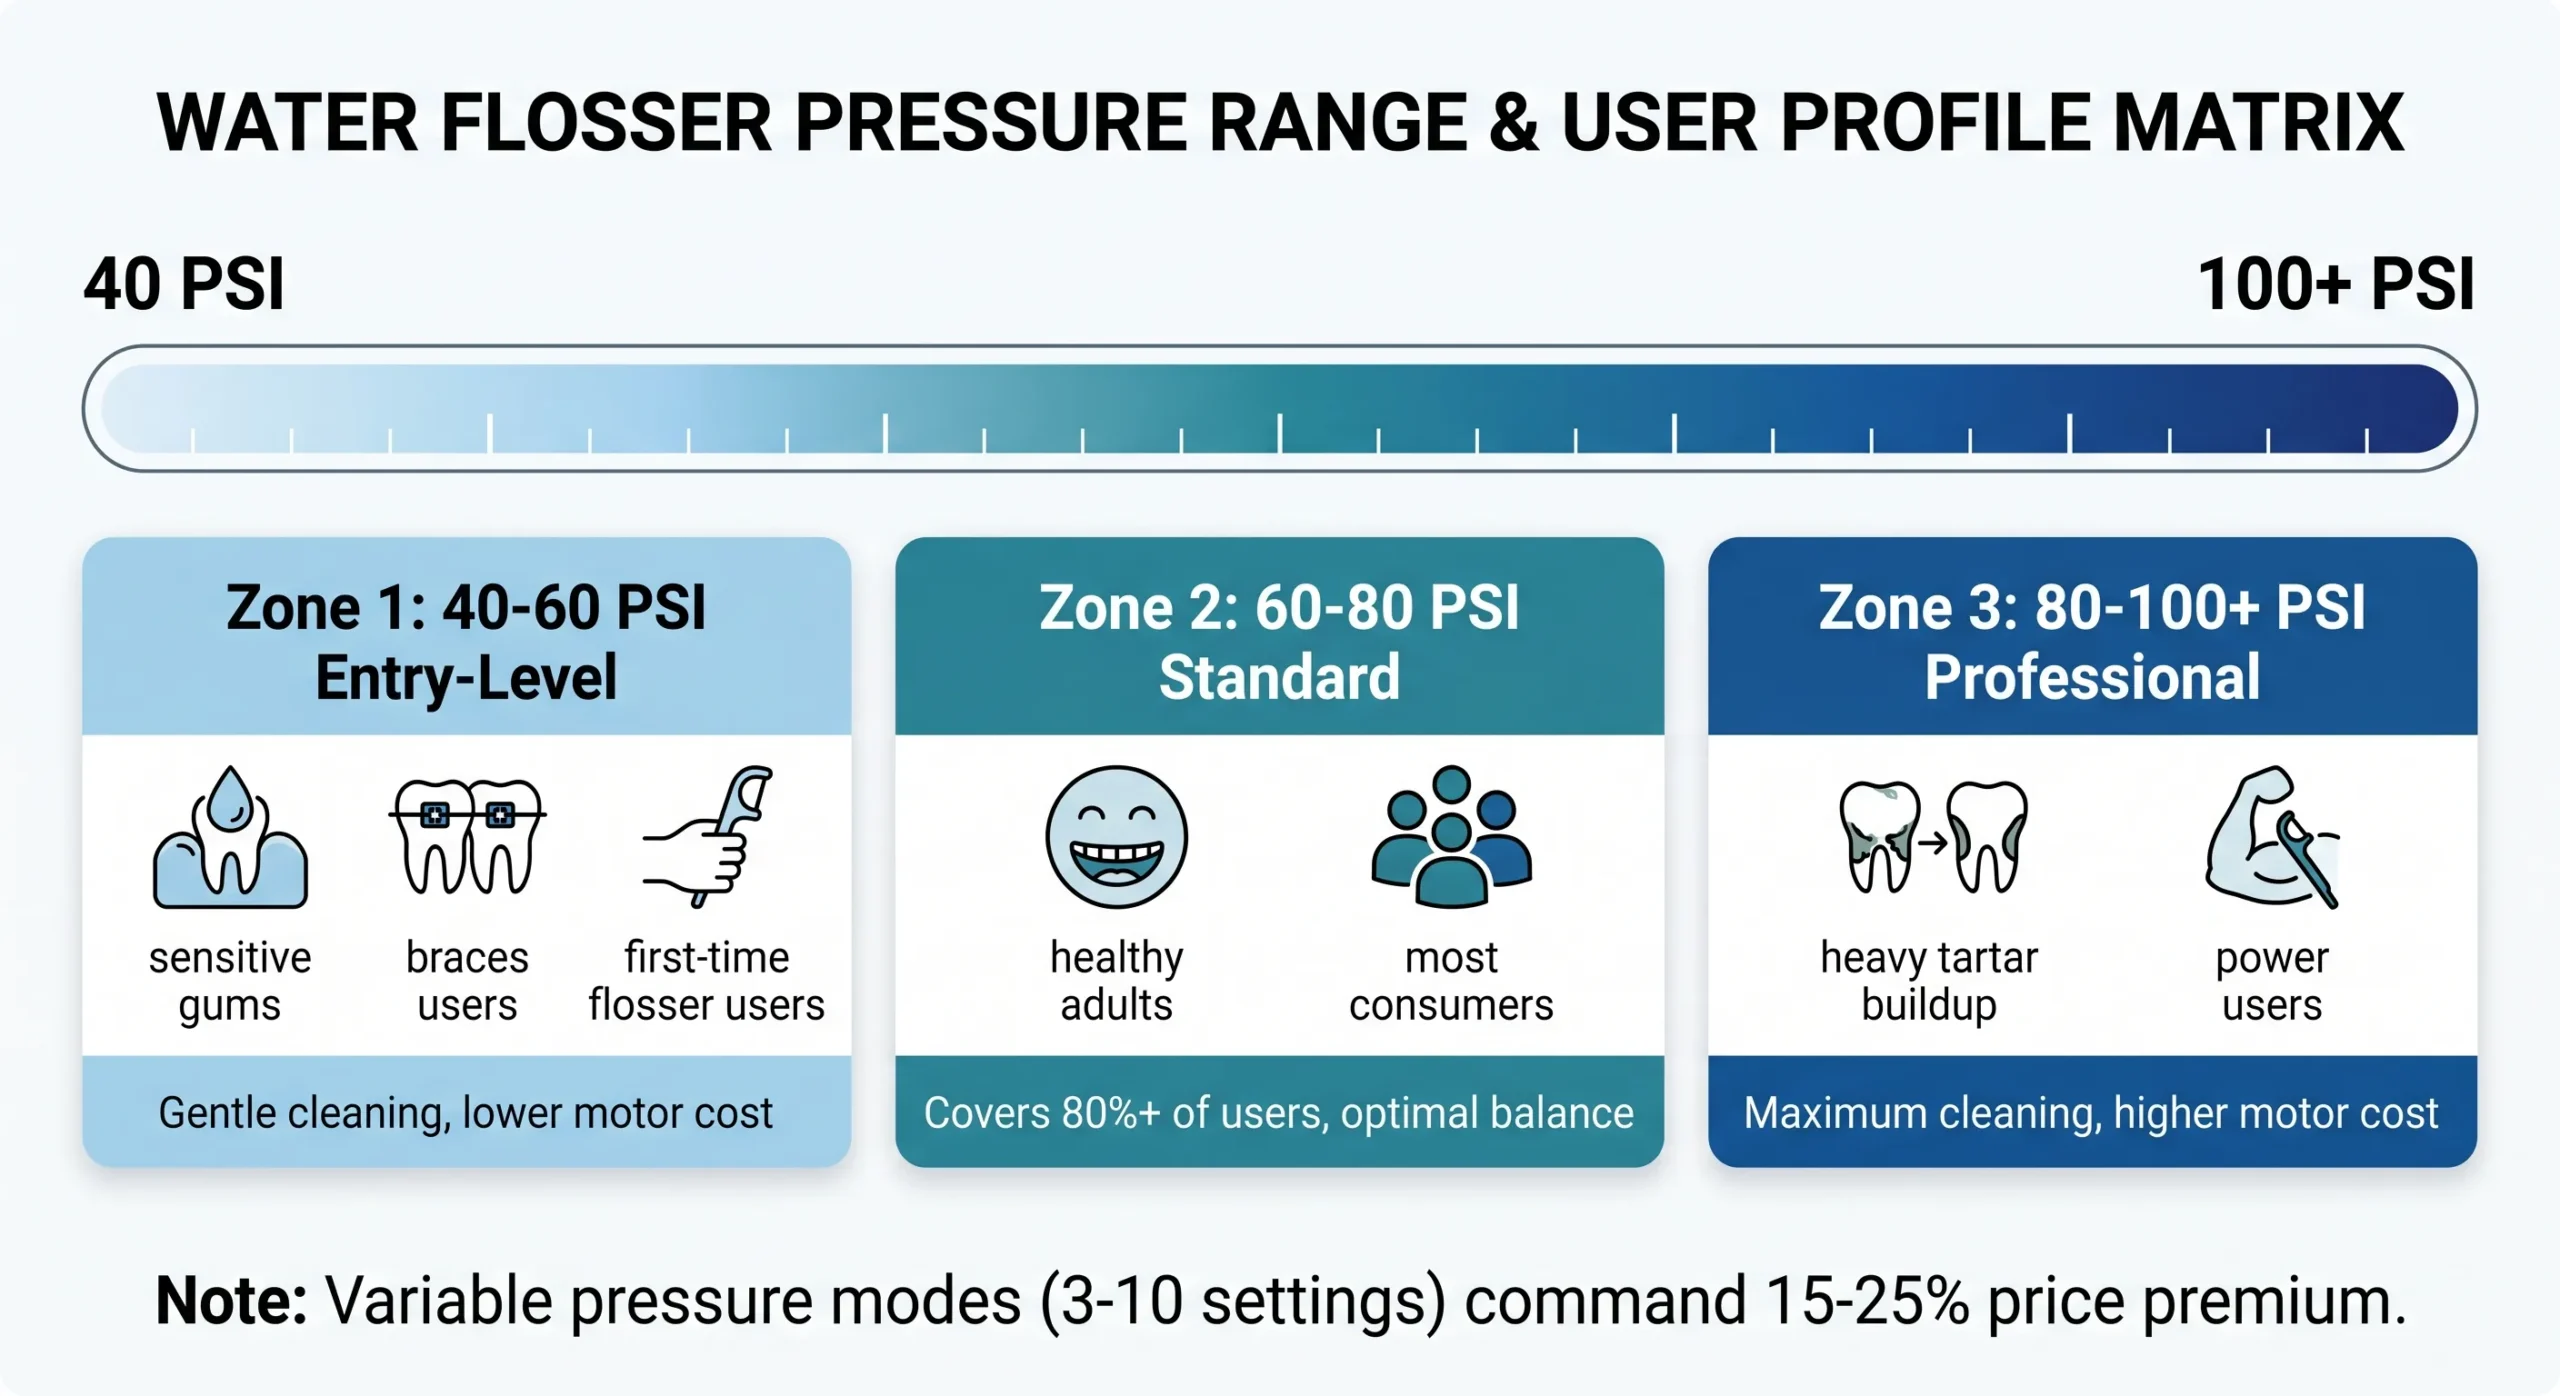
Begin at pressure level three or four on a ten-point scale. Increase gradually only after three to seven days of comfortable use. If you feel stinging, nasal spray, or pain, reduce the setting immediately. Sensitive gums, braces, or dental implants require gentler flow. Use pulse mode if your model has it, as it offers better control than continuous spray.
Use the Correct Tip for Your Dental Needs

Using the wrong tip can increase spray and reduce cleaning effectiveness. Standard angled tips work well for general use. Orthodontic tips clean around braces and wires. Implant tips feature soft rubber ends that protect sensitive areas. Periodontal tips deliver gentler streams for deep gum pockets.
Replace tips every three to six months. Worn tips leak and spray unpredictably. Check the tip connection monthly to ensure it’s secure and free from cracks or discoloration.
Control Water Temperature
Cold water causes sensitivity and jaw tightening, leading to sudden movements and spills. Hot water can warp plastic components and irritate your gums. Lukewarm or room-temperature water provides the most comfortable experience.
Fill the reservoir with lukewarm water. You can add a capful of alcohol-free mouthwash for freshness or half a teaspoon of salt per eight ounces of water for soothing anti-inflammatory benefits. Always secure the reservoir properly and leave space for pressurization.
Try the Closed-Mouth Spitting Method
This technique nearly eliminates all external spray. Close your mouth fully around the tip and let water collect inside. Turn off the device, remove the tip, and spit the water into the sink. Repeat this process as you move between teeth.
The closed-mouth method provides almost zero mess and complete water containment. However, it’s slower than other methods and carries a risk of water entering your nasal passages if your soft palate opens unexpectedly. Don’t attempt this if you tend to laugh or cough during use.
Use Your Flosser in the Shower
The simplest solution for excessive spraying is to use your water flosser in the shower. All splashes drain directly down the tub, eliminating cleanup concerns entirely. Use a cordless or shower-mountable model for best results.
This approach works especially well for users with small bathrooms or shallow sinks. You can combine water flossing with your regular shower routine for a complete oral care session without worrying about soaked towels or mirrors.
Set Up Your Environment for Success
Small environmental adjustments drastically reduce mess. Place a dark-colored towel in the sink to absorb splashes. Use a deep basin sink or install a splash guard. If you floss after showering, use a fogless mirror to see without creating additional fog.
Keep toilet paper rolls away from your flossing area. Multiple users report accidentally spraying and ruining their supplies. A dedicated flossing station with easy cleanup access makes the routine more manageable.
Maintain Your Device Properly
A poorly maintained water flosser develops leaks and erratic spray patterns. After each use, empty and rinse the reservoir, wipe the handle and nozzle, and let all parts air-dry completely. Weekly, run a fifty-fifty vinegar-water solution through the system to descale mineral deposits.
Soak tips in hydrogen peroxide or mouthwash for disinfection. Inspect seals and O-rings monthly for cracks or wear. Replace worn components promptly to maintain consistent performance and control.
Follow Dentist-Recommended Technique
Dental professionals demonstrate a specific method for mess-free water flossing. Dr. Lulu Tang, DMD, recommends inserting the tip before turning on the device, leaning over the sink with a downward gaze, closing lips gently, aiming at a forty-five-degree angle to the gumline, moving slowly one to two seconds per gap, and turning off before removing.
The goal is a comfortable, massaging sensation. Never use a setting that causes pain. This method is endorsed by periodontists and hygienists for both safety and effectiveness.
Compare Technique Versus Device Factors
Proper technique matters more than your specific model. High pressure, incorrect activation timing, open-mouth positioning, and upright head angle all create mess regardless of device quality. Low-pressure settings, correct activation sequence, gentle lip closure, and forward leaning dramatically reduce spray even with basic models.
Device features help but cannot compensate for poor technique. A premium water flosser used incorrectly will spray more than a basic model used properly.
Real User Fixes That Work
Thousands of verified users report success with these strategies. Using the flosser in the shower eliminates mess entirely. Leaning over the sink with eyes down dramatically reduces facial wetness. Starting at low pressure and increasing gradually helps users stop flinching. Closing lips lightly prevents corner leakage. Combining traditional floss picks with water flossing allows lower pressure use.
Most users adapt within three to seven days. Muscle memory develops quickly for lip control, head positioning, and activation timing.
Understand the Clinical Benefits
Despite initial messiness, water flossers offer significant oral health benefits. Clinical studies show they remove up to ninety-nine point nine percent of plaque from treated areas. Regular use reduces gingivitis and bleeding within two weeks. They are particularly effective for braces, dental implants, and deep periodontal pockets.
Most users report improved oral health and prefer water flossing once they master the technique. The initial learning curve is worth the long-term benefits.
Final Checklist for Mess-Free Water Flossing
Insert the tip before turning on the device. Turn off before removing the tip. Lean forward and look down. Close lips gently like a kiss. Start at low pressure. Use lukewarm water. Aim at a forty-five-degree angle to the gumline. Move slowly between teeth. Use the correct tip for your needs. Floss in the shower if needed.
Frequently Asked Questions About Water Flosser Spraying
Why does my water flosser spray everywhere even at low pressure?
Improper technique causes most spraying, regardless of pressure setting. Turning on the device before inserting the tip, using an open-mouth position, and standing upright instead of leaning forward all create spray. Fix your activation sequence and body positioning first before adjusting pressure.
Can I use my water flosser with braces?
Yes, use an orthodontic tip specifically designed for braces. These tips clean around wires and brackets more effectively than standard tips. Aim carefully and use moderate pressure to avoid dislodging orthodontic components.
How often should I replace my water flosser tips?
Replace tips every three to six months. Worn tips become less effective and may spray unpredictably. Check monthly for cracks, discoloration, or loose connections.
Is the closed-mouth method safe?
The closed-mouth method is safe if done correctly. However, water may enter your nasal passages if your soft palate opens unexpectedly during laughter or surprise. Don’t attempt this method if you have nasal reflux or tend to laugh during use.
Does water temperature affect spraying?
Yes, cold water causes jaw tightening and sensitivity, leading to sudden movements and spills. Use lukewarm or room-temperature water for comfort and consistent technique.
Can I use mouthwash in my water flosser?
Yes, you can add alcohol-free mouthwash to the reservoir. Avoid alcohol-based rinses as they can damage internal components. Salt water solutions also work well for soothing gums.
Key Takeaways for Solving Water Flosser Spray Issues

A water flosser spraying everywhere is fixable through proper technique, not device replacement. Activate the device after inserting the tip and turn it off before removal. Lean forward with a gentle lip seal and use low pressure settings initially. Environmental adjustments like shower use or splash guards help eliminate remaining mess. With consistent practice, most users master control within a week and enjoy the superior cleaning benefits water flossers provide. The mess isn’t in the machine; it’s in the method. Fix your technique, keep your bathroom dry, and achieve healthier gums.