
Is your Waterpik water flosser suddenly dead, leaking, or spitting out weak streams? You’re not alone, and you don’t need to replace the whole unit. Most Waterpik failures are repairable with simple tools and basic troubleshooting. Whether it is a WP-100W, WP60, WF, CC, or Sonic-Fusion model, this guide gives you step-by-step fixes for common issues like no power, broken tips, leaks, and low pressure. You will learn how to diagnose problems, disassemble safely, and restore full function, often in under 10 minutes.
Fix No Power: Diagnose Electrical Failure
If your Waterpik will not turn on, no motor sound, no lights, it is likely an upstream electrical fault. The motor rarely fails. Instead, check fuses, switches, and power delivery first.
Test and Bypass the Internal Fuse
Some models like the WP-100W have a small fuse taped near the motor. It can blow without warning after long-term use.
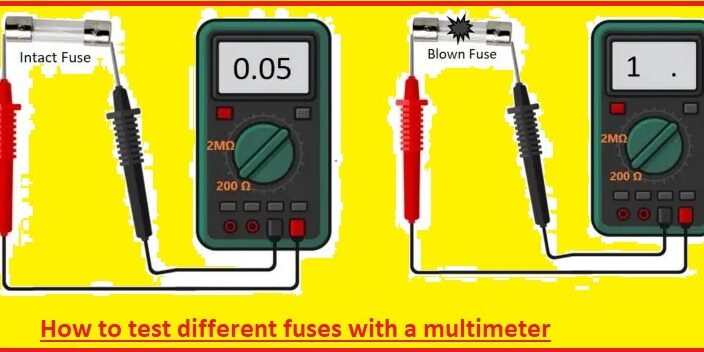
To test for a blown fuse, unplug the unit and use a multimeter to test continuity across the fuse. No continuity means the fuse is blown.
To bypass the fuse temporarily, clip an alligator wire across the fuse terminals. Plug in the unit. If it powers on, the fuse is faulty. For a permanent repair, solder a jumper wire over the fuse location.
Warning: Bypassing removes overcurrent protection. Avoid running the unit continuously for more than 2 to 3 minutes.
Test or Bypass the Power Switch
A failed switch prevents current flow even when the fuse and motor are good.
To diagnose switch failure, use a multimeter in continuity mode. Press the power button. It should show a closed circuit when turned on. An open circuit indicates a faulty switch.
To fix it, solder the red power wire directly to the motor terminal. The unit will run whenever plugged in. This is ideal for units used daily. Simply unplug when not in use.
Motor Runs But No Water: Clear Blockages
You hear the motor whirring but no water comes out. The pump is working, but flow is blocked somewhere in the system.
Clean the Nozzle Tip Holes
The four tiny holes in the jet tip easily clog with debris or mineral buildup.
Steps to clear the holes:
- Soak the tip in white vinegar or hydrogen peroxide for 5 to 7 minutes.
- Rinse under warm water.
- Use a toothpick or needle to gently poke each hole.
- Test water flow.
Pro Tip: Flush tips weekly and replace them every 6 months to prevent this issue.
Prime the System to Remove Airlock
New setup or after cleaning? Air may be trapped in the system.
To prime the system, fill the reservoir to maximum. Set the pressure dial to maximum, which is 100 PSI. Point the tip into the sink. Turn on and run until water flows steadily. Then adjust to your desired pressure.
Broken Tip Stuck in Handle: Remove It Now

A snapped jet tip lodged in the handle is a common and stressful failure. Multiple user-tested methods can extract it.
Use a Screw to Extract the Fragment
This method works about 90% of the time.
Steps:
- Insert a small coarse-thread screw into the hollow center of the broken piece.
- Twist slightly to bite into the plastic.
- Pull out with pliers while pressing the eject button.
Alternative Extraction Methods
Superglue and toothpick method: Apply cyanoacrylate glue into the hole. Insert a toothpick or incense stick. Wait 5 to 10 minutes. Wiggle and pull firmly.
Fork tine method: Insert a fork tine or nail pusher. Hold the unit upside down. Press the eject button and shake gently while applying upward pressure.
Manual shaking method: Hold the flosser upside down. Press and hold the eject button. Shake vigorously for up to 15 seconds. Users report this worked after just 15 seconds of shaking.
Leaking Hose or Handle: Replace the Assembly
Leaks at the hose-handle junction mean degraded seals or cracks. Most models allow full replacement without opening the base.
To replace the hose and handle assembly:
- Unscrew the old hose from the base.
- Screw in the new genuine Waterpik hose and handle assembly.
- Test for leaks.
Where to buy: Visit the official Waterpik store, enter your model number, and order the correct part. Third-party hoses may have misaligned buttons or poor seals.
Low Water Pressure: Fix Flow Fast
Weak spray reduces cleaning effectiveness. Causes include clogs, low battery, or worn valves.
Clean Internal Valves and O-Rings
The check valve and reservoir valve can restrict flow.
To access and clean the check valve, remove the speed dial and top cover. You will see a tiny white ball, a spring, a white disc, and a yellow snap-on cap. Soak these parts in vinegar. Clean the holes with a Q-tip.
To inspect the reservoir valve, look at the bottom of the water tank. If water drips when the unit is off, remove and rinse it. Push up from the base to dislodge it. Massage under warm water and reinstall dome-side up.
Diagnostic test: Run the unit without the valve. If pressure returns, replace the valve.
Charging Issues: Restore Battery Function
Cordless models may fail to charge or hold power. Most charging problems have simple fixes.
Clean Charging Contacts
Corrosion or grime blocks charging.
Steps:
- Power off the device.
- Wipe contacts on both the unit and base with a dry or slightly damp cloth.
- Re-seat and allow full charge, typically 4 hours.
Understand Indicator Lights
A flashing light means charging. A solid light means fully charged. If it blinks 8 times after use, you have about 30 percent charge remaining. Recharge soon.
Reset Battery Connection
- Remove from the charger.
- Press the power button 5 times quickly.
- Re-dock and wait for the flash pattern.
If there is no response, contact Waterpik support for possible battery replacement.
Fix Sonic-Fusion Wireless Disconnect
Sonic-Fusion SF-01 and SF-02 models lose sync if the handle sits out too long.
Reset the Wireless Link
Steps:
- Place the handle back into the charging dock.
- Remove it immediately.
- Observe the blue light turning on. The connection is restored.
- Press the Floss button to test.
Best practice: Always return the handle to the base after use to maintain sync and charge level. The base uses smart charging with no overcharge risk.
Disassemble Safely: Open Your Waterpik

Need internal access? Follow these model-specific steps.
Open WP-100W for Circuit Access
Tools needed: Phillips screwdriver, flathead screwdriver, pliers.
Steps:
- Remove the 4 bottom screws and 2 side screws.
- Lift the electrical connector straight up.
- Pry off the top cap with a flathead.
- Separate the housing.
You now see the fuse, capacitor, resistor, bridge rectifier, and switch.
Access Pump and Valves
For flow or pressure issues:
- Remove the 4 hidden screws under the nozzle housing. Use a Phillips screwdriver in the tiny holes.
- Take off the speed knob.
- Lift the top cover.
- Unscrew the pump assembly. There are 4 screws total.
- Bend back the rubber-slotted covers to expose hidden screws.
- Disconnect the hose and inspect the O-rings.
Clean all parts with vinegar or warm water. Reassemble in reverse order.
Prevent Future Failures: Maintenance Guide
Avoid repeat issues with simple upkeep performed regularly.
Clean Every 1 to 3 Months
Solution: 2 to 4 tablespoons of white vinegar mixed with 16 ounces of warm water.
For countertop models, fill the reservoir with the solution. Run half through. Let it sit in the hose for 5 minutes. Finish running the solution. Rinse with clean water.
For cordless models, add 1 tablespoon of vinegar to the full reservoir. Run until empty. Then rinse with clean water.
Never leave water in the reservoir. Empty and dry after each use to prevent mold and mineral buildup.
Use Filtered Water to Prevent Buildup
Hard water causes limescale and clogs. Use distilled or filtered water, especially in high-mineral areas.
Replace Tips Regularly
Standard jet tips should be replaced every 6 months. Toothbrush and orthodontic tips need replacement every 3 months. Worn tips reduce cleaning power and increase breakage risk.
Where to Buy Replacement Parts
Avoid full-unit replacement. Most parts are sold separately.
OEM Parts from Waterpik
Website: store.waterpik.com
Available parts: Tips, handles, hoses, valves, chargers, and bases. Enter your model number for exact fit. Genuine parts ensure proper seal and function.
Third-Party Options
Amazon and Walmart sell tips and parts for $10 to $30. Some users report color or button fit issues. You save money but risk compatibility problems.
When to Contact Waterpik Support
Some issues need professional help.
Phone: 1-800-525-2774
Support includes: Model-specific part matching, repair guidance, and fast shipping for older models. This is ideal for units over 10 to 15 years old.
Frequently Asked Questions About Waterpik Water Flosser Repair
Can I fix my Waterpik myself, or do I need to buy a new one?
Most Waterpik failures are repairable at home. Common issues like no power, weak pressure, clogged tips, and broken tips stuck in the handle can all be fixed with basic tools and simple procedures. Only severe motor failure or cracked housing typically requires replacement.
Why does my Waterpik have no power even though it is plugged in?
The most common cause is a blown internal fuse or a faulty power switch. Test the fuse with a multimeter. If it has no continuity, bypass it with a wire or replace it. If the switch fails, you can wire around it for permanent operation.
How do I remove a broken tip stuck inside my Waterpik handle?
Insert a small screw into the hollow center of the broken piece. Twist to grip the plastic. Pull out with pliers while pressing the eject button. Alternative methods include using superglue with a toothpick, shaking upside down, or using tweezers.
How often should I clean my Waterpik water flosser?
Clean the unit every 1 to 3 months using a vinegar and water solution. For cordless models, use 1 tablespoon of vinegar in a full reservoir. Run the solution through, then rinse with clean water. Weekly tip cleaning is also recommended.
Where can I find replacement parts for my specific Waterpik model?
Visit store.waterpik.com and enter your model number. You can purchase genuine tips, hoses, handles, valves, and chargers designed for your specific unit. Third-party sellers exist but may have fit issues.
Key Takeaways for Waterpik Water Flosser Repair
Your Waterpik is built to last, but only if maintained and repaired properly. Most failures are not motor problems. They are blown fuses, faulty switches, clogged tips, or worn valves. All of these have simple, low-cost fixes you can do at home.
From fuse bypasses to tip extractions, most repairs take under 10 minutes and require only basic tools. Use genuine Waterpik parts when replacing components. Clean your unit monthly with vinegar solution. Replace tips every 3 to 6 months. Never leave water sitting in the reservoir.
With this guide, you have everything needed to fix, restore, and extend your water flosser’s life for years to come.