
Waterpik water flosser tank leaks are a common and frustrating issue affecting models like the WP-100, WP-112C, WP-560W, and many others. If your unit is dripping or pooling water under the base even after proper use, you are not alone. The primary culprit is usually the rubber reservoir valve, a small but critical component that degrades over time, losing its seal and causing persistent leaks.
The good news is that most leaks are fixable in minutes with simple maintenance or a $10 part. Whether your flosser is brand new or several years old, this guide will help you diagnose the exact source, apply the right fix, and prevent future leaks with proven best practices.
Identify Your Leak Type
Before attempting repairs, pinpoint where the leak originates. Different leak patterns point to different causes and solutions.
Center Leak vs. Edge Leak
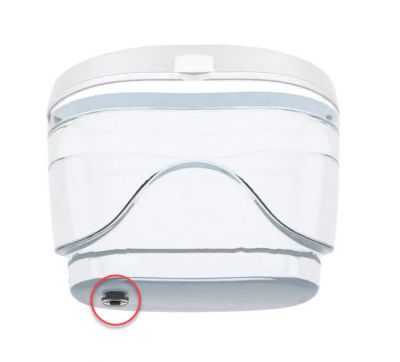
A leak from the center bottom of the reservoir points to reservoir valve failure, which is the most common issue. A leak along the edges of the tank is likely due to gasket or O-ring failure around the tank base.
Quick tip: Dry the base completely, fill the tank, and watch closely. A drip from the center means the valve is to blame. Seepage around the rim means the gasket needs attention.
Leak During or After Filling
Leaks that appear immediately when filled but not powered confirm a failed seal, either from the valve or gasket. Leaks that occur only during use could be pressure-related, so check for clogs or hose kinks first.
Diagnose the Reservoir Valve
The one-way rubber valve at the bottom of the tank controls water flow into the pump. Over time, it hardens, flattens, or cracks, especially if exposed to mouthwash, hard water, or heat.
Check for Valve Failure
Remove the reservoir from the base and inspect the dome-shaped rubber valve in the center. Look for loss of dome shape, meaning it appears flattened or inverted. Check for hardness or brittleness when touched. Look for cracks, tears, or mineral buildup on the surface.
If the valve feels stiff or no longer springs back when pressed, it is failing and needs replacement.
Pro insight: Even new units like the WP-112C can ship with defective valves that lack elasticity. This is a manufacturing flaw, not user error.
Test If Valve Is Causing Leak
Use this definitive diagnostic test to confirm the valve is the problem.
Valve Removal Test
Push the valve out from the outside bottom of the reservoir. Place the empty tank back on the base. Fill it with water. Turn on the unit.
If water flows and no leak occurs, the valve was restricting flow or failing to seal, and you should replace it. If the leak continues, the issue may be the gasket, a reservoir crack, or an internal pump seal.
This test not only diagnoses the problem but often restores temporary function as a useful workaround while waiting for parts.
Replace the Reservoir Valve
Valve replacement is the most effective fix for center leaks and takes less than five minutes.
Tools Needed
Replacement Waterpik valve (OEM recommended) and your fingertips. No tools are required.
Step-by-Step Installation
Remove the old valve by pushing it from the outside toward the inside. Never pull from the inside because you risk cracking the plastic.
Insert the new valve from the inside outward. The dome side faces up into the tank. The four-pronged stem extends down. Press firmly until fully seated and flush.
Warning: Installing the valve upside down with the dome facing down will cause immediate leaks. Double-check the orientation before proceeding.
Valves are inexpensive and long-lasting when stored properly. Buy a six-pack for future replacements.
Clean or Replace the Reservoir Gasket
If water seeps from the edge of the tank, the perimeter gasket or O-ring is likely compromised.
Signs of Gasket Failure
Water leaks when the tank is seated but not powered. The gasket appears cracked, flattened, or coated in mineral deposits. The leak persists after valve replacement.
Fix Options
Clean the gasket by removing it and rinsing with warm water. Wipe sealing surfaces on the tank and base with vinegar or isopropyl alcohol. Reinstall and test.
Replace the gasket using an OEM gasket or food-safe silicone O-ring that matches the size. Apply silicone lubricant before installation for a better seal and easier installation.
Pro tip: Lubricating the gasket reduces friction and extends its life. Do this every time you replace it.
Handle Cracked or Damaged Reservoirs

Cracks in the tank are less common but more serious than seal failures.
Can You Repair a Cracked Tank
Only repair if the crack is small and not near the valve or locking mechanism. Only repair if there is no pressure loss during use.
DIY Repair Steps
Drain and dry the reservoir completely. Clean the area with isopropyl alcohol. Apply FDA-compliant waterproof epoxy like marine-grade epoxy. Cure for 24 to 48 hours before use. Test with a low water level first.
Do not repair if the crack is large, near internal components, or causes instability. Replace the entire reservoir instead.
Rule Out Pressure-Related Leaks
Sometimes increased internal pressure forces water through weak seals, mimicking a reservoir leak.
Common Causes
A clogged flossing tip restricts flow and raises pressure. A kinked or twisted hose creates backpressure. The handle not being upright disrupts water flow.
Quick Checks
Swap in a clean jet tip. Straighten the hose and ensure no kinks exist. Keep the handle pointing upward during use.
If the leak stops, the issue was pressure-induced rather than a faulty seal.
Prevent Future Leaks
Treat rubber parts as consumables. They wear out. With simple habits, you can double their lifespan.
Daily Best Practices
Empty the reservoir after every use and never leave water inside. Remove the tank from the base when not in use. Store upright to allow drying. Dilute mouthwash 1:1 with water to reduce chemical stress.
Avoid undiluted mouthwash because it accelerates rubber degradation.
Maintenance Schedule for Longevity
Perform maintenance tasks on a consistent schedule to keep your flosser leak-free.
After each use, empty and detach the reservoir to prevent stagnation and mold. Weekly, wipe sealing surfaces to catch early wear. Monthly, descale with 1:1 vinegar-water to remove minerals and improve the seal. Quarterly, inspect the valve and gasket for proactive replacement. Annually, replace all rubber seals to prevent unexpected leaks.
Smart move: Set a calendar reminder to replace the valve every six to twelve months even if no leak is visible.
When to Repair vs. Replace
Not every leak warrants a fix. Use this decision framework to guide your choice.
For units three years old or younger, repair is recommended. Replace the valve or gasket with a $10 part. For single leak points with functional pump and charging, repair is cost-effective. For units over five years old, replacement is advised due to risk of recurring issues. For multiple leak points like a crack plus degraded seal, replacement is preferred. If repair cost exceeds 50% of a new unit price, upgrade instead. For recurring leaks despite repairs, particularly in WP-560 series models, consider a newer model.
Upgrade tip: Newer models use higher-elasticity seals and better quality control, resulting in fewer leaks out of the box.
Buy the Right Replacement Parts
Use OEM valves for guaranteed fit and performance.
Compatible Models
WP-100 and WF-100 Ultra, WP-112C, WP-250 Nano, WP-260 Kids, WP-300 Traveler, WP-560W and WP-560C, WF-06 Whitening.
Where to Buy
Amazon offers the best value at $9 for a six-pack. Waterpik.com charges $14.99 for a two-pack with OEM guarantee. Authorized retailers like Walmart, Target, and Best Buy also carry them.
Buy in bulk: A six-pack costs less per valve and ensures you are never without a spare.
Store Spare Valves Properly
Rubber degrades faster when exposed to air and light.
Storage Tips
Keep valves in an airtight Ziploc bag. Store in a cool, dark place like a drawer. Avoid bathrooms with high humidity. Use within two to three years for best performance.
Heat and UV light accelerate rubber aging, so do not leave spares in sunlight.
Troubleshoot Low Water Pressure
A degraded valve does not just leak. It can also reduce pressure.
Is the Valve Causing Weak Flow
Remove the valve. Seat the empty tank on the base. Fill and turn on. If pressure returns, the valve is clogged or restricting flow, and you should replace it.
Other causes include a clogged tip, air in the system, or a pause button not fully depressed. But if pressure improves after valve removal, a new valve provides an instant fix.
What to Do If New Unit Leaks
Brand-new models especially the WP-112C sometimes leak out of the box.
This Is Not Normal
Do not attempt DIY fixes on a new unit. Contact Waterpik support immediately and request a warranty replacement. This is a manufacturing defect covered by the warranty.
Have your purchase date and model number ready. Most new units are covered for one to two years.
Future-Proof with Better Models
Waterpik is improving designs to reduce leaks in newer models.
2023-2025 Improvements
Higher-elasticity rubber seals resist hardening better than older materials. Tighter locking mechanisms prevent misalignment during use. Improved quality control reduces factory defects. Modular tanks allow quick swaps when needed. Smart leak detection is in development for future models.
Look for newer models with user-replaceable seals and better materials.
Final Leak-Free Checklist
Empty the reservoir after every use. Remove the tank from the base when idle. Descale monthly with vinegar solution. Replace the valve every six to twelve months. Use OEM parts for replacements. Store spares in a sealed, dark container. Wipe seals weekly to check for wear. Dilute mouthwash 1:1. Upgrade if leaks recur despite repairs.
Frequently Asked Questions About Waterpik Water Flosser Tank Leaks
Why does my Waterpik leak from the bottom center?
The most common cause is a failed reservoir valve. This rubber component at the bottom center of the tank hardens and loses its seal over time. Replace the valve to fix the leak.
Can I use my Waterpik if the tank is leaking?
It depends on the severity. Minor leaks from a failing valve or gasket can be used temporarily while you wait for replacement parts. However, a cracked tank or significant leaks should be addressed before use to prevent water damage.
How often should I replace the Waterpik reservoir valve?
Replace the valve every six to twelve months with regular use. Treat rubber components as consumables because they naturally degrade from pressure cycles, temperature changes, and chemical exposure.
Are Waterpik leaks covered under warranty?
Manufacturing defects are covered, especially in new units. If your unit leaks out of the box or within the warranty period, contact Waterpik support for a replacement. Wear-related leaks after the warranty require part replacement.
Does using mouthwash cause Waterpik leaks?
Undiluted mouthwash accelerates rubber degradation. Always dilute mouthwash 1:1 with water before adding it to the reservoir. This reduces chemical stress on seals and extends their life.
What is the Waterpik reservoir valve part number?
The valve is universal across most models including WP-100, WP-112C, WP-250, WP-260, WP-300, WP-560, and WF-06. Replacement six-packs are available on Amazon or through Waterpik.com.
Key Takeaways for Fixing Waterpik Tank Leaks
Waterpik water flosser tank leaks are almost always fixable, and you do not need to replace the whole unit. The reservoir valve is the usual suspect, and replacing it costs less than $2 per fix if you buy in bulk. With regular maintenance including emptying after each use, monthly descaling, and annual seal replacement, you can keep your flosser leak-free for years.
While the designed-to-leak philosophy may frustrate users, smart care and proactive part replacement put control back in your hands. Stock up on OEM valves, follow the maintenance schedule, and address leaks immediately to extend the life of your Waterpik water flosser.